Connecting Splunk Enterprise to IBM DB2 via JDBC Driver
Introduction to Splunk
Splunk is a cutting edge operational intelligence and data processing platform that offers a top tier log analysis. It’s a powerful engine that lets you monitor, search, investigate, visualize and report on what’s happening with your IT infrastructure in real time.
There are times where an organization might want to connect to an external database from Splunk to get data from a database or write Splunk enterprise data in to databases etc. Fortunately, Splunk has a DB Connect app that is easily installable in your Splunk Enterprise. This app uses a JDBC driver in the background to perform any operations against the database.
In this tutorial, we will be going through on how you can connect your IBM DB2 database using Splunk DB Connect app that leverages Progress DataDirect IBM DB2 JDBC driver.Before You Start
Make sure you have following installed and configured properly, before you go ahead with the tutorial.
- Have Splunk Enterprise installed and running.
- Installed the Splunk DB Connect app in Splunk Enterprise.
Installing Progress DataDirect DB2 JDBC Driver
- Download the IBM DB2 JDBC driver from Progress website.
- After the download has completed, unzip the package PROGRESS_DATADIRECT_JDBC_DB2_WIN.zip to extract the Setup.exe.
- Double click on the Setup.exe to start the installer. Follow the prompts on the installer and when prompted about type of installation, choose Evaluation Installation.
- If you would like to change the installation folder, you can do so during the installation process.
- Complete the installation, by click on Next and on the Install Summary page, click on Install.
Configure DataDirect DB2 JDBC in Splunk DB Connect
In this section, we will go through how to configure the DataDirect JDBC DB2 to work with Splunk DB Connect.
- Go to \path\to\Splunk\etc\apps\splunk_app_db_connect\default directory.
- Make a backup of db_connection_types.conf file anywhere on your machine and open the file for edits.
- Add the following configuration to the file, to add support for Splunk DB Connect app to use Progress DataDirect DB2 JDBC driver.
[datadirect_db2]displayName = Progress DataDirect IBM DB2 DriverserviceClass = com.splunk.dbx2.DefaultDBX2JDBCjdbcDriverClass = com.ddtek.jdbc.db2.DB2DriversupportedVersions = 1.0jdbcUrlFormat = jdbc:datadirect:db2://<host>:<port>;DatabaseName=<database>port = 50000 - Save the file and close it.
- Now head over to \install\path\to\Progress\DataDirect\Connect_for_JDBC_51\lib and copy the db2.jar file to \path\to\Splunk\etc\apps\splunk_app_db_connect\bin\lib
- Reload the drivers in Splunk DB Connect settings or restart Splunk Enterprise to make sure the changes are reflected and you should see the Progress DataDirect DB2 driver listed on the drivers’ page along with the status saying that the driver has been installed as shown below.

Connecting to DB2
- Go to Splunk DB Connect Explorer and create a new identity by clicking on (+) on the left side bar across Identities tree.
- Fill in the details on the form as shown, where username and password are the credentials for DB2 database and name the Identity as you like.
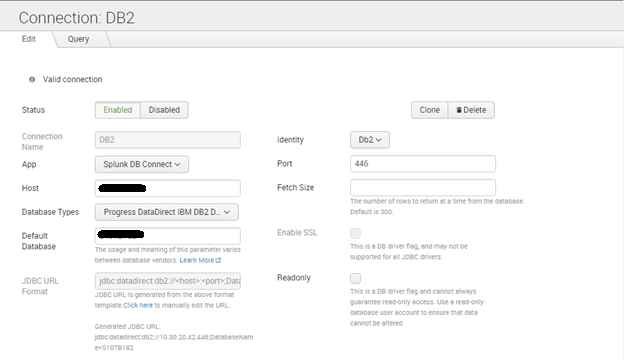
- Create a new connection, and fill in the details as below
Name: <Any Name>
Identity: <Identity created in previous step>
App: Splunk DB Connect
Port: <Port for your database>
Host: <IP Address/Hostname of DB2>
Database Types: Progress DataDirect IBM DB2 Driver
Default database: <database name>
JDBC URL Format: <No change needed, will be automatically populated from configuration file>
- Here is a screenshot of the configuration that I have done for your reference.

- Scroll down and click on validate button, to check if you are able to successfully connect to your DB2 instance. You should see a Valid Connection notification as shown below once you have successfully connected.

Next Steps
Now that you have successfully connected your DB2 database with Splunk, feel free to connect more of your databases using Progress DataDirect JDBC drivers for Oracle, Cloudera Hive, Spark SQL and more, using the same approach that we showed you in this tutorial. Also, learn about the unfair advantage that you get by choosing Progress DataDirect connectivity solutions.