Connect and Import data from any REST API in Apache Nifi
Introduction
Apache Nifi is an important and powerful tool for automating data flow between systems. Importing data from a REST API in Apache Nifi is extremely useful, but can involve a significant amount of time writing, testing and maintaining a custom plugin. In this tutorial, we will show how you can import data from any REST API in Apache Nifi without the additional custom headaches. What’s the trick? Progress DataDirect’s Autonomous REST Connector- the newest addition to our JDBC suite of connectors - which can help you sample, connect and query any REST API using the JDBC interface.
By following along with the steps below, you’ll learn how to import data from any REST API using Autonomous REST Connector and ingest that data into Hive. For this tutorial we’ll be using Alpha Vantage API, which provides stock prices in multiple intervals.
Pre-requisites
-
Download and install Apache Nifi on your machine.
Download and add connectors to Nifi classpath
Setup DataDirect Autonomous REST Connector
- Download the Hive JDBC connector from our website.
- Install the connector by running the setup executable file on your machine and following the instructions on the installer.
- After you have finished installation, you should find the Hive connector at the below default path, unless you have chosen to install it at a different location:
/home/<user>/Progress/DataDirect/JDBC_60/lib/autorest.jar
- Copy the Hive from the above path to Nifi’s lib folder, by running the below command:
cp /home/<user>/Progress/DataDirect/JDBC_60/lib/autorest.jar <path-to>/nifi-x.x.0/lib/autorest.jar
Setup DataDirect Hive Connector
- Download the Hive JDBC connector from our website.
- Install the connector by running the setup executable file on your machine and following the instructions on the installer.
- After you have finished the installation, you should find the Hive connector at the below default path, unless you have chosen to install it at a different location:
/home/<user>/Progress/DataDirect/JDBC_60/lib/hive.jar
- Copy the Hive from the above path to Nifi’s lib folder, by running the below command:
cp /home/<user>/Progress/DataDirect/JDBC_60/lib/hive.jar <path-to>/nifi-x.x.0/lib/hive.jarConfiguring Autonomous REST connector
-
To connect to the Alpha Vantage API using Autonomous REST connector, you can point it to the endpoint with the default values.
- For this tutorial, I'll connect to the Stock Time Series Endpoints offered by Alpha Vantage. Let’s assume I want to get all time series intraday values for a stock with an interval of 1 minute, here would be my request:
https://www.alphavantage.co/query?function=TIME_SERIES_INTRADAY&symbol=PRGS&interval=1min&apikey=<apikey>
- To configure the driver to connect to the above endpoint, simply use the JDBC URL below:
jdbc:datadirect:autorest:sample=https://www.alphavantage.co/query?function=TIME_SERIES_INTRADAY&symbol=PRGS&interval=1min&apikey=<apikey>
- When you connect to any REST API using Autonomous REST Connector, it will automatically sample the API and create a configuration, which you can access by querying the _CONFIGURATION table. You can get this configuration by using the Autonomous REST JDBC driver in any SQL querying tools like Dbeaver, Squirrel SQL etc.
- For the tutorial, I am providing this configuration here, save this in a file called alphavantage.rest file.
Note: Please use your api key in the #default property under apikey json object.{"query":{"#path":[],"Meta Data":{"1. Information":"VarChar(84)","2. Symbol":"VarChar(64),#key","3. Last Refreshed":"Timestamp(0)","4. Interval":"VarChar(64)","5. Output Size":"VarChar(64)","6. Time Zone":"VarChar(64)"},"Time Series (1min){Timestamp(0)}":{"1. open":"Double","2. high":"Double","3. low":"Double","4. close":"Double","5. volume":"Integer"},"function":{"#type":"VarChar(64),#key","#virtual":true,"#default":"TIME_SERIES_INTRADAY","#eq":"function"},"symbol":{"#type":"VarChar(64),#key","#virtual":true,"#default":"PRGS","#eq":"symbol"},"interval":{"#type":"VarChar(64),#key","#virtual":true,"#default":"1min","#eq":"interval"},"apikey":{"#type":"VarChar(64),#key","#virtual":true,"#default":"<your-api-key>","#eq":"apikey"}}}
- Take a look at the configuration and you'll notice that Autonomous REST Connector has detected all the objects and their data types.
- To learn more about Autonomous REST Connector and how you can configure it to your needs - and to connect to multiple endpoints - we recommend you go through these tutorials after you have finished this one.
Create the Nifi Flow
-
Launch Apache Nifi by running the bin/nifi.sh run command on your terminal. Note that your password must be the root directory of Nifi when you run this command.
- Open your browser and go to http://localhost:8080/nifi to access the Nifi UI where you can create the flow. You should see a canvas as shown below when the page loads.
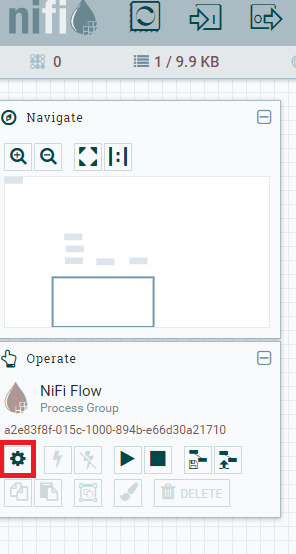
- To start building the flow, begin with configuring the JDBC drivers. On your canvas, there are two side bars; Navigate and Operate. Under Operate, open Settings for the process group named Nifi Flow as shown below.
- You should now see a pop-up with two tabs named General and Controller Services. Go to the Controller Services tab and click the + button to add a new controller service.
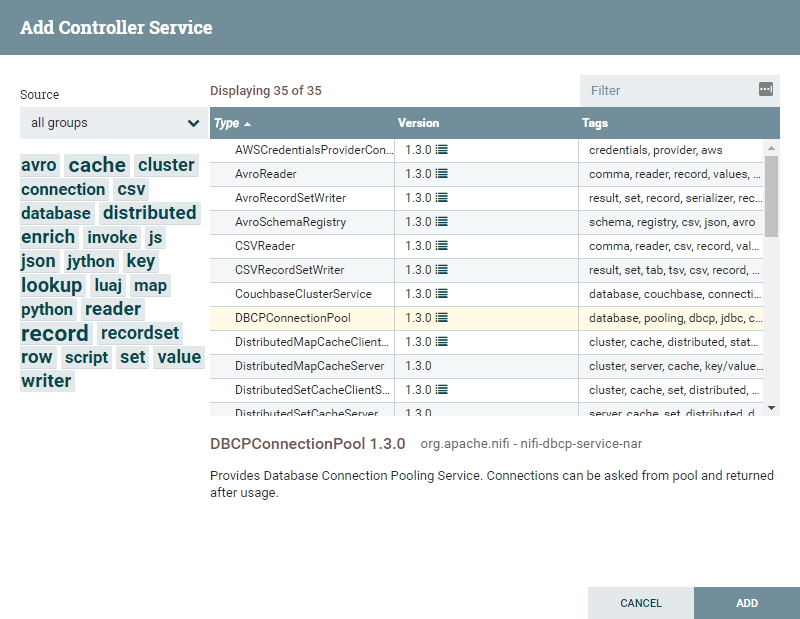
- You should now see a new pop-up displaying various Controller Services you can choose from. Choose DBCPConnectionPool as your and click the Add button as shown below.
- Click on Edit button of the newly created and you should see the screen below:
- Fill in the details to connect to Alpha Vantage REST API using Autonomous REST Connector as shown below:
Database Driver Class Name:
com.ddtek.jdbc.autorest.AutoRESTDriver
Database Connection URL:
jdbc:datadirect:autorest:config=/home/<path-to>/alphavantage.rest
Note: Config option should have path to the alphavantage.rest file we created in the previous step.
- Go to the Settings tab and rename the controller service to AlphaVantageREST and click on Apply button to save the settings.
- Now it’s time to enable this controller service. On the Controller Service, click the Enable button between edit and delete as shown below to enable the service.
- Similarly create a new controller service for configuring the Hive connection. Repeat the above steps from 4 through 9, except for 7 where you use the following details instead of that:
Database Driver Class Name:
com.ddtek.jdbc.hive.HiveDriver
Database Connection URL:
jdbc:datadirect:hive://<server_address>:<port>;TransactionMode=Ignore
Database User:
Fill in your Hive Username
Password:
Fill in your Hive Password
- Below is a screenshot of how the controllers will look after they have been enabled.
- Close the Nifi Flow Configuration pop-up and return to the canvas. We'll build the flow now that everything is in place.
- First, read the data from the Alpha Vantage REST API using DataDirect Autonomous REST Connector. This can be done using a processor called QueryDatabaseTable which supports incremental pulling of data.
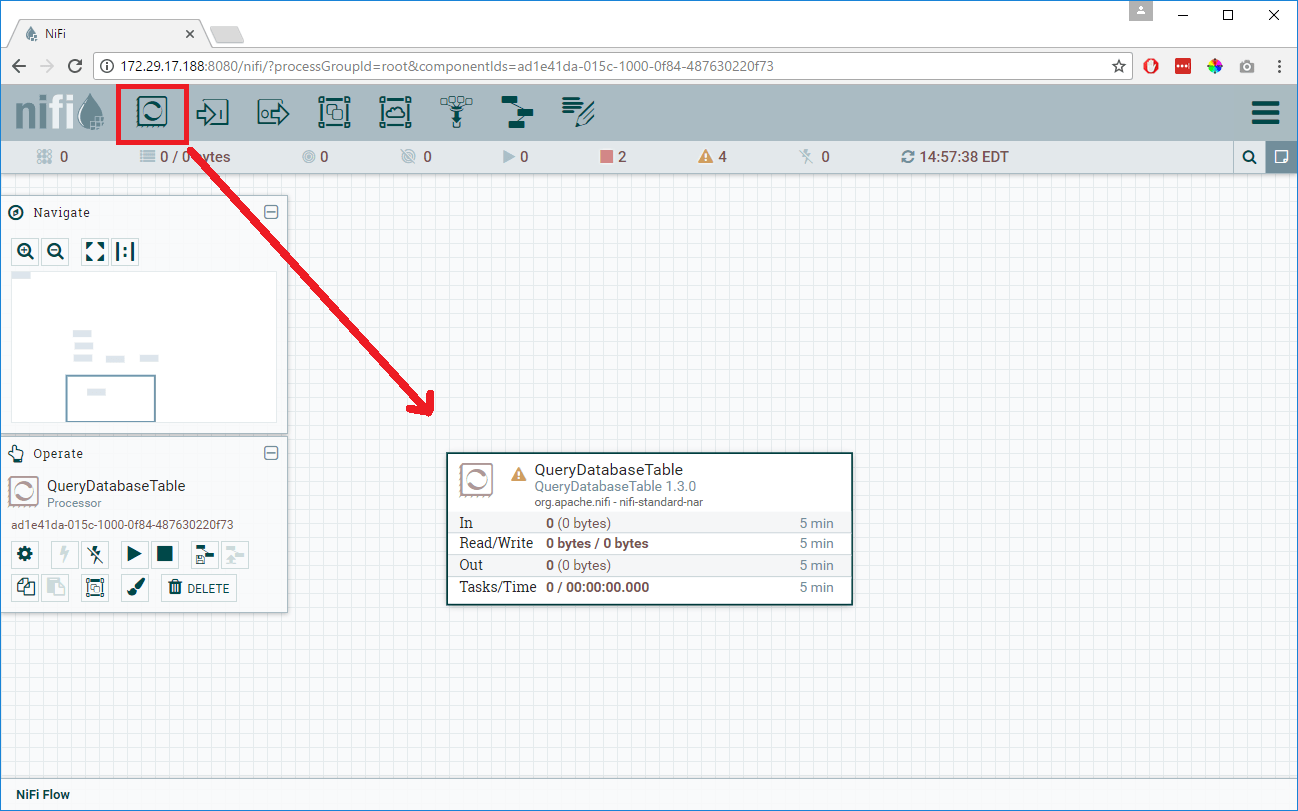
- Now drag a processor on to the canvas and choose QueryDatabaseTable and Add it on to canvas as shown below:
- Right click on the QueryDatabaseTable processor and choose to Configure. Go to the Scheduling tab and choose the kind of scheduling strategy for when this flow should run.
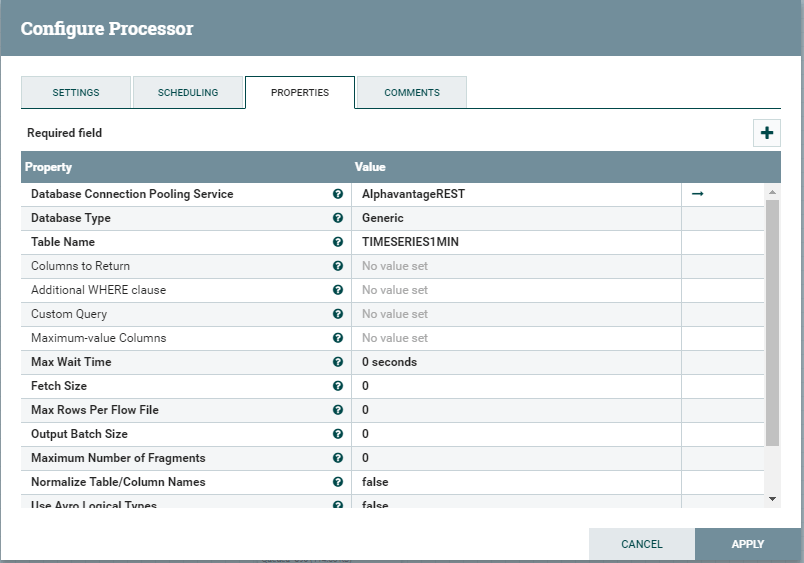
- Go to the Properties tab and configure it as follows:
Database Connection Pooling Service:
Choose the controller service where you configured Alpha Vantage REST Connection in previous steps. Choose the controller AlphaVantageREST where we configured the connection to Alpha Vantage REST API using the Progress DataDirect Autonomous REST Connector.
Table Name:
Choose the table that you would like to ingest incrementally. I choose to sync the table TIMESERIES1MIN
Below is a screenshot of the final settings for your reference.
- Click Apply to save the processor configuration.
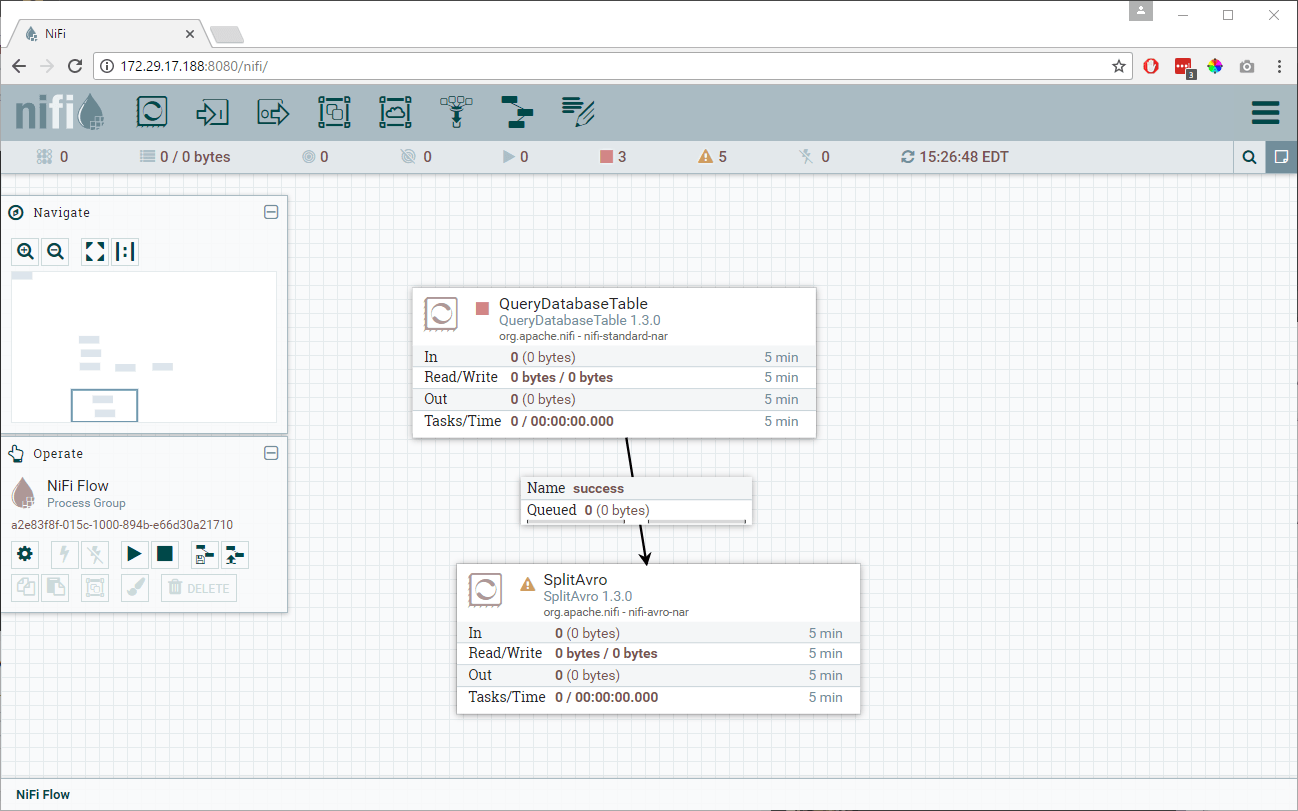
- Drag another processor from the menu and choose SplitAvro as your processor from the list. This will split the Avro binary output that comes out of the QueryDatabaseTable processor, if it’s too big.
- Connect the processor QueryDatabaseTable to SplitAvro. As soon as you connect both the processors you will see a configuration pop-up for that connection. There is no additional configuration needed here, just click Add.
- You now have a flow as shown below. Notice that the QueryDatabaseTable processor no longer has a warning, which means it is properly configured. There are still warning signs on SplitAvro because we didn’t yet configure it.
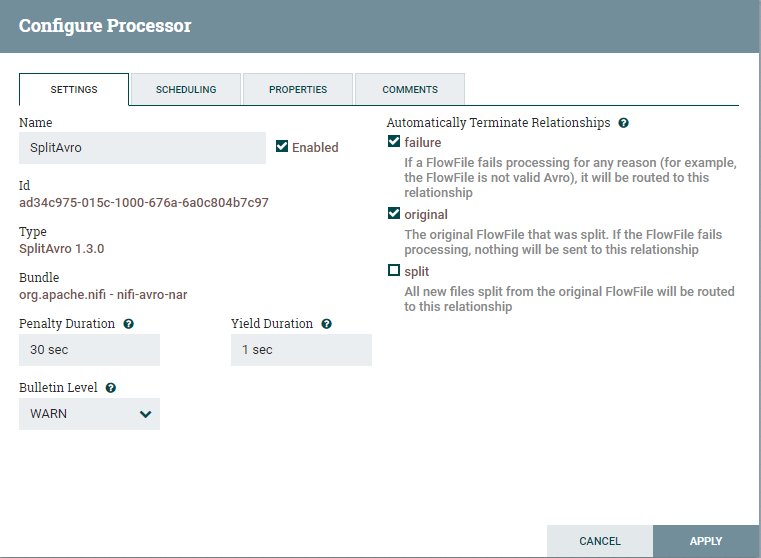
- Right click on the SplitAvro processor and choose Configure. On the settings tab, choose to automatically terminate the relationships for failure in processor and for the original as we don’t need the original Avro binary output as shown below. We will be using the only split relationship to go ahead.
- These are the only settings that you need to address here. You can control how many records each split data file can contain from the Properties tab, but I will be using default values for this tutorial. You can click Apply and save the configuration for SplitAvro.
- Drag another processor from menu and choose ConvertAvrotoJSON to be your processor. This processor will convert all the Avro records to JSON format.
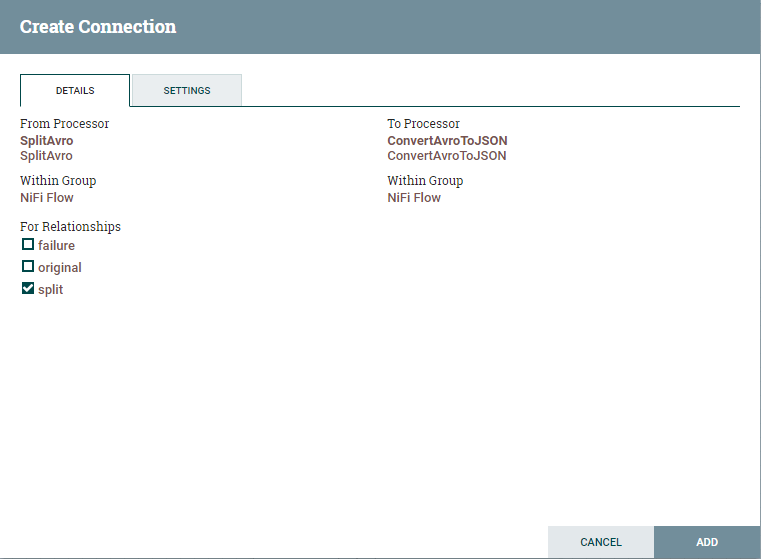
- Connect SplitAvro and ConvertAvrotoJSON processors and you should now see configuration for connection between these two processors. Under for relationships, as we only need the split, choose it and click Add as shown below.
- Notice that all the warnings for the processor are cleared. You should now see warnings only for the ConvertAvrotoJSON processor.
- Right click the ConvertAvrotoJSON processor and choose Configure.
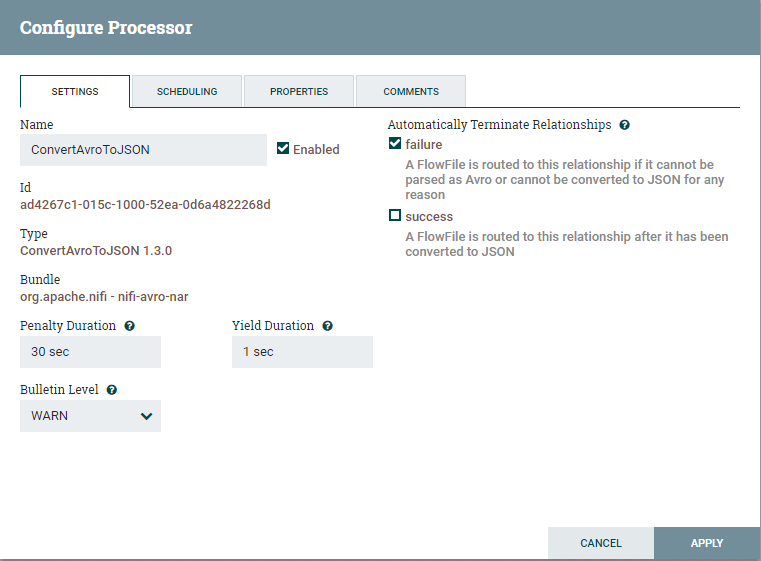
- Under the Settings tab, choose to automatically terminate relationships for failure as shown below. Click Apply to save the configuration
- Drag another processor from the menu and choose the ConvertJSONtoSQL processor. This processor will help in creating Insert statements for the destination table.
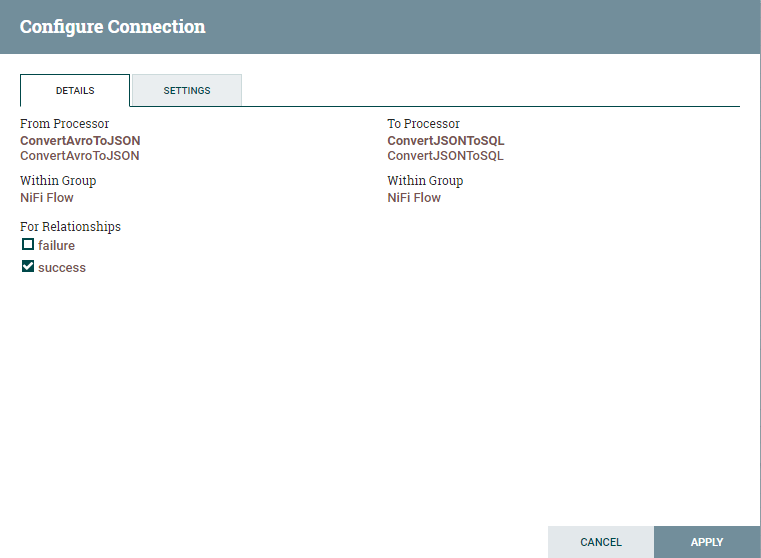
- Connect the ConvertAvrotoJSON and ConvertJSONtoSQL processors and you should see a pop-up for connection configuration. Enable the connection for the Relationship Success and click Add as shown below:
- Notice that all the warnings for the ConvertAvrotoJSON processor are cleared. You should now see warnings only for the ConvertJSONtoSQL processor.
- Before going ahead, if you don’t have the timeseries1min table with the same schema as Alpha Vantage, you will have to create it first. Unfortunately, I have not found a way to automate this,. If you find a way to do so, please let me know in comments.
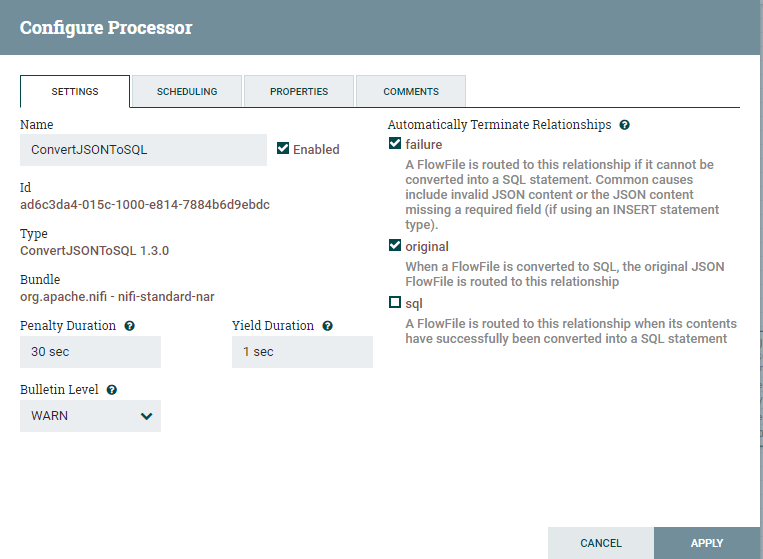
- Right click on ConvertJSONtoSQL and choose Configure. On the Settings tab, choose to automatically terminate relationships on Failure and Original as shown below:
- Go to the Properties tab and fill in the details as following:
JDBC Connection Pool:
Choose the controller service where you configured Hive Connection in previous steps. In my case, I chose the controller HiveConnect where I configured the connection to Hive using the Progress DataDirect JDBC driver.
Statement Type:
Insert
Table name:
The table where you want to insert the data in Hive.
Note: If you don’t have the table in Hive, create it using the below SQL statement:
CREATETABLETIMESERIES1MIN(QUERY_METADATA_2SYMBOLVarChar(64),QUERY_FUNCTIONVarChar(64),QUERY_SYMBOLVarChar(64),QUERY_INTERVALVarChar(64),QUERY_APIKEYVarChar(64),`KEY`Timestamp,OPEN_Double,HIGHDouble,LOWDouble,CLOSE_Double,VOLUMEINT)
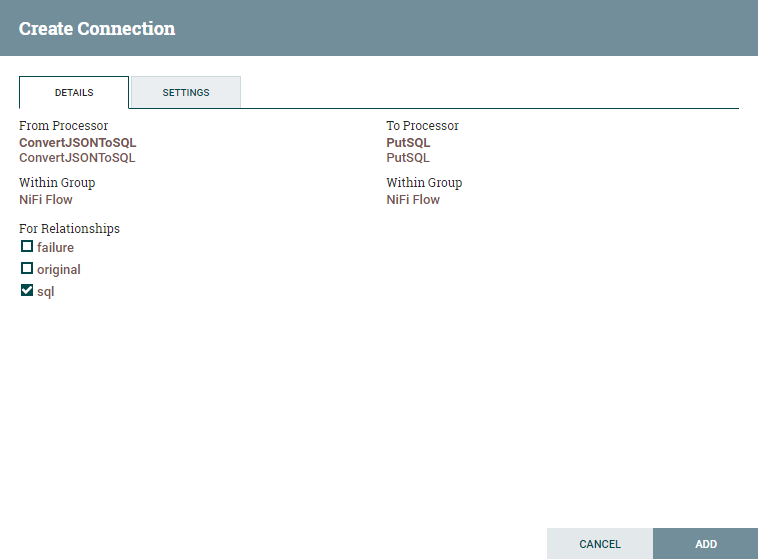
- The last processor we need is the PutSQL processor that puts the Insert statements created in the processor ConvertJSONtoSQL. Connect the ConvertJSONtoSQL processor to PutSQL processor.
- You should now see the pop-up for the connection configuration. Configure it as shown below and click Add.
- Right click on PutSQL processor and click Configure. Under Settings, automatically terminate relationships for Failure, Retry and Success.
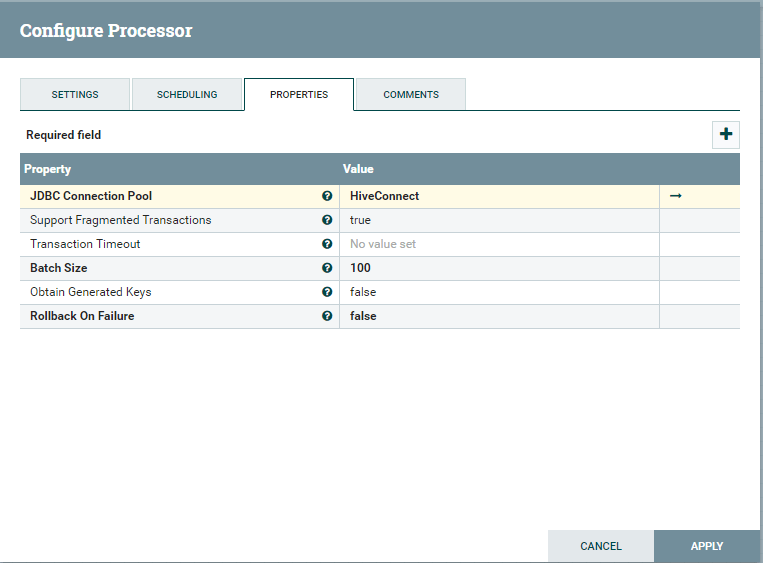
- Under the Properties tab, configure the connection to Hive as follows. Here I am using the controller service that I have created for Hive in previous steps.
- Click Apply to save the configuration. Your flow should look similar to the image below and you should see no warnings for any of the processors.
Run the flow
-
To start the flow, right click every processor and select Start. Once the processors are started you can see the data flow from the Alpha Vantage REST API to Hive. By creating a connection to the Alpha Vantage REST API, Autonomous REST Connector will help you read the data from the API and provide it to the QueryDatabaseTable processor.
-
Once the PutSQL processor has completed its process, you should see the data in your Hive instance.
-
If you have scheduled the QueryDatabasetable to run after an elapsed time, confirm that the fetch incremental data was pulled from the REST API and was ingested into Hive automatically.
This is just one example of how easy and painless it can be with Progress DataDirect Autonomous REST Connector to read the data from any REST API. Feel free to try the connector with Nifi or any application you want. If you have any questions or issues, please contact us or comment below.

