Running Sitefinity Scheduled Tasks with Azure App Services and Cloud Services

Running Scheduled Tasks in Sitefinity can save you time and improve efficiency. Learn how to get them up and running on Azure environments in this post.
Scheduled Tasks in Progress Sitefinity today provide customers with the ability to run background logic, such as the import/export of data, automation and more. However, there are some limitations as to the offerings provided by this feature. One that I’d like to address today is the support for instances on both of our supported Azure environments: Cloud Services and App Services.
What is the Limitation?
If you have worked with our Scheduled Tasks before, you may have seen this Knowledge Base article with a solution for running a Scheduled Task on one node in an on-premise/virtual machine-based Load Balanced environment. Unfortunately, this article does not apply to an Azure environment due to the lack of unique URLs for each instance. On this blog post I will show you a solution that can be used for Azure.
What is the Solution?
For this blog post and solution, we will be using the first of two instances on Azure App Services and Cloud Services as where the code will execute. For this we will get the collection of instances on Azure, select the first one by its name/id and finally validate that it is the same as the currently requested one.
Before we begin programming, these two steps should be taken:
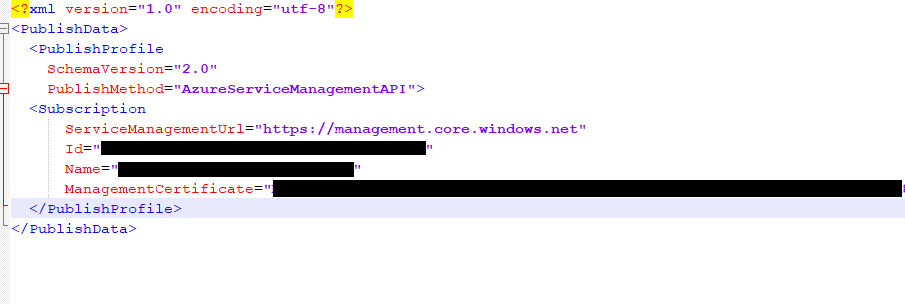
- Download your Azure Publish settings file. For more on how this is done, please refer to this MSDN article. This file contains two fields that we will need for our solution: The Azure Subscription Id, and our Management Certificate.
- Go to the bin folder of your Sitefinity project and make a note of the version of the Newtonsoft.Json.dll.
Open your Sitefinity project in Visual Studio, and download the following NuGet Packages:
- Microsoft.WindowsAzure.Management.Libraries
- Newtonsoft.Json (install the version that was noted previously, as the above package will install an older version as per its dependency)
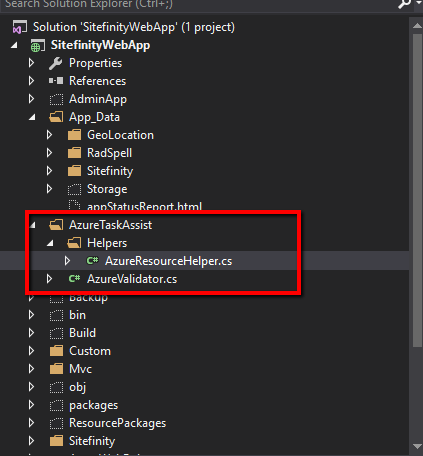
In the root of your Sitefinity project, create the following folder structure:

Authenticating with Azure and Making Sure We’re on the First Instance
Under our folder structure, let's create the AzureValidator class. Here is where we will house the information of our Azure account, create and use the certificate needed for Authentication with Azure's API, and make the necessary validation so that Sitefinity can know if the instance we are on is the first one.
For this class there are three important properties that need to be added. The first is AzureMode, which is an Enum of two items (AppServices, CloudServices). The second and third need information from the Azure Publish settings file (remember that from earlier?): SubscriptionId, CertificateData. Open the file and you should see something like the following:

Copy the values from Id and ManagementCertificate and paste them into the SubscriptionId and CertificateData properties respectively. Once done your properties should look like this:
public enum AzureMode { AppServices = 0, CloudServices = 1 };//replace <Id> and <ManagementCertificate> with the information on the Azure Publish settingsprivate static readonly string SubscriptionId = "<Id>";private static readonly string CertificateData = "<ManagementCertificate>";Now for the methods that we will be using in this class, we will have the GetCertificateCredentials method, which converts the CertificateData from its string value (Base64) and imports it into a new X509 Certificate and return it. To authenticate with the Azure API, we create the AuthenticateAzure class, which returns a CertificateCloudCredentials object, which is generated when we pass our SubscriptionId and the certificate created in our previous method. Finally, we have the ValidateForOneInstance method, where we pass our AzureMode set to the value of your choice, and this method will be used when our Scheduled task is running so that it can compare if the current instance is the same as the first instance and return true or false depending on the result. Once finished, the class should look similar to this:
using Microsoft.WindowsAzure;using System;using System.Collections.Generic;using System.Linq;using System.Security.Cryptography.X509Certificates;using System.Web;namespace SitefinityWebApp.AzureTaskAssist{ public class AzureValidator { private static X509Certificate2 GetCertificateCredentials() { var cert = new X509Certificate2(); cert.Import(Convert.FromBase64String(CertificateData)); return cert; } public static CertificateCloudCredentials AuthenticateAzure() { var cert = GetCertificateCredentials(); return new CertificateCloudCredentials(SubscriptionId, cert); } public static bool ValidateForOneInstance(AzureMode mode) { string currentInstance = AzureResourceHelper.GetCurrentInstance(mode); string firstInstance = AzureResourceHelper.GetFirstInstance(mode); if (currentInstance == firstInstance) { return true; } return false; } public enum AzureMode { AppServices = 0, CloudServices = 1 }; //replace <Id> and <ManagementCertificate> with the information on the Azure Publish settings private static readonly string SubscriptionId = "<Id>"; private static readonly string CertificateData = "<ManagementCertificate>"; }}Obtaining the Instances from Both Azure App Services and Cloud Services Under One Roof
Under the Helpers folder, create a class called AzureResourceHelper. Here is where we will add the methods and logic that will involve the Azure Management Library and the calls to both Azure App Services and Cloud Services, which are themselves in separate namespaces. To get around that small inconvenience, we will have the methods from both sides return the same value type: string. After that we will create two methods (GetCurrentInstance and GetCurrentInstance) that will receive our AzureMode enum, and depending on the value it will call methods from the specific Azure Service.
Azure App Services API
Our first method will be the GetAppServiceCurrentInstanceId, which only returns the following Environment variable: Environment.GetEnvironmentVariable("WEBSITE_INSTANCE_ID").ToString();
The GetAppServiceFirstInstance method which will create an instance of a WebSiteManagementClient (the AuthenticateAzure methods from the AzureValidator class needs to be passed), and from this client we obtain the WebSiteInstanceIdsResponse collection, which we can get from the client we created in its WebSites.GetInstanceIds method. This process can be somewhat tricky, as we need to pass the Website's name, and the WebSpace name to obtain the instances. The Website name can be found on the Azure Portal, as it is the name that was used when creating the Website on the App Service, however, WebSpace values are not found on the Azure Portal UI, and have the following syntax: "<Websitename>-<Region>webspace"…. tricky, right? An example of this would be: sfangelazuretask-CentralUSwebspace. You can obtain this value through code as well, and it would be the following:
//var list = client.WebSpaces.List();This gets you the list of webspaces on App Services, and from there you can find the one you will be working on to pass it to the Azure API.
Azure Cloud Services API
Similar to our first method on App Services, GetCloudServiceCurrentInstanceId will return the current instance from the following string: RoleEnvironment.CurrentRoleInstance.Id;
In order to obtain the first instance on Cloud Services, the GetCloudServiceFirstInstance needs to authenticate with Azure in order to create an instance of ComputeManagementClient, and this one only needs the name of the Cloud Service (you can get this from the Azure Portal) in order to get a list of Hosted Services (HostedServices.GetDetailed) made to Cloud Services. Then you can get a List of Deployments from this, and finally from here one can obtain the first one and its RoleInstance.
Your class should look like this when done:
using SitefinityWebApp.AzureTaskAssist;using System;using Microsoft.WindowsAzure.Management.WebSites;using Microsoft.WindowsAzure;using Microsoft.WindowsAzure.Management.WebSites.Models;using Microsoft.WindowsAzure.ServiceRuntime;using static Microsoft.WindowsAzure.Management.Compute.Models.HostedServiceGetDetailedResponse;using System.Collections.Generic;using Microsoft.WindowsAzure.Management.Compute;using System.Linq; namespace SitefinityWebApp{ public class AzureResourceHelper { public static string GetCurrentInstance(AzureValidator.AzureMode mode) { if(mode == AzureValidator.AzureMode.AppServices) { return GetAppServiceCurrentInstanceId(); } else if(mode == AzureValidator.AzureMode.CloudServices) { return GetCloudServiceCurrentInstanceId(); } return ""; } public static string GetFirstInstance(AzureValidator.AzureMode mode) { if (mode == AzureValidator.AzureMode.AppServices) { return GetAppServiceFirstInstance(); } else if (mode == AzureValidator.AzureMode.CloudServices) { return GetCloudServiceFirstInstance(); } return ""; } public static string GetAppServiceFirstInstance() { using (var client = new WebSiteManagementClient(AzureValidator.AuthenticateAzure())) { //Create a new variable for the Instance Id collection var instanceIds = new WebSiteInstanceIdsResponse(); //OPTIONAL: Obtain a list of the WebSpaces that are found on the App Services //var list = client.WebSpaces.List(); //Obtain the collection of Instances on the Azure App Service instanceIds = client.WebSites.GetInstanceIds( "<Websitename>-<Region>webspace" /*webspace name*/, "<Websitename>" /*web site name*/); return instanceIds.InstanceIds[0]; } } public static string GetAppServiceCurrentInstanceId() { return Environment.GetEnvironmentVariable("WEBSITE_INSTANCE_ID").ToString(); } public static string GetCloudServiceCurrentInstanceId() { return RoleEnvironment.CurrentRoleInstance.Id; } public static string GetCloudServiceFirstInstance() { using (ComputeManagementClient computeManagementClient = new ComputeManagementClient(AzureValidator.AuthenticateAzure())) { var cloudServiceName = "<CloudServiceName>"; var cloudServiceDetails = computeManagementClient.HostedServices.GetDetailed(cloudServiceName); var firstDeployment = cloudServiceDetails.Deployments.ToList().FirstOrDefault(); return firstDeployment.RoleInstances[0].InstanceName; } } }}
How and Where to Use this Logic
When creating a Scheduled Task, all you need to do is call ValidateForOneNode from the AzureValidator class and pass the AzureMode that you will be working with and it will be taken care of. For example:
SchedulingManager manager = new SchedulingManager(); //Select if running this on Cloud Services or App Services //Run on only the selected node, then check if there are no tasks already created. //Execute the task if (AzureValidator.ValidateForOneNode(AzureValidator.AzureMode.CloudServices)) { var task = manager.GetTaskData().Where(t => t.Key == AzureScheduledTask.TaskKey); if (task.Count() > 0) return; AzureScheduledTask Azuretask = new AzureScheduledTask(); Azuretask.ExecuteTask(); }
Conclusion
With the solution we just talked about, you will be able to enhance your Load Balanced Sitefinity CMS site with the functionality to properly function in Azure and not worry about duplication problems with import/export Scheduled Tasks or background tasks. Feel free to enhance this solution to suit your needs and share them with the community, and as always let us know your thoughts with a comment or over on our feedback portal.
Download the Logic and Try it Yourself
In this AzureScheduledTasks zip file, you'll find a Global.asax file and folder with all the logic covered on this blog (with more detailed comments), as well as a Scheduled Task that you can use as a reference to test this logic. Place the files on the root of your Sitefinity project and make any necessary changes so that it can work for you. Along with this you can find a text file that contains short instructions on how to create the Dynamic Module that the task contains.

