How To Connect To Any REST API From Tableau
Can Tableau Get Data from REST APIs?
Do you want to access REST API data from Tableau for analytics or data visualization? It can be tricky, as connecting to any REST API usually requires investing time and custom programming. Fortunately, with Progress DataDirect Autonomous REST Connector, you can connect to any REST API without any code and query the REST service using SQL 92.
The Autonomous REST Connector uses sampling to normalize the JSON responses from REST API and make them available as relational tables. It empowers you to use the full capabilities of SQL, including joining data from different endpoints.
To get you started with the Autonomous REST Connector, in this tutorial, we will walk you through the process of connecting to HubSpot API from Tableau. HubSpot is a popular automation and CRM platform for marketing, sales, and customer service. This tutorial will give you an overview of how flexible Autonomous REST Connector is and how it works. Let’s get started.
Note: This tutorial is for demonstration purposes only. The preferred method to get connected to HubSpot and other publicly accessible REST services is through the prebuilt model files. For details, refer to Getting started using prebuilt Model files (Windows).
Download and Install Autonomous REST Connector
- Navigate to the Autonomous REST Connector for ODBC page and select the connector you want to download.
- When prompted, provide your details, such as name and email address; then, click DOWNLOAD.
- Extract the contents of the connector zip file into a temporary directory; then, double-click the installer program:
- For 32-bit connectors: PROGRESS_DATADIRECT_ODBC_8.0_WIN_32_INSTALL.exe
- For 64-bit connectors: PROGRESS_DATADIRECT_ODBC_8.0_WIN_64_INSTALL.exe
- Follow the prompts to complete the installation.
HubSpot Authentication
HubSpot offers two means of authentication – OAuth 2.0 and API Keys. Both mechanisms are supported by the Autonomous REST Connector.
For this tutorial, we will use OAuth 2.0 for authentication.
Create an ODBC Data Source
- Start the ODBC Administrator by selecting its icon from the Progress DataDirect for ODBC program group.
- On the ODBC Administrator, select the User DSN tab, and then click Add to display a list of installed drivers. Select DataDirect 8.0 Autonomous REST Connector and click Finish.
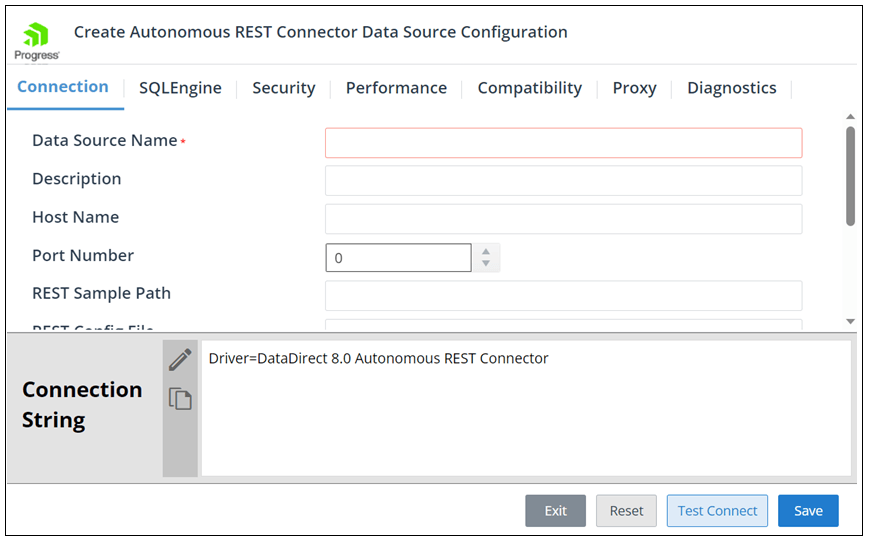
- The Configuration Manager appears in your default browser. On the Connection tab, specify values for the following fields:
- Data Source Name: Specify a name for the data source you are creating.
- REST Sample Path: Specify the endpoint you want to connect to. For example, if you want to connect to the Get All Companies endpoint, specify: https://api.hubapi.com/companies/v2/companies/paged
- Authentication Method: Select 24 - OAuth2from the drop-down list.
- Client ID: Specify the client ID key for your application.
- Client Secret: Specify the client secret for your application.
- Authorization URI: Specify the endpoint for obtaining an authorization code from a third-party authorization service. For example: https://app.hubspot.com/oauth/authorize
- Token URI: Specify the endpoint for retrieving access tokens. For example: https://api.hubapi.com/oauth/v1/token
- Redirect URI: Specify the endpoint to which the client will be returned after authenticating with a third-party service. For example: http://localhost/

4. Click Fetch OAuth Token; then, click Test Connect to connect to the HubSpot API.
Access REST Data Using Tableau
- Navigate to the\tools\Tableau subdirectory of the Progress DataDirect installation directory; then, locate the following Tableau data source file:
DataDirect AutoREST.tdc
- Copy the Tableau data source file into the following directory:
C:\Users\user_name\Documents\My Tableau Repository\Datasources
- Open Tableau. If the Connect menu does not open by default, select Data > New Data Source or the Add New Data Source button
 to open the menu.
 - From the Connect menu, select Other Databases (ODBC).
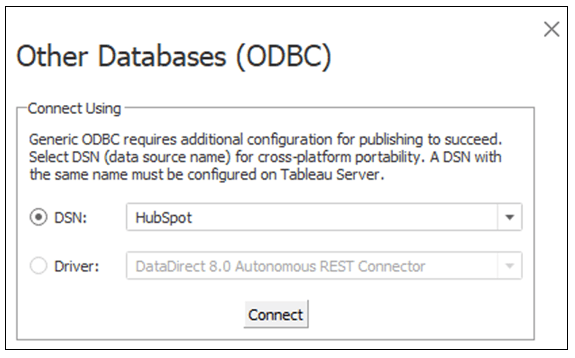
- In the DSN field, select the data source you created in the Configuration Manager; then, click Connect.
Result: A list of tables made available by Autonomous REST Connector by normalizing the JSON response from HubSpot API appears. You can now access the REST API data as usual.

Connecting to Multiple Endpoints
To connect to multiple endpoints using Autonomous REST Connector:
- Open the Configuration Manager by selecting the Autonomous REST Composer (ODBC) icon from your desktop or the Windows Start menu. The Configuration Manager opens in your default web browser.

- Select Create Model. The Create a Model window appears.
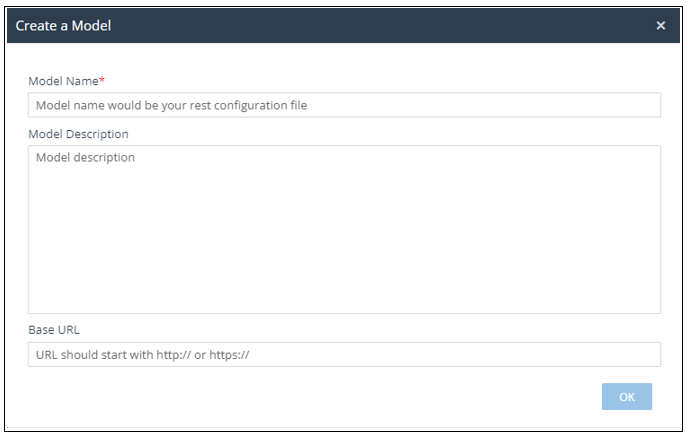
Complete the following fields to create a new project; then, click OK:
- Model Name: The name of your Model file to be created. For example: HubSpotModel.
- Model Description: An optional description of your Model. Note that this description will be stored in clear text in the Model file.
- Base URL: The host name portion of your REST endpoints. For example: https://api.hubapi.com
The Configuration Manager opens to the Connection tab.
- Select the Authentication Method used by your endpoints, provide values for the appropriate fields, and then click Fetch OAuth Token:
- In the Configure Authentication Method(s) field, select OAuth2.
- In the Authentication Method drop-down, select OAuth2. The fields associated with OAuth2 are exposed:
- Client ID: Specify the client ID key for your application.
- Client Secret: Specify the client secret for your application.
- Authorization URI: Specify the endpoint for obtaining an authorization code from a third-party authorization service. For example: https://app.hubspot.com/oauth/authorize
- Token URI: Specify the endpoint for retrieving access tokens. For example: https://api.hubapi.com/oauth/v1/token
- Redirect URI:
Specify the endpoint to which the client will be returned after
authenticating with a third-party service. For example:
http://localhost/
Note: Authentication properties specified through the Configuration Manager are not persisted in the Model file. To share authentication settings among all connections using the file, you must manually update the Model file.
- Select the Configure Endpoints tab on the side menu.
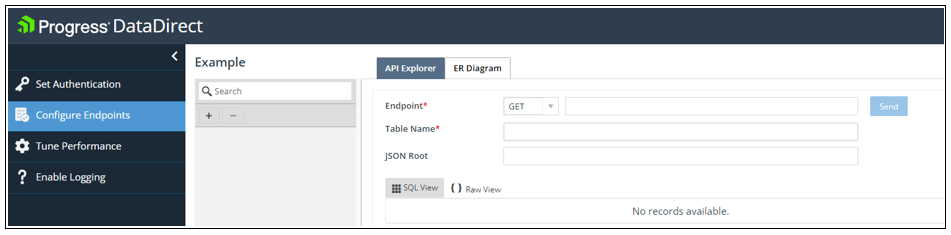
Provide the minimum required information for an endpoint to which you want to issue requests:
- From the Endpoint drop-down menu, select the type of request to issue against your endpoint. For example: Get.
- In the Endpoint
field, type the path portion of your endpoint after the base URL. Note
that the value must be URL-encoded using valid syntax. For example,
spaces in an endpoint are replaced with
%20. For example: >companies/v2/companies/paged - In the Table Name field, type the name of the relational table to which you want the endpoint to map. For example: Companies.
- Click Send.
The driver sends the REST request and generates a relational view of
the data based on the response. To add additional endpoints, click + in the request pane on the left.
For testing purposes, you can add the following endpoints:
Table Name Endpoint Companies companies/v2/companies/paged CompanyProperties properties/v1/companies/properties Contacts contacts/v1/lists/all/contacts/all ContactProperties properties/v1/contacts/properties Deals deals/v1/deal/paged DealProperties properties/v1/deals/properties DealPipelines deals/v1/pipelines Engagement engagements/v1/engagements/paged Forms forms/v2/forms Owners owners/v2/owners Products crm-objects/v1/objects/products/paged Tickets crm-objects/v1/objects/tickets/paged Emails marketing-emails/v1/emails - Click Download to generate and download your Model file.
- Open the ODBC Administrator and then double-click the data source you have created. The Configuration Manager appears.
- On the Connection tab of the Configuration Manager:
- Clear the REST Sample Path field’s value.
- In the REST Config File field, browse to the Model file you have created.
- Click Update.
- Open Tableau and reconnect to the data source. An updated list of tables appears.