Build a custom ODBC driver using .NET
Introduction
Do you have a custom API that you use internally in your company that you would like to connect to your favorite analytics tool? Do you have a data source which has a REST API and doesn’t have an ODBC driver, but you would like to have one for your analytics or integration purposes?
If so, you're in the right place. Progress OpenAccess SDK is a framework that enables you to build a driver for any REST data source quickly and easily, without you having to deal with low level ODBC API’s. This tutorial will get you started in building your own ODBC driver using Progress DataDirect OpenAccess SDK. We will walk you through building an ODBC driver for a free financial REST API provided by Alpha Vantage, which offers real time and historical stock market data.
Update: For a code-less solution, look at our new Autonomous REST Connector, which is designed to connect to any REST API easily. You can get started by following this tutorial.
Environment Setup
- Navigate to OpenAccess SDK for ODBC to download the driver.
- On the download page:
- UnderServer and IP SDK, download Windows installers based on your machine architecture (32-bit or 64-bit)
- On the Product registration, Enter your name and company. Enter serial as ‘EVAL’ and leave the Key textbox empty for 15-day trial period.
- For the all the next steps in installation, leave the default settings as it is and proceed to install the OpenAccess server.
- Under Client/Server Configuration, download ODBC Client for Windows (32-bit or 64-bit)
- Under SDK add-ons, download OpenAccess REST IP generator.
- Install the OpenAccess server by running the installer named oaserverxx_win_setup.exe.
- Install the OpenAccess ODBC client by running the installer named oaodbcxx_win_setup.exe. This will install the OpenAccess ODBC driver in your machine.
Setting up the Project
- To get started easily, I have uploaded sample OpenAccess .NET project to GitHub which is IP code that helps you translate your SQL queries to Alpha Vantage Time Series API and map the results from the API to a tabular format.
- Download the Solution Stocks-AlphaVantage-dotnet from this repository on GitHub.
- Open the Solution in Visual Studio using the .sln file.
- Add the following references to the project, if not present:
- C:\Program Files\Progress\DataDirect\oaserver81\ip\bin\oadamipnet40.dll
- C:\Program Files\Progress\DataDirect\oaserver81\ip\bin\oanet.sql.ip.dll
- Install Newtonsoft.JSON package
- Build the solution and you should not see any errors now.
- Open the Stocks Project properties and under Build, change the Output Path to below
C:\Program Files\Progress\DataDirect\oaserver81\ip\bin - The reason to change the output path to above location is to add the project binaries to OpenAccess classpath.
- Close Visual Studio and re-open with admin privileges for your builds to be successful.
Setting up OpenAccess Service
- From the Start Menu, Go to All Programs -> Progress DataDirect OpenAccess Server and IP XX-Bit SDK 8.X -> Management Console.
- On the Management Console, under Manager(localhost), connect to OpenAccessSDK8XX_Agent
- Right Click on Services Folder -> New -> Services to create a new service. You should now see an Add Service window. Follow the below instructions to create the service successfully.
- Service Type: Service for .NET
- Service Name: Any name that you choose
- TCP Port: Any port between 1024 and 65534
- Check the Register Service check box
- Go to the newly created service -> Configuration -> Service Settings and configure it as follows.
- IP Parameters
- ServiceIPModule: oadamipnet40.dll
- Logging (during development)
- ServiceDebugLogLevel: 127
- SeriviceIPLogOption: Enable Full Tracing
- IP Parameters
- Go to DataSource Settings -> Default and configure it as follows.
- IP Parameters
- DataSourceIPSchemaPath: \path\to\Progress\DataDirect\oaserver80\ip\schema\template_dynamic
- DataSourceIPType: DAMIP
- DataSourceIPClass: Stocks.dll
- DataSourceIPCustomProperties: apikey=?
- IP Parameters
- If your API or data source needs Username and password based authentication, you need to change the DataSourceLogonMethod to DBMSLogon(UID, PWD)
- Notice the DataSourceIPCustomProperties value, it’s a way of how you can pass any values to the code other than credentials. You will be able to access the apikey needed by you for accessing the AlphaVantage API in the code.
- Right click on the service and click on ‘Start <ServiceName>’
Understanding the IP code
- OpenAccess IP provides you with an interface of 19 functions abstracting a lot complexities needed to build a driver. If you open the damip.cs file, you should see these functions. Don’t let the number of functions intimidate you, as you need only 4 of these functions to run the POC ODBC driver successfully.
- To get started with a basic POC driver, the functions that you are required to implement are ipGetSupport, ipConnect, ipSchema and ipExecute.
- Please note that we have pushed our code for this project to GitHub. Feel free to reference it for the rest of this section.
- ipConnect Method
- As soon as you start connecting to the driver, the ipConnect method is called. In this method, you connect to the data source and check if the connection is successful.
- You provide a username, password and any custom properties that were set when configuring the driver, which you can use while checking the connection to the data source.
- If you can connect to the data source successfully using the Authentication details provided, the system will return a success code.
- ipGetSupport Method
- Once your connection is determined, this method will call to see which features are supported by the driver such as SELECT, INSERT, UPDATE, DELETE, SCHEMA Functions, Operators, Joins etc..
- Refer to array ip_support_array from the Github repository in the class OpenAccessIP to get an idea on this.
- For this tutorial, we chose to support SELECT, Schema functions and operators “=” and “>”.
- ipSchema Method
- The OpenAccess SDK SQL engine calls this method when it needs to get any of the following information about the schema.
- List of Tables
- Columns for a Table
- Details about each column
- Foreign Keys, Primary Keys
- Indexes
- Other Schema objects
- You will know what type of schema information is being requested by checking the input argument iType. To learn more about the types of information, check out this documentation page.
- For a basic driver that is implementing dynamic schema, when there is a request for type DAMOBJ_TYPE_TABLE, you have to provide the table information. It can be all the tables or a single table, and this can be checked using pSearchObj input argument of ipSchema table. If pSearchObj is null, you return all of the table's info that you want to expose from your REST API. If it is not null, you return the specific table info requested in pSearchObj.
- If the request is for DAMOBJ_TYPE_COLUMN, then you have to provide column information for the tables. Again, here you must check for pSearchObj to get to know the table that is being requested for and provide the column information for that table. If pSearchObj is null, then you have to provide all the columns for all of the tables.
- You add the schema information to OpenAccess using the method dam_add_schemaobj for all the schema types using their respective Objects. Learn more about this function from this page in on our OpenAccess™ SDK Documentation page.
- Refer to the ipSchema implementation of the sample provided in GitHub to get an overview. In the sample, we have only one table, so we are getting metadata for that table and providing it to OpenAccess as discussed above.
- The OpenAccess SDK SQL engine calls this method when it needs to get any of the following information about the schema.
- ipExecute Method
- This method is where you get the SQL query information, prepare the REST URL based on the filters, aggregation in the query, send the GET request to the REST server, process the data and send it to OpenAccess. Once you have done that, you will be able to see the result set for the query you issued.
- There are two important input parameters called dam_hstmt and iStmtType. The dam_hstmt handles the statement being executed and iStmtType lets you know which type of statement is being executed like SELECT, UPDATE, INSERT, DELETE etc. To know more about all the statement types, you can visit this documentation page.
- In this tutorial, we will be focusing on the SELECT statement. First, you should check your type of statement. If it’s SELECT, proceed to check the table on which SELECT is being requested. You can check that using the function:
dam_describeTable(long hstmt, StringBuilder pCatalog, StringBuilder pSchema, StringBuilder pTableName, StringBuilder pTablePath, StringBuilder pUserData)
- Pass empty StringBuilder objects as input arguments and you should have the table name and schema name once the function gets executed.
- Once you have the table name, you would need to start checking the query for various clauses like WHERE, TOP etc., and column handles for each column in the table.
- To get Column handles for each column in table, you need to use the function
long dam_getCol(long hstmt, String ColumnName)
where hstmt is statement handle. You have to get column handles for all the columns in the table by iterating through them. These column handles will be referenced later in the code when you are adding data to the resultsets. - To learn about TOP clause in the query, call the method
int dam_getInfo(long hdbc, long hstmt,int iInfoType,StringBuilder pStrInfoValue, xo_int pIntInfoValue)
The argument iInfoType must be set to DAM_INFO_QUERY_TOP_ROWS, which will get you the TOP ‘N’ value. The iInfoType can take many arguments and depending on the type of information being requested, it will get you that information. Visit this table to learn more about the Info types that can be used with dam_getInfo function. - Next up, check the WHERE clause. To get set of condition lists, you need to use the function
long dam_getSetOfConditionListsEx(DAM_HSTMT hstmt, int iType, DAM_HCOL hcol, int * pbPartialLists)
which fetches the expression from WHERE clause on one or more columns in the form of AND/OR expressions.
The type of condition list requested:
SQL_SET_CONDLIST_INTERSECT - transform the where clause into a set of AND conditions and return these as a list. This is valid only if IP_SUPPORT_UNION_CONDLIST is set to 0.
SQL_SET_CONDLIST_UNION - transform the where clause into a set of OR conditions and return these as a list. This is valid only if IP_SUPPORT_UNION_CONDLIST is set to 1.
Learn more about this function by visiting this documentation page - Once you get the Set of Conditions lists, you need to iterate through them to fetch individual conditions and separate the conditions based on the operator. This requires you to use following functions and you can refer to the code in GitHub on how to use these functions properly.
 int64 dam_getFirstCondList(int64 hset_of_condlist)

 int64 dam_getNextCondList(int64 hset_of_condlist)

 long dam_getFirstCond(long hstmt, long hlist)

long dam_getNextCond(long hstmt, long hlist) -
Next, you need to build a request URL for your REST API based on all the above factors and send the request to get the data. If your API supports filter conditions or any aggregation, it is always a good idea to push them down from the driver to REST API for better performance. Say, for this NYC Parking violations example, when we send a query like:
SELECT * FROM TIMESERIES WHERE "function"='TIME_SERIES_INTRADAY' AND symbol='PRGS' AND "interval"='5min'
The IP code translates this query to AlphaVantage API as
https://www.alphavantage.co/query?function=TIME_SERIES_INTRADAY&symbol=PRGS&interval=5min&outputsize=full&apikey=xxxx
-
If your API doesn’t have an advanced filtering option OpenAccess will take care of sending the correct result set from the full data that you add to OpenAccess.
-
After you get the response, all you need to do is parse it and start adding data to the result set. To add the data to result set, first you need to allocate memory for a row by calling the function
long dam_allocRow(long hstmt)
which returns a handle that you need to use it in the next steps. - Once you have the memory allocated, iterate through your result set and add one column after another to the row that you have created in the previous step, based on the datatype of column. To do that you must use the function dam_addxxxValToRow, where xxx is datatype of the column that you are trying to add. You need to use the row handle that you got in the previous step and the column handle of the column that you got before. For example, for adding a VARCHAR column to row, here is the code we would use
dam_addCharValToRow(dam_hstmt, hrow_handle, columnHandle, data, ip.XO_NTS)
You can learn more about the function dam_addxxxValToRow here. - After you have added all the columns to the row, it’s time to add the row to the result set. Before adding to result set, you can check if the row that you are adding satisfies the SQL query conditions by using the function
int
dam_isTargetRow(long hstmt, long hRow)
which will return DAM_TRUE, if the row matches restriction. - Finally, you can now add the row to table using the function
int
dam_addRowToTable(long stmt_handle, long row_handle)
where row_handle is the handle that you got when you created memory for the row. - Parse through all your data and add them to the result set to be able to see the result when the query is executed. Congratulations, you have developed a basic ODBC driver for your custom REST API.
Debugging the Code
- To debug the code, you need to have your service running in OpenAccess Management console.
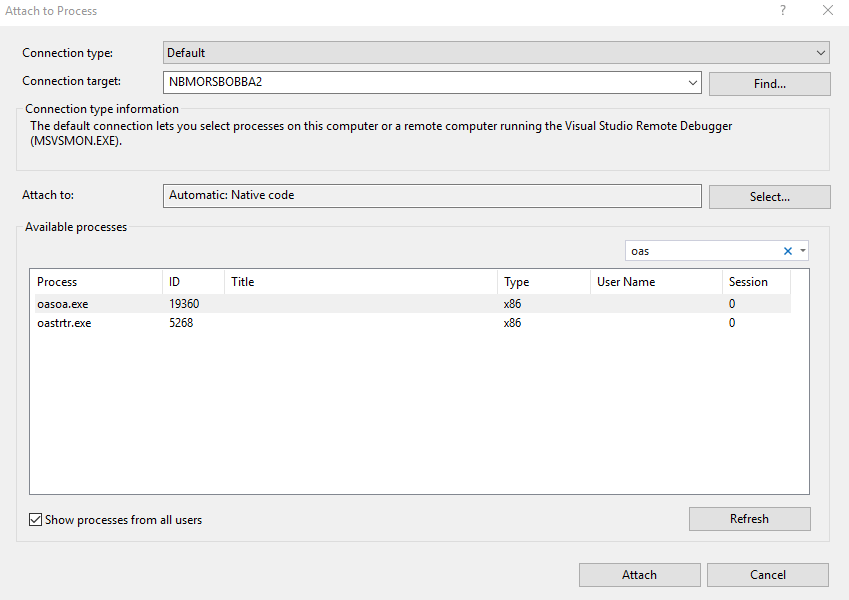
- In Visual Studio, Open Debug menu -> Attach to Process and you should see a new window. Select “Show processes from all users” in the bottom corner of the window.
- Now search for the process oasoe.exe and attach to the process to start debugging as shown below.

- Place a breakpoint in ipConnect or ipExecute methods and try to run a query – you should be hitting that breakpoint – helping you to debug the code.
Testing the Driver
- Open ODBC Administrator (32 bit if you have installed 32 bit OpenAccess ODBC client, else open 64-bit).
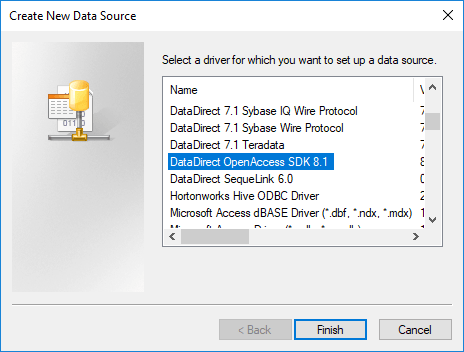
- Add New DataSource -> Choose Driver as DataDirect OpenAccess SDK 8.X and click on Finish to configure the driver as shown below.
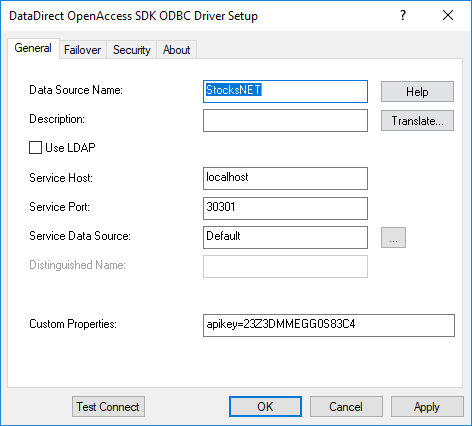
- Configure the driver as shown below. The port number is the one given when you created the OpenAccess service.
- Notice we provided the apikey in Custom properties, which will be needed by your code to connect to the service and fetch data.
- Click on Test Connect to test the connection. If your OpenAccess service is running, you should be able to connect successfully.
- Now go to Start Menu -> All Programs -> Progress DataDirect OpenAccess Client for ODBC xx_bit SDK and open Interactive SQL program.
- You should now see a terminal, enter the following command to connect to the above ODBC data source.
Connectstocksnet;
- You should now be able to run queries. If you have started debugging in IDE and placed breakpoints, you should be able to debug too simultaneously.Here are sample queries you should be able to run, if you have used my code:
SELECT*FROMTIMESERIESWHERE"function"='TIME_SERIES_INTRADAY'ANDsymbol='PRGS'AND"interval"='5min'SELECT*FROMTIMESERIESWHERE"function"='TIME_SERIES_INTRADAY'ANDsymbol='PRGS'AND"interval"='5min'ANDOutputSize='full'SELECT*FROMTIMESERIESWHERE"function"='TIME_SERIES_DAILY'ANDsymbol='PRGS'SELECT*FROMTIMESERIESWHERE"function"='TIME_SERIES_DAILY'ANDsymbol='PRGS'ANDOutputSize='full'SELECT*FROMTIMESERIESWHERE"function"='TIME_SERIES_WEEKLY'ANDsymbol='PRGS'SELECT*FROMTIMESERIESWHERE"function"='TIME_SERIES_WEEKLY_ADJUSTED'ANDsymbol='PRGS'SELECT*FROMTIMESERIESWHERE"function"='TIME_SERIES_MONTHLY'ANDsymbol='PRGS'SELECT*FROMTIMESERIESWHERE"function"='TIME_SERIES_MONTHLY_ADJUSTED'ANDsymbol='PRGS'


We hope this tutorial helped you to build your own custom ODBC driver using Progress DataDirect OpenAccess SDK.