Using Azure Data Factory to copy data via OData with Hybrid Data Pipeline
Data Access & Integrations made easy with Hybrid Data Pipeline
Hybrid Data Pipeline provides easy connectivity to any data store, be it a traditional database or SaaS application or RESTful source that’s running either in cloud or on-premise. It can be hosted in any cloud platforms along side with your existing cloud applications and enables you to achieve a seamless integration.
What’s explained in this tutorial?
This tutorial explains how easily you can use Hybrid Data Pipeline that is setup in Azure Cloud Platform and understand how it can integrate with Azure Data Factory.
Azure Data Factory (ADF) is Azure's cloud service that enables building data pipelines with various tasks.
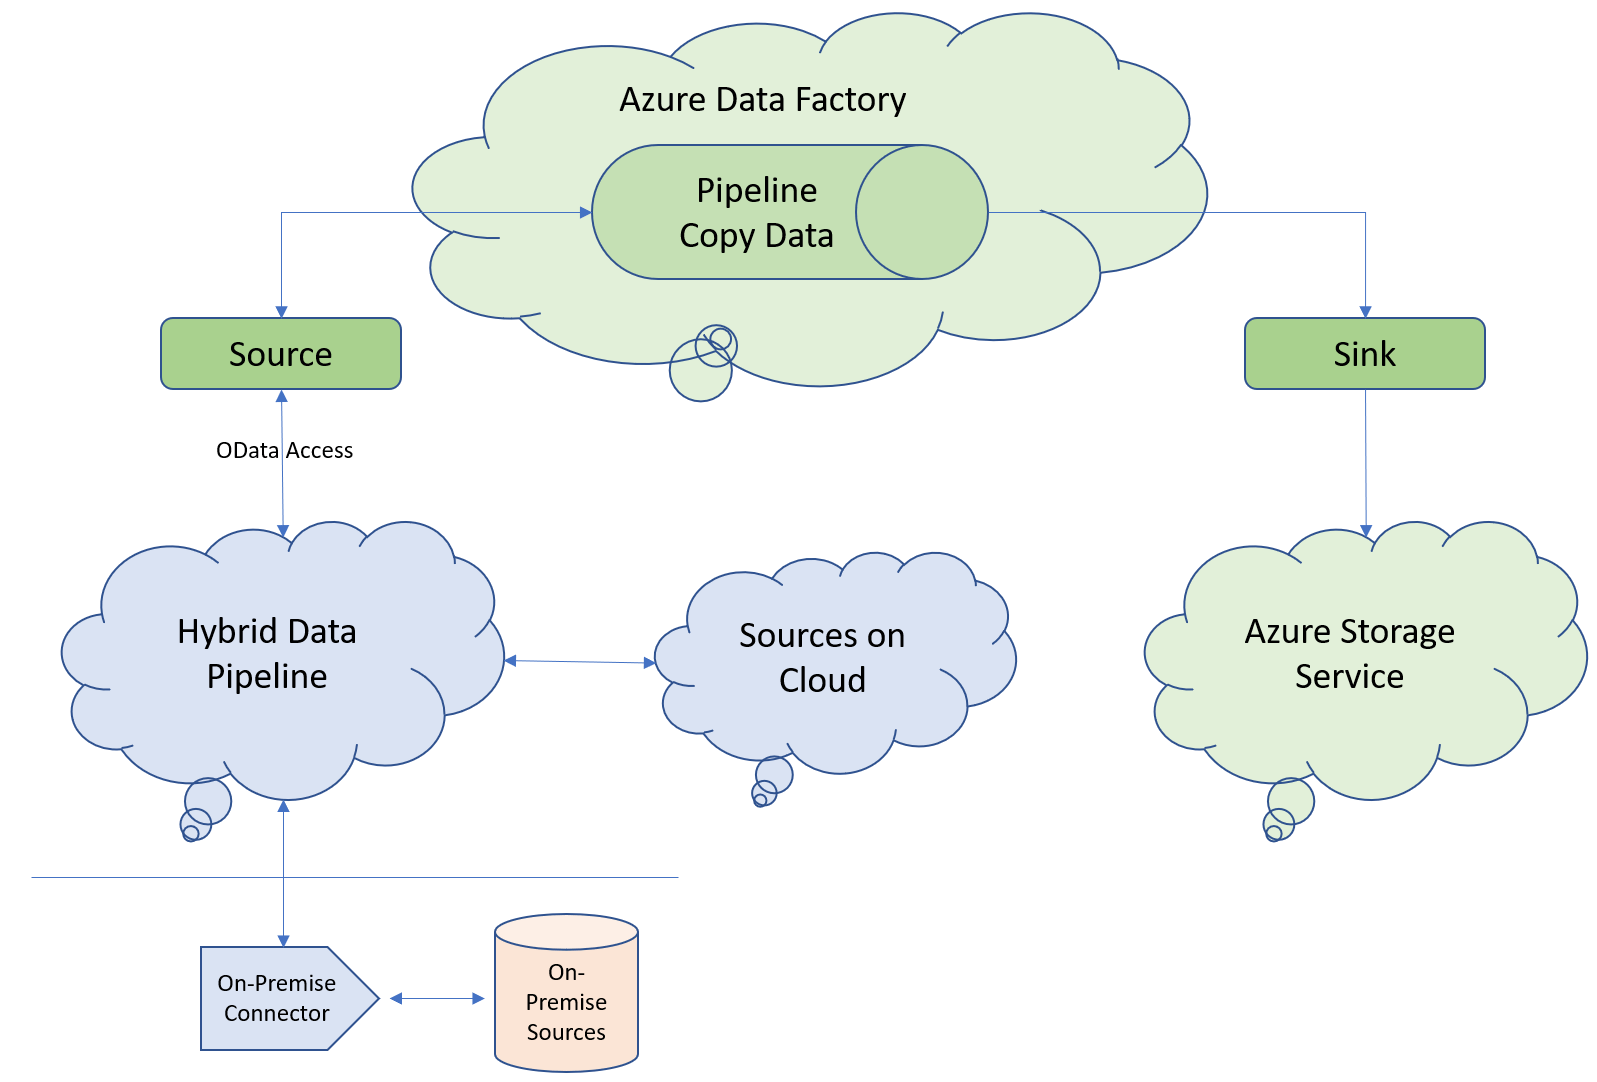
As an example use-case, this tutorial describes how to configure a Pipeline with a copy data activity in Azure Data Factory. In copy data activity, as a ‘Source’ configuration it will use Hybrid Data Pipeline for data access via OData for any data store of interest. And as a ‘Sink’ configuration it will use Azure File Storage service.
Following picture depicts the use-case we achieve as part of this tutorial:
Configure a data source in Hybrid Data Pipeline for OData Access
Hybrid Data Pipeline should be installed in a machine accessible from Azure Cloud, for example you can install in Azure VM or it could be installed in any other cloud platform as well.
Steps
- Once the product is installed, Login to Hybrid Data Pipeline's Web Interface
- Choose 'Manage Data Sources' option from the left navigator, click on 'New Data Source' button
- You would see a list of datastores, pick a data store of your interest and it will show a configuration screen
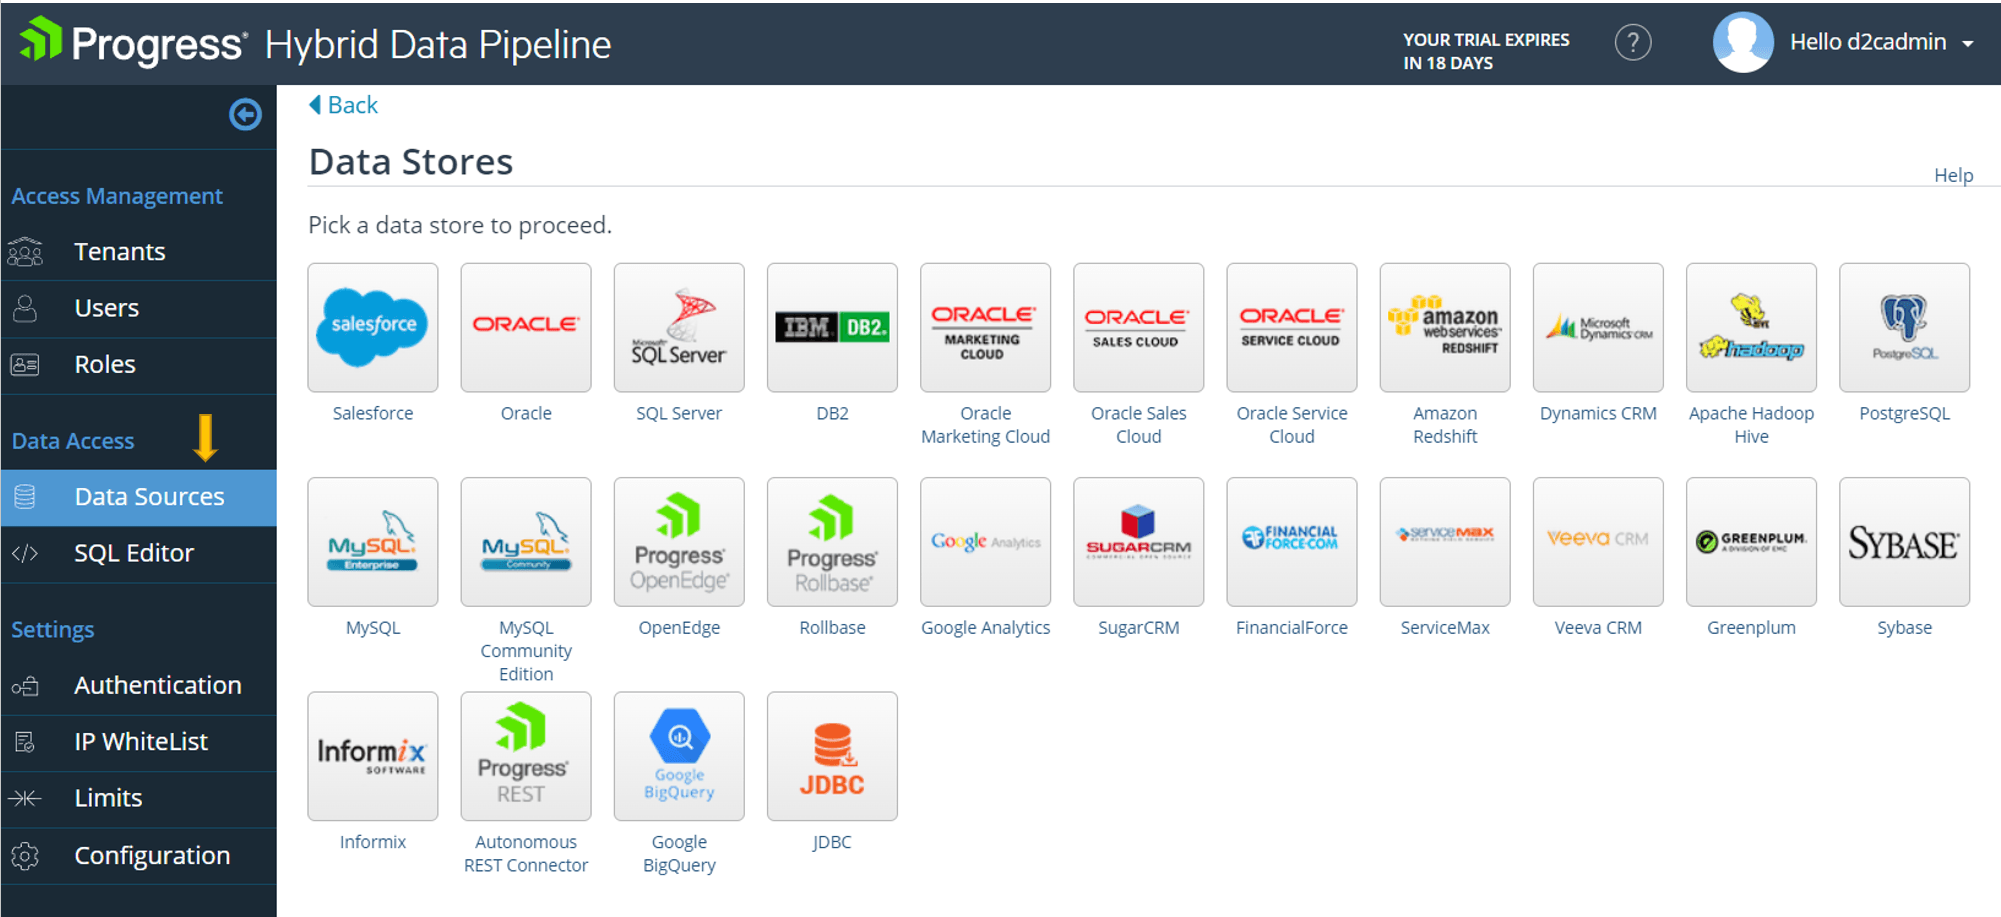
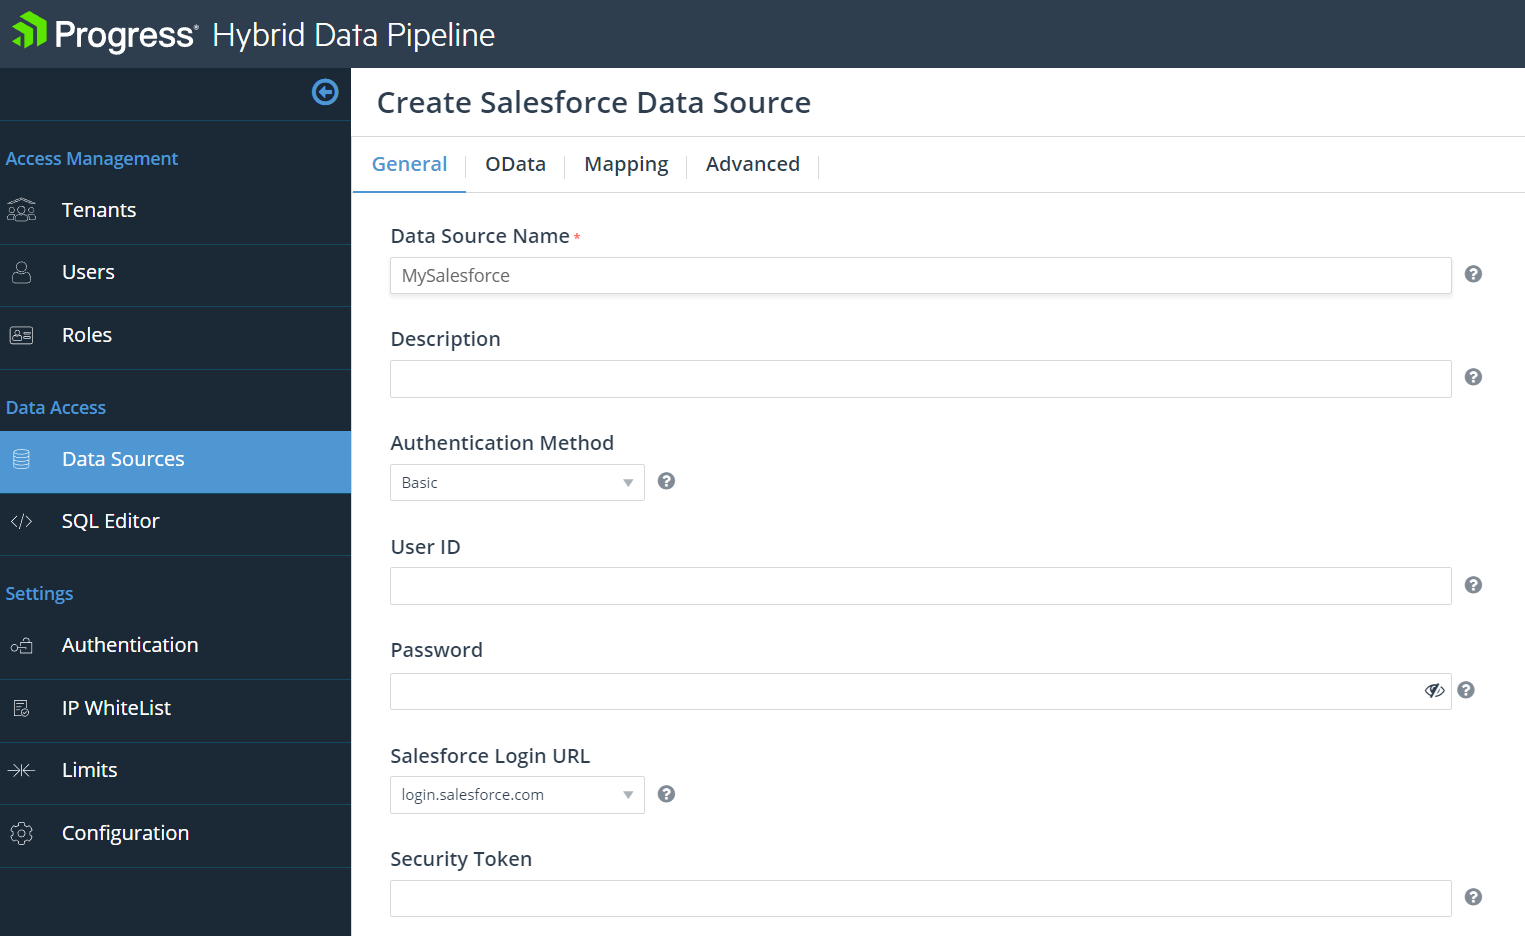
- Enter required details like URLs and credentials to connect to the respective data store
- Switch to OData tab and configure OData model using OData Editor and Save the configuration
- OData Editor assists in customizing what tables & columns can be accessed, with customized names that is different than the original table names in the database. You can view this as a powerful, controlled access to your data that is in-built in Hybrid Data Pipeline's OData access architecture.
- Now, save the data source configuration
Steps to connect to a data store running in on-premise network
Note that the On-Premise connector component is only required if your application is running in cloud and it needs connectivity to the on-premise source running in local/enterprise network that's not exposed for outside access. The typical on-premise sources are Oracle, SQLServer, PostgreSQL, DB2 database or any other SaaS source that's setup in local/enterprise network.
- In order to connect to on-premise data stores, Hybrid Data Pipeline offers an On-Premise Connector that needs to be installed in a machine that can connect to on-premise data store.
- Every on-premise connector installation will generate an ID and it needs to be configured for ‘ConnectorId’ option during data source connection configuration
- That’s all needed. You could do a ‘Test Connection’ to see if a successful connection could be made to the On-Premise data store.
Sample OData Service URI
Assume you need to gather 'Leads' data from Salesforce instance. In this case, you define a data source configuration for Salesforce and expose Leads table as part of OData schema map as shown in the picture below -
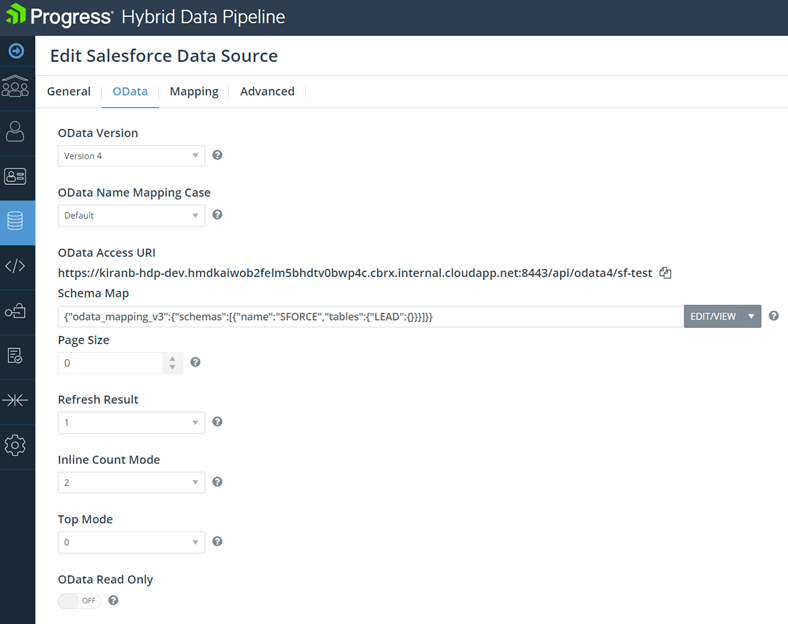
Following would be the OData Service URI to query Salesforce datasource table.https://<machine name or IP>:8443/api/odata4/sf-test
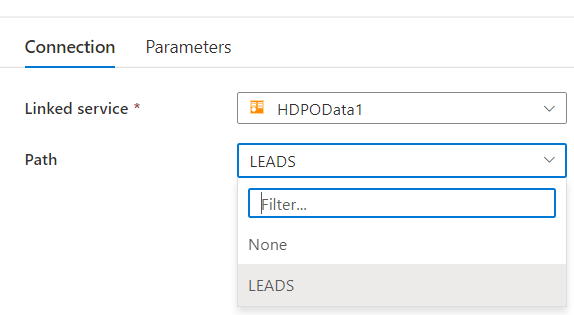
In the linked service you create for OData in Azure, the available paths are listed in a drop down in Azure Data Factory. You can choose the LEADS entry from the list.
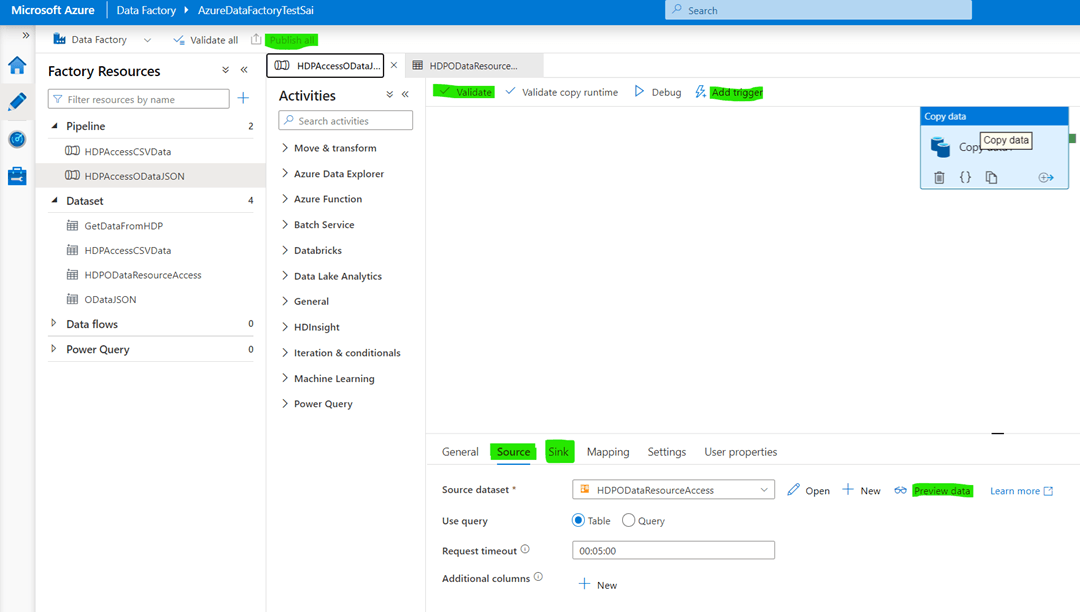
Configure a Pipeline with a copy data activity in Azure Data Factory
Refer to Microsoft’s Azure Data Factory documentation for more details on how to configure a pipeline. High level steps that are necessary to configure a pipeline using Hybrid Data Pipeline’s OData Service is described below.
Steps
- Creating a Data Factory and open Azure Data Factory Studio
- Login to https://portal.azure.com
- Choose Data Factories, create a new data factory with necessary details
- Select the newly created data factory, launch Azure Data Factory Studio using ‘open’ button
- A bunch of configurations need to be created in Azure Data Factory Studio and they are described at a high level below
- Creating a Data Set that acts as a ‘Source’ to your Copy Data activity
- Create a new Data Set, pick up ‘OData’ from Generic protocol tab as a data store, hit continue
- Provide a name to the data set, create a new linked service
- Provide a name to the linked service
- Configure OData Service details
- Here’s where you need to enter the OData service URL and relevant credentials of Hybrid Data Pipeline
- Configure the Service URL, choose Basic Authentication Type
- Enter user name and password
- Creating a Data Set that acts as a ‘Sink’ to your Copy Data activity
- Create a new Data Set, pick up ‘Azure File Storage’ from Azure tab as a data store, hit continue
- Select the format as JSON, hit continue
- Provide a name to the data set, create a new linked service
- Provide a name to the linked service
- Configure required details like authentication method, storage account name and key to connect to azure file storage service
- Configure the target file path where the OData response need to be written
- Save the changes.
- Create a Pipeline
- Create a new Pipeline and provide a name
- Under Activities, search for ‘Copy data’ and select the same
- Provide a name, switch to Source Tab
- Choose the data set created in Step#2
- Click on Preview data option and you should be able to see the OData response from Hybrid Data Pipeline
- Switch to Sink Tab and choose the data set created in Step#3
- Use the Validate button in the UI to validate the pipeline, resolve errors if it shows any
- Use Publish all button to publish the pipeline defined
- Testing the Pipeline
- Click on ‘Add Trigger’ option and choose ‘Trigger now’ option to run the pipeline on-demand
- A run will be scheduled, click on ‘View Pipeline run’ option in the notification
- In the Activity Runs view, you can see the run status, it shows successful when the pipeline runs with no errors.
- On successful run, you should now see a file in Azure File Storage with the OData response that Hybrid Data Pipeline returned.
Summary
Hybrid Data Pipeline offers connectivity to 25+ data stores and with Autonomous REST Connector it enables connectivity to vast number of sources that support RESTful APIs.
You can also bring in your own JDBC driver and drop-in to get OData API support via Hybrid Data Pipeline. In addition to OData based access, Hybrid Data Pipeline supports data access based on other standards based interfaces like JDBC and ODBC.
Please feel free to download a trial of Progress DataDirect Hybrid Data Pipeline and try out. If you have any questions, don’t hesitate to contact us and we will be happy to help.
References
Hybrid Data Pipeline Installation Guide
On-Premise Connector Installation Guide
Configuring Data Source for OData Access