This guide looks at common ways to create the active user within your Kinvey app. We’ll examine several key examples to help you get started.
When you are getting started with Kinvey, generally the first thing you want to do is just grab some data from a collection. You set up your collection, fill it with data and use the default permissions that give all users read capability.
After including the Kinvey HTML5 SDK, you begin writing code like this to pull some data from the collection:
var client = Kinvey.init({ appKey: 'kid_rk7NMn57z', appSecret: '3ecc483bd0864882b0c69965030961c6'});var myDatastore = Kinvey.DataStore.collection('myCollection');myDatastore().pull() .then(function(ordinaries) { // do something extraordinary }).catch(function(error) { console.log(error); });But, lo and behold, rather than data, you get a NoActiveUserError error that says:
There is not an active user. Please login a user and retry the request.
The key thing to remember is that every Kinvey app has an active user—whether that user is explicit (i.e. they logged in with a username/password or social identity) or implicit (i.e. they are effectively “anonymous” users, as I discussed in my recent post).
The goal of this guide is to look at some of the common ways that you create the active user within your Kinvey app. We’ll look at the following examples:
- Creating an implicit (anonymous) active user
- Signing up and logging in with Kinvey authentication
- Signing up and logging in with social authentication
- Restricting data access via roles
The Demo App
To make all of this easier to understand, I’ve created a simple example app. The example app demonstrates all the topics that we’ll be discussing in this article. It allows the user to continue without logging in (i.e. implicit/anonymous login), to sign up and log in using Kinvey authentication, to sign up or log in using Google authentication, and, finally, to assign themselves a user role.
As a bonus topic, the example even relies upon some simple custom endpoints in Kinvey that we’ll discuss as well.
You can see the code and try the app via the JSFiddle below.
You can either get the code directly from the JSFiddle or I’ve also made it available on GitHub.
Note that if you want to recreate the project for your own Kinvey instance, replace appKey and appSecret values within the scripts.js file in the GitHub project.
While the sample app is built with HTML and JavaScript, the Kinvey SDK examples should translate across the various supported languages and frameworks. The Kinvey DevCenter makes it easy to swap between documentation across all the supported platforms without losing context.
The Kinvey Setup
Within Kinvey, the demo app has three collections.

There are also three roles.

Each collection has different permissions that correspond to these roles (i.e. all users can access ordinary-people, heroes can access heroes and villains can access villains), which we’ll discuss in more detail in the roles section below.
In this tutorial, we’ll discuss three types of users:
- Implicit users (i.e. anonymous users) that do not require a log in.
- Users that are authenticated using Kinvey authentication.
- Users that are authenticated using a social account (in our example, this will be Google) via Kinvey’s Mobile Identity Connect with OAuth.
It’s important to note that there are other types of authentication available in Kinvey such as LDAP or Active Directory that I won’t be covering in this article.
All users (whether implicit, Kinvey, Google) are stored in our users collection in Kinvey, as you can see below.

Since our sample app doesn’t collect any additional user data, you can distinguish between them by the fact that the Kinvey authentication user has a username (in our case, an email), the social authentication user has additional data in the _socialidentity column and the implicit user has neither of those things.
Creating an Implicit (Anonymous) Active User
Let’s go back to that collection I showed earlier—the one with the default permissions that give all users read capability. I don’t want anyone to have to log in to view this data. How would we create a user that has access to this data without requiring authentication?
In our example app there is the option to “Continue without signing in” that implements this. Keep in mind that although this is triggered by user interaction in the example, this could also happen transparently (without user interaction)—see my prior post for an example of doing that.
The first thing we have to do, as always, is initialize the Kinvey library.
var client = Kinvey.init({ appKey: 'kid_rk7NMn57z', appSecret: '3ecc483bd0864882b0c69965030961c6'});
Now let’s look at what happens when you click the “Continue without signing in” link.
// log in an implicit user (i.e. anonymous) that defaults to the all users roledocument.getElementById('nosignin').addEventListener('click', function () { loginSuccess(); document.getElementById('rolechooser').classList.add('fadeout'); var promise = Kinvey.User.signup() .then(function(user) { loadData(); }).catch(function(error) { console.log(error); });});
The first two lines of code here essentially just handle transitions and styles. The key portion is this:
var promise = Kinvey.User.signup().then(function(user) { loadData();}).catch(function(error) { console.log(error);});
Calling the signup() method will create an implicit user and, assuming it is successful, load the data. In this case, we’ll load data from the ordinary-people collection as our implicit user only has the default “All Users” permissions.
var ordinary_ds = Kinvey.DataStore.collection('ordinary-people');ordinary_ds.pull().then(function(ordinaries) { var el = document.getElementById('ordinaries-list'), chrList = ''; ordinaries.forEach(function(ordinary) { chrList += '<li>' + ordinary.name + '</li>'; }); el.innerHTML = chrList; displayCharacters();}).catch(function(error) { console.log(error);});
Attempting to access data from the heroes or villains collections will result in an InsufficientCredentialsError due to the lack of the proper role.
So I’ll have tons of implicit/anonymous users in my Kinvey users collection?
Yes. The strategy we use above would create a new implicit user for every device or browser. The user ID will be cached in local storage but will be removed whenever we call the Kinvey.User.logout() method (note that this is called on every reload of our sample app, something not recommended for a typical production app). There’s no restriction on the number of users you can create, however it’s something to keep in mind—especially if you plan on manually managing user permissions via the Kinvey Console. An alternative strategy would be to create a service account for your web application and run all anonymous calls through this account
Using Kinvey Authentication
Most applications need some form of user authentication. Of course, you can roll your own, but using the Kinvey authentication can help speed up your development. Let’s look at how.
Sign Up
Our sample app has very simple registration requirements, requiring only a username and password. In most cases, you’ll require more information than this, but the system supports adding any additional user attributes when signing up.
Here’s the basic sign up code from our sample app.
// sign up a new user with Kinvey authenticationdocument.getElementById('signup-button').addEventListener('click', function(event) { // TODO: perform form validation var user = new Kinvey.User(); var promise = user.signup({ username: document.getElementById('email').value, password: document.getElementById('password').value }) .then(function(user) { loginSuccess(); console.log(user); }) .catch(function(error) { // for the sake of simplicity, I'm just displaying any errors that the API sends me back document.getElementById('error').innerHTML = error.message; });});To register a new user, we simply call the same signup() method we used for the implicit user, but this time we are passing a username and password combination. It’s important to note that, for simplicity’s sake since this is a sample app and not a real-world app, we are not doing any client-side validation on the username and password.
In our sample app, we are just passing back any errors we may receive in the sign up process. While this isn’t necessarily recommended for a real application, thankfully the messages are pretty clear. For instance, here’s what happens if I try to register using an email that already exists in the system:
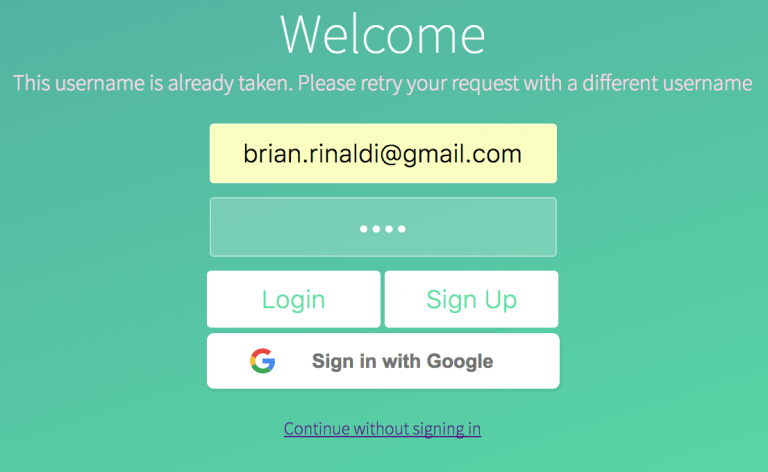
A preferable way of handling this in a real-world application might be to rely upon the built-in username existence check prior to calling the signup() method.
Log In
Logging in an already registered user is as easy as passing the username and password to the login() method.
// login using the Kinvey authenticationdocument.getElementById('login-button').addEventListener('click', function(event) { var user = new Kinvey.User(); var promise = user.login({ username: document.getElementById('email').value, password: document.getElementById('password').value }) .then(function(user) { loginSuccess(); console.log(user); }) .catch(function(error) { document.getElementById('error').innerHTML = error.message; });});Again, for the sake of simplicity, we are only passing back any login errors we may receive.
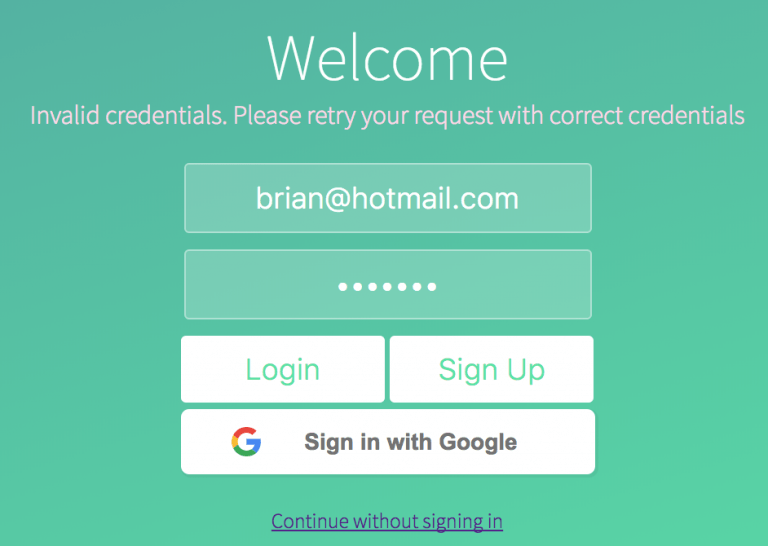
Why Use Kinvey Authentication?
You may be wondering what the big deal is? This isn’t difficult to implement on your own. However, now that we have built the sign up and login most applications would require the following additional features:
- Email verification with a customizable verification email, verification page and verified response
- A forgot username reminder
- A means of resetting the password
The good news—as you can see from the links above—is that all of these features are already baked in for you with Kinvey authentication. There’s no need to reinvent the wheel, as they say.
Using Social Identity Authentication
Social identity authentication like those offered by Google, Facebook, Twitter and LinkedIn can be a useful tool to make it easy for users to sign up for your app using an account that they already possess. It can turn the sign up and login process into just one-click—and the easier it is to sign up the less likely users will abandon the process.
Each authentication provider (Google, Facebook, etc) have their own requirements and documentation. On the Kinvey side these are all managed via the Mobile Identity Connect (MIC) service. Let’s look at an example of how to set up MIC to allow us to enable users to sign up and log in using their Google account.
Setting Up Google Sign-In
The hardest part about setting up the credentials in Google APIs is knowing where to look—the rest is easy.
Go to the Google API Console. The link you want is the “Credentials” option under “API & Services” in the left-hand menu. On your first visit this may take you to a API Library list (don’t ask me why)—if so, just click back and re-click Credentials link.
Next click the “Create credentials” button, which will reveal a dropdown where you can choose “OAuth client ID”. This will bring you to a page where you can choose the application type. Since our demo app is a web application, choose that option.
Fill in the form. The name can be anything you like. “Authorized JavaScript origins” can be blank. Under “Authorized redirect URIs” we’ll need to add. Why don’t we need our web app’s URI? This is because Kinvey will handle everything for us.
You can see an example of my completed Google credentials settings below.
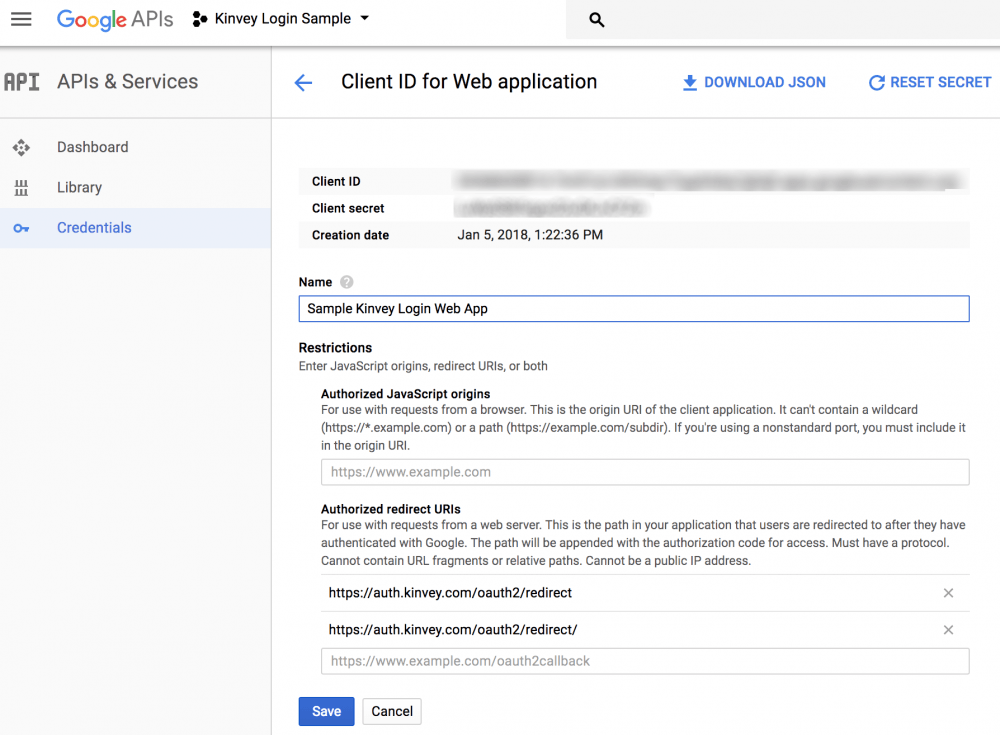
Once you are done, take note of the “Client ID” and “Client secret” (which I have intentionally blurred out) as we’ll need them in an moment.
Setting up MIC
Now that our Google credentials are all set up, let’s set up Mobile Identity Connect inside the Kinvey Console.
Start by clicking the “Mobile Identity Connect” option under the “Identity” submenu on the left-hand navigation. Next click the button that reads “Add Auth Service” and choose “OAuth2”.
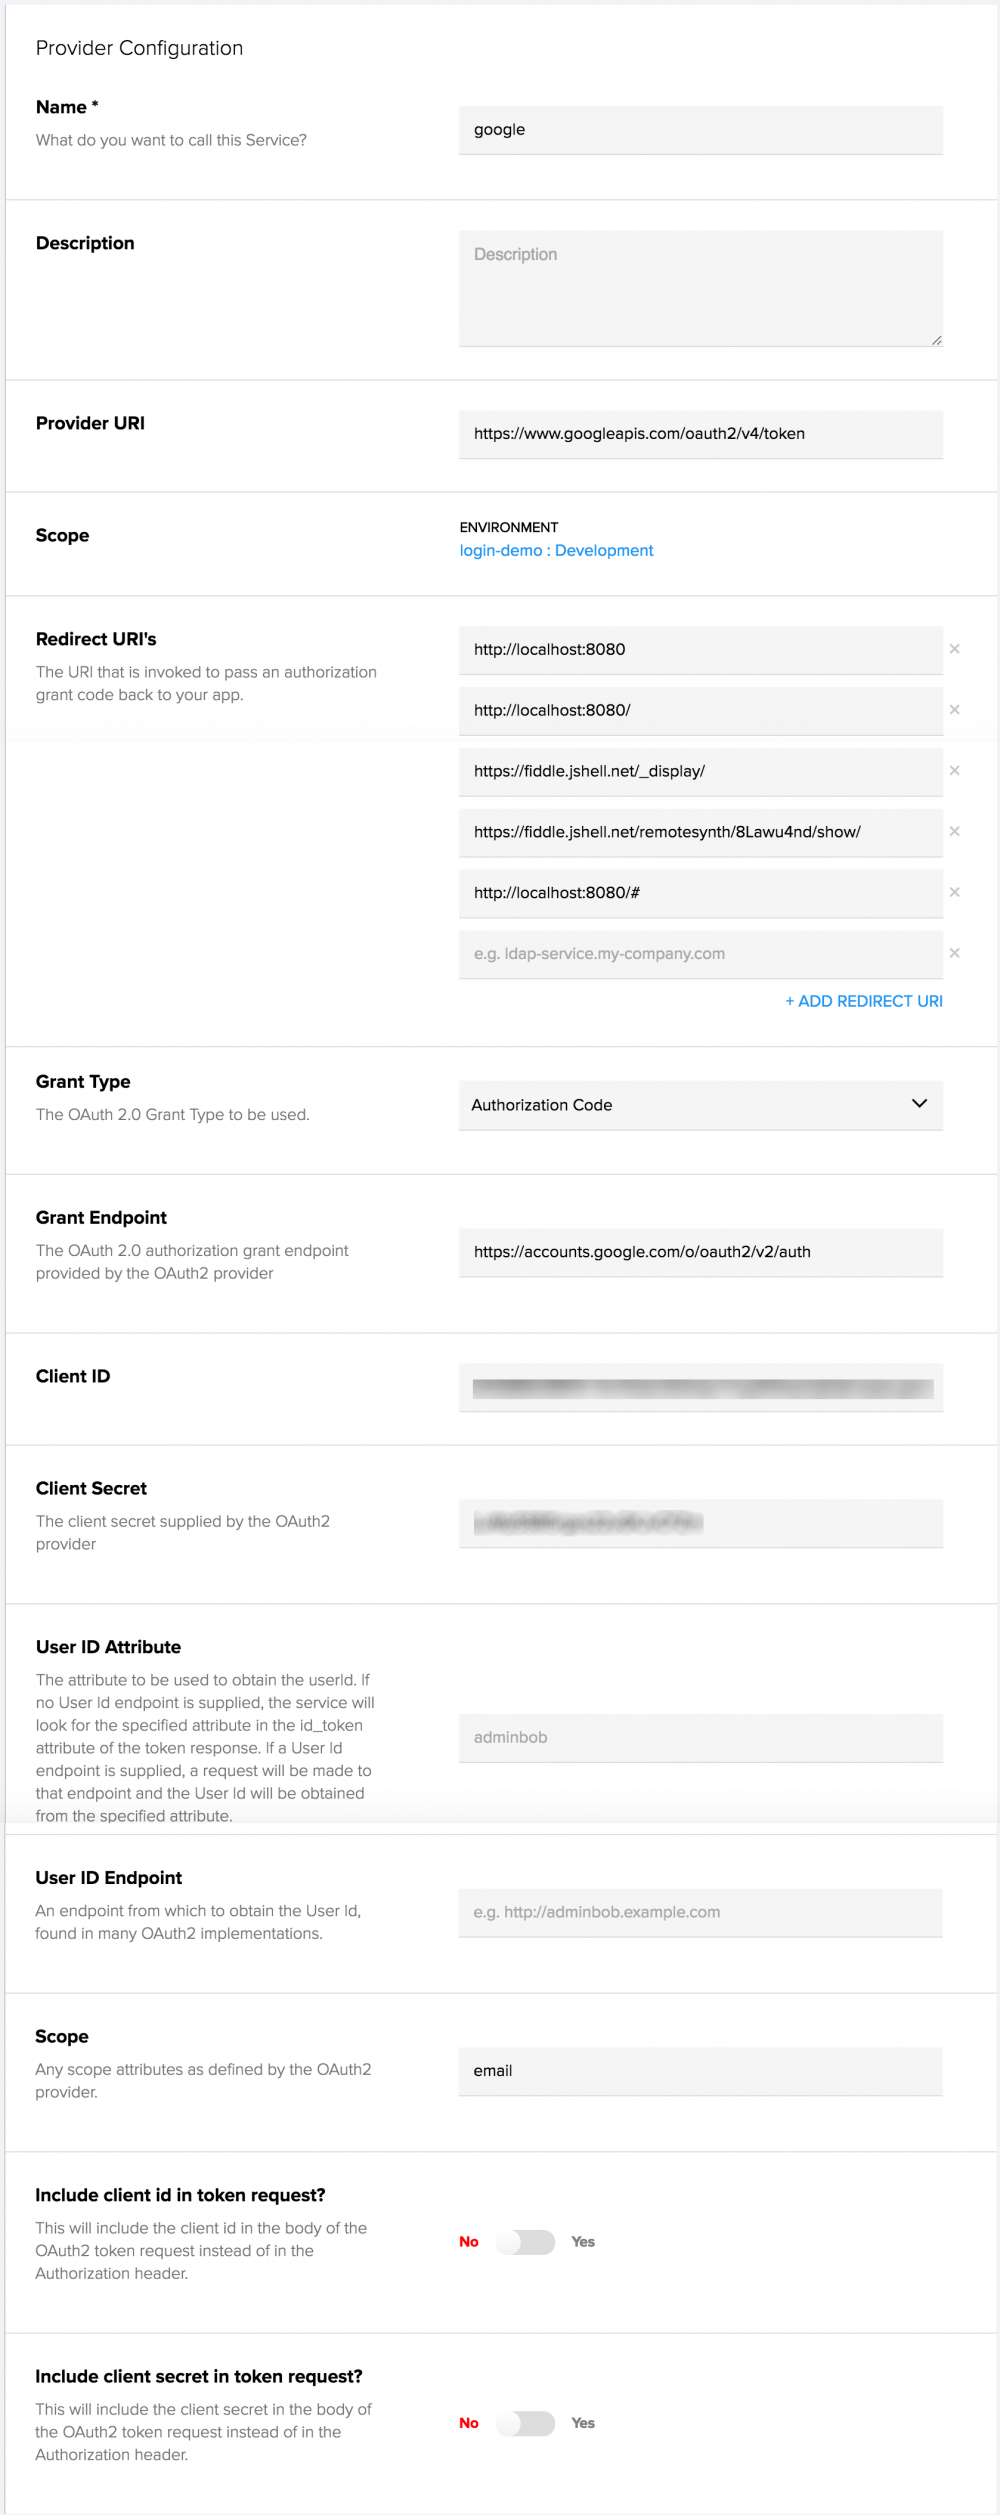
There are a lot of settings on this form, but let’s look at what is relevant to us.
- The name can be anything you like.
- The Provider URI should be https://www.googleapis.com/oauth2/v4/token (via the Google documentation).
- The Redirect URI’s should include the URL where the demo is running (so, as you can see below, I’ve added my localhost and JSFiddle URLs where I am running the demo). Note that slashes, hashes and other characters matter here.
- The “Grant Type” should be “Authorization Code”.
- The “Grant Endpoint” should be https://accounts.google.com/o/oauth2/v2/auth (again via the Google documentation).
- The “Client ID” and “Client Secret” should be the ones provided by Google above.
- The value of “Scope” should be “email”.
You can see my complete settings below:
Writing the Code
Now that we’re set up on Google and Kinvey, let’s look at the code that runs when you click the sign in with Google button on the demo.
// sign up or log in with Google authenticationdocument.getElementById('google-login').addEventListener('click', function(event) { var promise = Kinvey.User.loginWithMIC(window.location.href); promise.then(function onSuccess(user) { loginSuccess(); console.log(user); }).catch(function onError(error) { document.getElementById('error').innerHTML = error.message; });});Yup, there’s not a lot of code involved. Just call the Kinvey.User.loginWithMIC() method and pass the callback URL. In the demo code we’re just passing the current URL, which just means that we don’t need to change the code from localhost to JSFiddle. Once again, this code just posts the text of the error within the form, but a real-world application would need better error handling should the login fail.
Restricting Access with Roles
At this point, all of our demo app’s users can log in with Kinvey authentication or Google Sign-In or bypass the login as an anonymous user. Obviously all of our users have the default “All Users” permissions and, by default, collections give “All Users” have some degree read and write permissions. Below are the default collection permissions.

You can read more about the specifics what each of these access types mean, but, for all intents and purposes, by default All users have create and read capability. However, this can be restricted by roles and, obviously, the default All users permissions can be modified or removed.
Creating and Assigning Roles via the Console
Roles are easy to create from within the Kinvey Console. Simply click the “Roles” option under the “Identity” sub-navigation, create a new role and give it a name. For example, in our sample app, we have three roles:

You can assign users to roles via the Kinvey Console as well. Open your users collection, select a user and assign roles via the sidebar on the right.
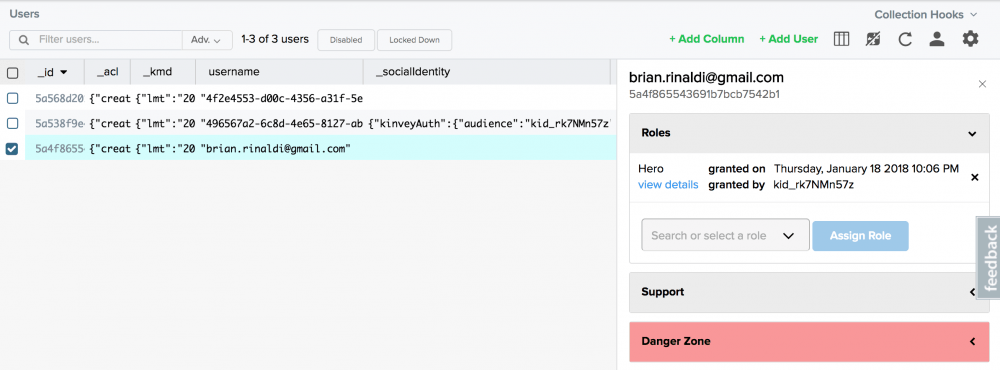
Granting Collection Permissions to Specific Roles
To set permissions for a collection, open the collection’s settings and choose “Permissions”. From here we can remove or change any existing permissions or add permissions for any roles we’ve created. For instance, the Heroes collection in our sample app should only give access to other people who are assigned the role of “Hero”. A “Villain” should obviously be denied access. (We wouldn’t want anyone figuring out the secret identities of our heroes would we?)
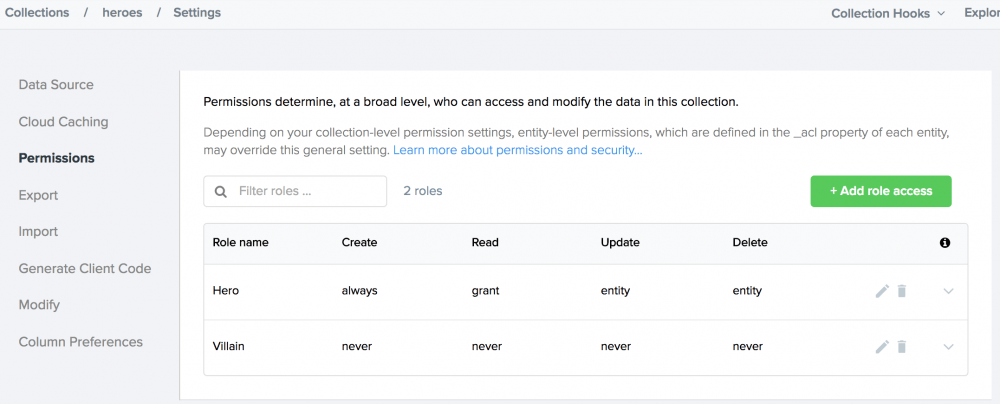
Technically, we could get away with not specifically denying the “Villain” role access here since we removed the “All users” permissions—thus any user not in a Hero role would be denied access.
Assigning Roles via Code
The next step is to allow our users to be assigned to either a hero or villain role (or neither if they choose to bypass the login). Let’s get to coding…
But first, there’s a bit of good news/bad news here.
- 😞 Assigning roles isn’t yet supported in the Kinvey SDKs.
- 😃 We can still assign roles using code via Kinvey’s REST API.
- 😞 Assigning roles via the REST API requires the using the master credentials, which we wouldn’t want to expose in client-side JavaScript code as it would be a security risk.
- 😃 Kinvey offers the option for business logic in custom endpoints that would negate the need for exposing the master credentials.
The net result is that we can definitely do what we want to do here—and it’s not even that difficult. We just have to do it slightly differently than we may have expected.
Creating the Custom Endpoints
Kinvey offers multiple options that allow us to customize requests to our backend—from things like collection hooks to Flex Services. Each of these solutions offer the ability to run server-side business logic, but in this case we’ll use custom endpoints that we can call via REST requests.
To do this, click the “Custom Endpoints” option under the “Business Logic” option on the left-hand menu in the Kinvey Console. Click the “Add an Endpoint” button, give it a name (the first one we’ll create is called “addRole”) and, finally, choose the “Code Editor” option before continuing.
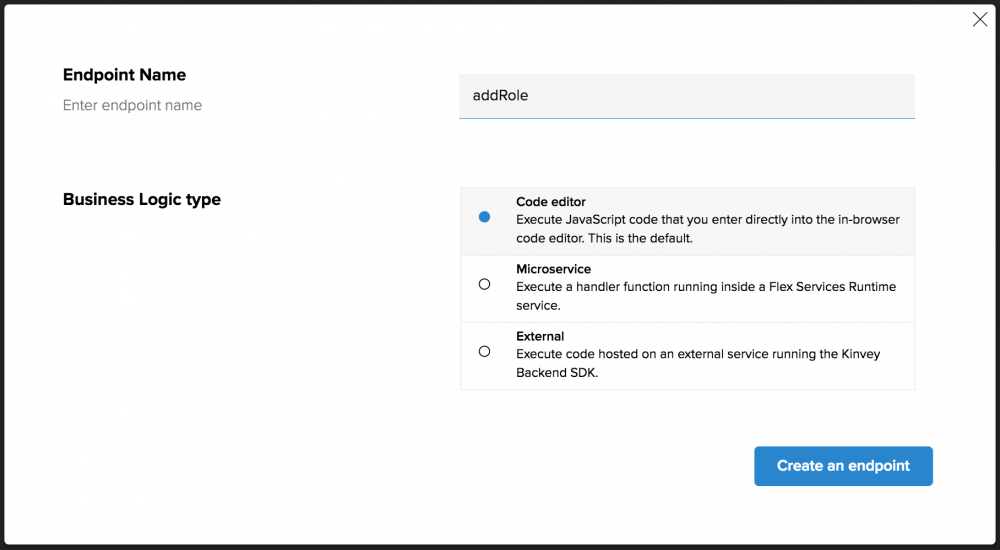
This will bring you into the web-based code editor. Here’s the code for our first custom endpoint—we’ll walk through it in a moment.
function onRequest(request, response, modules) { var context = modules.backendContext, utils = modules.utils, appKey = context.getAppKey(), masterSecret = context.getMasterSecret(), userid = request.body.userid, roleid = request.body.roleid, uri = 'https://baas.kinvey.com/user/' + context.getAppKey()+ '/' + userid + '/roles/' + roleid, authString = "Basic " + utils.base64.encode(appKey + ":" + masterSecret), requestOptions = { uri:uri, headers: { "Authorization":authString } }, auth; auth = modules.request.put(requestOptions,function(error, res, body){ if (error){ response.error(error); } else { response.body = JSON.parse(body); response.complete(res.status); } });}The first portion sets a ton of variables, so let’s look at the important ones to understand:
- The appKey and masterSecret variables use methods to get the master credentials that we didn’t want to expose within our client-side code. Because the custom endpoint runs within the context of the master credentials, we don’t need to hardcode it here.
- userid and roleid pull data that we’ll send along with the request. We’ll see how to send this data when we write the client-side code.
- The uri, authstring and requestOptions assemble the information needed to make the request to add a role—we’re still using the REST API here.
Finally, we use the request module to do a PUT request to the REST API to add a role.
The code for our next custom endpoint (deleteRole) to remove a role from a user is nearly identical to the prior code. Can you spot the difference?
function onRequest(request, response, modules) { var context = modules.backendContext, utils = modules.utils, appKey = context.getAppKey(), masterSecret = context.getMasterSecret(), userid = request.body.userid, roleid = request.body.roleid, uri = 'https://baas.kinvey.com/user/' + context.getAppKey()+ '/' + userid + '/roles/' + roleid, authString = "Basic " + utils.base64.encode(appKey + ":" + masterSecret), requestOptions = { uri:uri, headers: { "Authorization":authString } }, auth; auth = modules.request.del(requestOptions,function(error, res, body){ if (error){ response.error(error); } else { response.body = "{}"; response.complete(res.status); } });}The only real difference is that the request is a DELETE request to the REST API so it uses the modules.request.del() method. You may have noticed that the response body of the DELETE request is empty, so we’ve modified that as well.
Calling Our Custom Endpoints
Let’s look at how we call these custom endpoints in code.
// just in case, remove the other role first then pass the hero role id to assign the roledocument.getElementById('hero-button').addEventListener('click', function() { var userid = Kinvey.User.getActiveUser(client)._id, promise = Kinvey.CustomEndpoint.execute('deleteRole', { userid: userid, roleid: villainRoleId }) .then(function(response) { setRole(heroRoleId); }) .catch(function(error) { console.log(error); });});When we click the “I’m a hero” button, we’ll first call the deleteRole endpoint to remove the villain role from the user, if it exists. We invoke the custom endpoint with Kinvey.CustomEndpoint.execute(). We specify the name of the endpoint that we are calling (i.e. deleteRole) and then specify the body (this is where the request.body variables we populate within the custom endpoint code come from). The code for the “I’m a villain” button is basically the same, simply passing different values to add and remove.
Note that instead of hardcoding the role IDs, in a real-world app we might get a list of roles to populate the options. This would also require the help of a custom endpoint as it requires the master credentials as well.
The setRole() method that we call in the above code calls our other custom endpoint (i.e. addRole).
// set the user role via the REST API (not available in SDK at the moment)function setRole(roleid) { var userid = Kinvey.User.getActiveUser(client)._id, promise = Kinvey.CustomEndpoint.execute('addRole', { userid: userid, roleid: roleid }) .then(function(response) { console.log(response); document.getElementById('rolechooser').classList.add('fadeout'); loadData(); }) .catch(function(error) { console.log(error); });}Now that our users can choose a hero or villain role (or choose to remain in the all users role by bypassing the login), we’ll see that when trying to access a collection that they do not have rights to (ex. a villain accessing the heroes collection) causes the request to return an InsufficientCredentialsError denying them access.
Next Steps
Obviously our demo app is intentionally contrived, but hopefully it illustrated some of the core concepts around users within Kinvey. If we wanted to expand upon the authentication, we could add support for logging in via Facebook, LinkedIn or Twitter using Mobile Identity Connect and following a very similar course as we did for Google Log-In. We could also enable people to connect the login to our enterprise authentication using LDAP or Active Directory. The tools are all available to you within Kinvey.
To access the full code for this sample visit the project on GitHub or on JSFiddle.


