Sitefinity 4.0: Automate Translations with Custom Workflows and Google Translate

The content you're reading is getting on in years.
This post is on the older side and its content may be out of date.
Be sure to visit our blogs homepage for our latest news, updates and information.
Recently one of our customers asked us for a solution to automatically translate news, blog posts and other content-based items in Sitefinity using Google Translate.
The main idea behind the solution depicted in this article is to automatically create and populate missing language versions using Google Translate once a content-based item is saved as a draft. The content editors can thereafter review and improve the newly generated translations.
Custom workflows provide the means to modify and extend the processes behind the lifecycle of content-based items (as well as pages, media items, etc.) with user-specific logic, which perfectly suits this task.
NOTE:
- The following sample demonstrates the implementation of user-specific scenarios using custom workflows in Sitefinity 4.0 – a Professional or Enterprise license is required to use this sample.
- Workflow (.xamlx) files are updated frequently; make sure to keep your modified custom workflow file up-to-date.
- You will need the Telerik.Samples.GoogleTranslateWorkflow project files which you can find here.
- You can get the latest default workflow files from your client account.
The following section offers step-by-step instructions on how to extend the workflow file; if you want to skip it you can use the CompleteGoogleTranslateWorkflow.xamlx file from the archive instead.
Create the .xaml workflow file
- Copy the unmodified AnyContentApprovalWorkflow.xamlx workflow file to the Workflows directory inside your Sitefinity project folder.
- Open the Sitefinity project file in Visual Studio.
- Add a reference to the Telerik.Samples.GoogleTranslateWorkflow project.
- Build the solution.
- Open the AnyContentApprovalWorkflow.xamlx file inside Visual Studio and locate the ContentApproval Flowchart.
- Double click the ContentApproval Flowchart and locate the ClearScheduledOperationsActivity.
- Create a new Flowchart and name it “Google Translate Flowchart”.
- Set the “Google Translate Flowchart” as the last step by dragging an arrow from ClearScheduledOperationsActivity and dropping it on the newly created Flowchart.
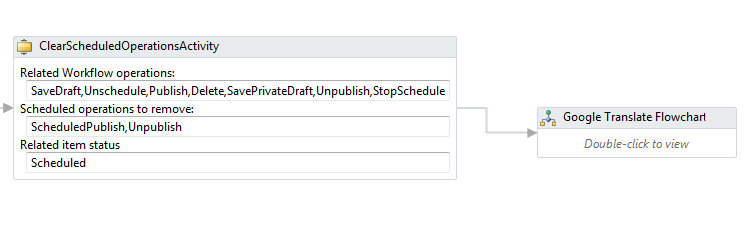
- Double click the “Google Translate Flowchart”.
- Open the Variables tab and create a new variable by clicking the bottom table row.
- Name the variable translateItem and set its type to IAnyTempDraftFacade
- Inside the Default field paste: App.Prepare().SetContentProvider(providerName).WorkWith().AnyContentItem(contextBag("ContentType"), itemId).GetTemp()
- To create custom translations when the item is saved as a draft add a FlowDecision element from the toolbox.
- Set operationName.Equals("SaveDraft") as the condition.
- Add a ForEach element to the Flowchart.
- Set it as the step which is executed if the FlowDecision returns true by dragging an arrow from the FlowDecision element.
- Set System.Globalization.CultureInfo as the TypeArgument
- Set New Telerik.Sitefinity.Abstractions.AppSettings().DefinedFrontendLanguages as Values.
- Double click the newly added ForEach element.
- Add the GoogleTranslateActivity from the toolbox.
NOTE: If you cannot find the GoogleTranslateActivity in your toolbox make sure that you executed steps 3&4. - Select the GoogleTranslateActivity element and set the following parameters
- OnbehalfOfIp as: contextBag("userHostAddress")
- TranslateTo as: item
- WorkflowItem as: translateItem.GetAs(Of IWorkflowItem)()

- In the breadcrumb on top click “Google Translate Flowchart” to get back to the “Google Translate Flowchart”.
- From the toolbox add an ExecuteCodeActivity and set its CodeExecutionResult property to translateItem.SaveChanges()
- Save the workflow file.
- Build the solution.
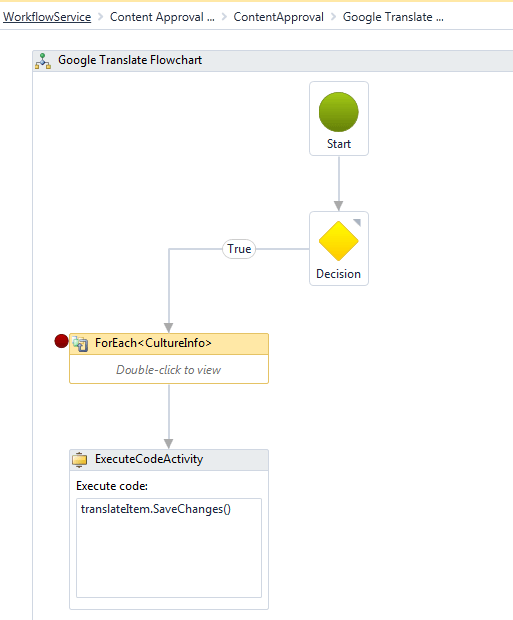
The Google Translate Flowchart in its complete state.
Register the workflow
The only thing left to do is to register the custom workflow:
In the backend, go to Administration > Settings > Advanced > Workflows.
The Settings view lists workflow associations by model type.

Change the workflow ServiceUrl to point at the GoogleTranslateAnyContentApproval.xamlx workflow, for each model you want to apply automatic translation to.
Final comments
The whole procedure described above could have been implemented entirely inside the GoogleTranslateActivity. However, having only the actual translation logic encapsulated as an activity allows it to be reused in completely different scenarios.
This is where the power of Sitefinity’s workflows comes into play, which allows you to model your own unique business processes using convenient enterprise-grade WF4 technology.
