Customizing Sitefinity 4 Controls with the ViewMap

The content you're reading is getting on in years.
This post is on the older side and its content may be out of date.
Be sure to visit our blogs homepage for our latest news, updates and information.
Earlier this week, you learned how to use the Advanced Settings in Sitefinity 4 to customize the toolbar configuration for Sitefinity’s RichText editor (RadEditor). This is an extremely useful technique for making site-wide toolbar changes to Sitefinity’s RadEditor.
Some scenarios, however, require additional customizations to the RadEditor or other Sitefinity controls. For these situations, it’s necessary to customize these controls by mapping them to your own custom template files and configurations.
Today I’ll show you how you can use the Sitefinity ViewMap configuration that is made for this very purpose.
ViewMap
The ViewMap is used to specify a global mapping for a specific control type to a custom template. By creating entries in this section, you can map all instances of that control to a specific external template.
Let’s see how we can create a mapping to the RadEditor so that we only show a single toolbar with our own custom items (instead of toggling between Basic and Advanced).
HtmlField Template
Because the RadEditor is wrapped in an HtmlField, it is this type that we need to map. Before we do that, however, we need a copy of the template to which the mapping will point.
The widget templates for all editable front and backend controls are available in the Sitefinity SDK. Because templates can change from Sitefinity version to version, I recommend you always grab your templates from the SDK.
After installing the SDK the templates will be in the WidgetTemplates.zip file located at the path C:\Program Files (x86)\Telerik\Sitefinity [version]\SDK\Content\Resources. Extract that file and locate the HtmlField.ascx template in the Fields folder.
ToolsFile
The toolbar in RadEditor is driven by an xml ToolsFile. By default, an embedded, internal file is used in the HtmlField. Create your own file or download this example ToolsFile.xml file and save it in your site.
For more information on editing this file with available toolbox controls, see this documentation: Using the ToolsFile.xml.
Now open the template file from above and modify the RadEditor properties, setting the ToolsFile property to point to the path of your custom file.
<telerik:RadEditor ID="editControl" runat="server" Skin="Sitefinity" Width="100%" Height="550px" EnableResize="False" EditModes="Design, HTML" DialogHandlerUrl="~/Telerik.Web.UI.DialogHandler.axd" Content="" NewLineBr="False" StripFormattingOptions="Css,Font,Span" OnClientPasteHtml="OnClientPasteHtml" OnClientCommandExecuting="OnClientCommandExecuting" ToolsFile="~/Templates/Admin/BasicTools.xml"> <FlashManager ViewPaths="~/Files" UploadPaths="~/Files" DeletePaths="~/Files" /> </telerik:RadEditor>
Important Note: The HtmlField uses JavaScript to toggle between Basic and Advanced modes. To use a custom ToolsFile, you need to disable this functionality by removing the OnClientLoad property from the RadEditor in the template.
OnClientLoad="Telerik$Sitefinity$Web$UI$Fields$HtmlField$radEditorToggleAdvancedToolbars"
ViewMap
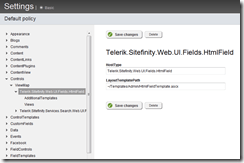
Go to your site’s Administration > Settings > Advanced page and open the Controls > ViewMap node. Create a new entry and for the HostType, enter Telerik.Sitefinity.Web.UI.Fields.HtmlField. Then enter the path to your custom template file in the LayoutTemplatePath property.
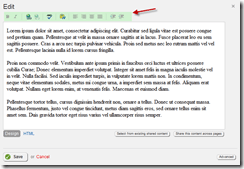
Now restart your website application and open up a content block for editing. You’ll now see your custom toolbar with all of the tools you specified.
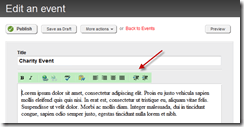
In addition, because the ViewMap is a global configuration, ALL instances of the HtmlField are now mapped, including the editors for built in and custom modules.
What’s Next
Because you have access to the RadEditor element, you can perform all kinds of customizations beyond the toolbar, including content filters, or disabling the Design view and only allowing the HTML view.
The ViewMap is a powerful configuration point, allowing you to map and customize many controls, not just RadEditor, from one location. I’ll explore such examples in a future topic.


