WebLogic 8.1 Tutorial
Introduction
This document explains the steps required to use the DataDirect Connect® for JDBC® drivers with the WebLogic Application Server1. These steps include:
- Install DataDirect Connect for JDBC.
- Create a connection pool using the WebLogic Server Administration Console
- Create a data source using the Administration Console.
- Generate the JSP test page. A sample JSP test page is provided in the WebLogicTest.war file, which is available with this document.
- Deploy the WebLogic web application to the WebLogic server.
- Run the WebLogic web application.
Detailed information about each of these steps is included in the following sections.
Create a Connection Pool
To create a connection pool for either local transactions or XA transactions:
- Ensure that WebLogic Server is running by executing the startup script you modified in section "1. Install DataDirect Connect® for JDBC." Open the WebLogic Server Administration Console by specifying the URL http://localhost:7001/console in a Web browser.3 Enter the administrator user name and password, and click Sign In.
- In the left pane of the WebLogic Server Console window, select mydomain4 | Services | JDBC | Connection Pools. The right pane provides an option to configure a new JDBC connection pool as shown in the following example.
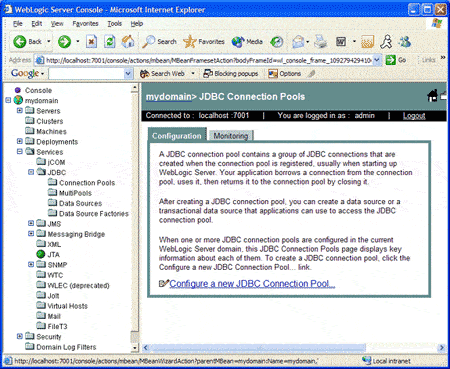
- In the right pane, click the Configure a new JDBC Connection Pool link. The Configure a JDBC Connection Pool window appears in the right pane.
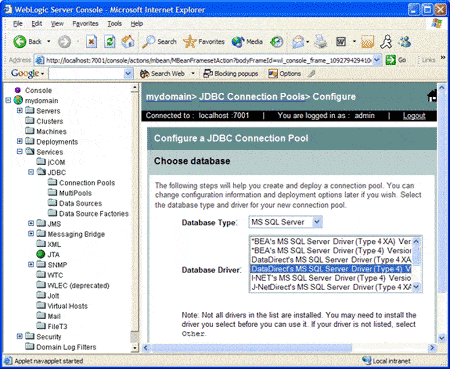
- In the Database Type drop-down box, select the Database Type. (Microsoft SQL Server is used in the following example.) A list of drivers is displayed in the Database Driver list box. In this list, select the appropriate SQL Server driver. If you are creating:
- A connection pool for local transactions, select the "DataDirect's MS SQL Server Driver (Type 4)" entry
- A connection pool for XA transactions, select the "DataDirect's MS SQL Server Driver (Type 4 XA)v entry
- Click Continue. The Define connection properties window appears in the right pane. Enter the following information in this window:
Name: The name of the JDBC connection pool.
Database Name: The name of the database to which to connect.
Host Name: The name or IP address of the database server.
Port: The number of the port on the database server used to connect to the database.
Database User Name: The database account user name used in the physical database connection.
Password: The database account password used in the physical database connection.
Confirm Password: Re-enter the password.

-
Click Continue. The Test Database Connection window appears in the right pane as shown in the following example.
Confirm the connection pool information. The Properties field lists the connection properties that will be used to establish the connection. You may add additional connection properties in this field. Refer to the DataDirect Connect for JDBC User's Guide and Reference for a list of properties that may be specified for the SQL Server driver.

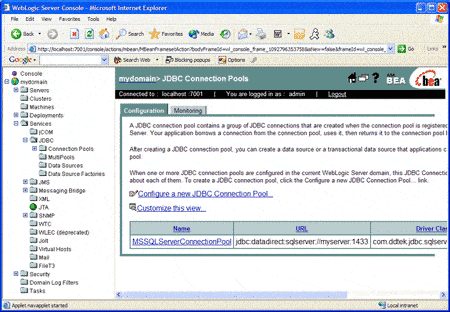
- Click Test Driver Configuration. Once the connection is verified, click CREATE AND DEPLOY. The new connection pool is added to the list of connection pools as shown in the following example.
Install DataDirect Connect for JDBC
- Install DataDirect Connect for JDBC using the instructions in the DataDirect Connect for JDBC Installation Guide.
- Copy the DataDirect Connect for JDBC jar files (util.jar, base.jar, db2.jar, informix.jar, oracle.jar, sqlserver.jar, and sybase.jar) from:
install_dir/lib
to:
BEA_HOME\weblogic81\server\lib2
where install_dir is your DataDirect Connect for JDBC installation directory and BEA_HOME is your BEA WebLogic Server installation directory.
If you plan to use DataDirect Spy, you also must copy spy.jar from the install_dir\spy subdirectory of your DataDirect Connect for JDBC installation directory to:
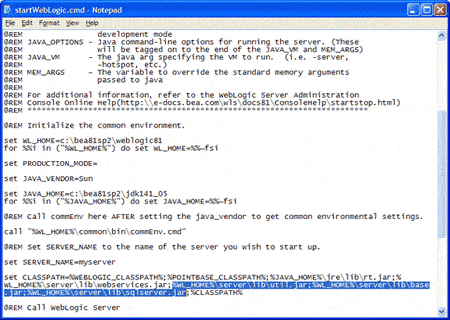
BEA_HOME\weblogic81\server\lib. - Add the DataDirect Connect for JDBC jar files to WebLogic Server's classpath. Open the WebLogic Server startup script named startWebLogic.cmd (on Windows) or startWebLogic.sh (on UNIX) in a text editor, and modify the CLASSPATH to add the path to the jar files for each DataDirect Connect for JDBC driver you installed. This script is located in the BEA_HOME\user_projects\domains\DOMAIN_NAME subdirectory (whereBEA_HOME is your WebLogic Server installation directory and DOMAIN_NAME is the name of the WebLogic domain for which the drivers are being configured). For example, to set the CLASSPATH for the default installation on Windows, you would modify the startWebLogic.cmd script in theBEA_HOME\user_projects\domains\mydomain subdirectory as shown in the following example.
NOTE: The examples shown in the remainder of this document use the default domain name of mydomain.
Create a Data Source
You must create a data source to use with the DataDirect Connect for JDBC drivers. An application does not use a connection pool directly to obtain a connection to a database. Instead, an application uses a JDBC data source to obtain a connection from a connection pool.
Creating a Data Source
To create a data source that points to an existing connection pool, complete the following steps:
- Ensure that WebLogic Server is running by executing the startup script you modified in section "1. Install DataDirect Connect® for JDBC." Open the WebLogic Server Console by specifying the URL http://localhost:7001/console in a Web browser.5 Enter the administrator user name and password, and click Sign In.
- In the left pane of the WebLogic Server Console window, select mydomain6 | Services | JDBC | Data Sources. The right pane displays an option that allows you to configure a new JDBC data source as shown in the following example.
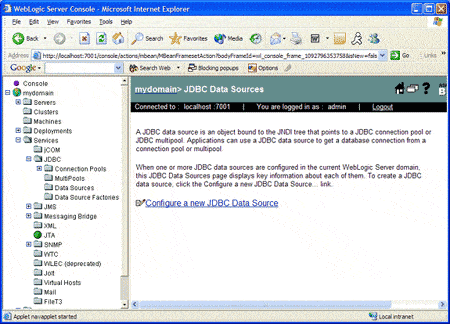
- In the right pane, click the Configure a new JDBC Data Source link. The Configure a JDBC Data Source window appears in the right pane.
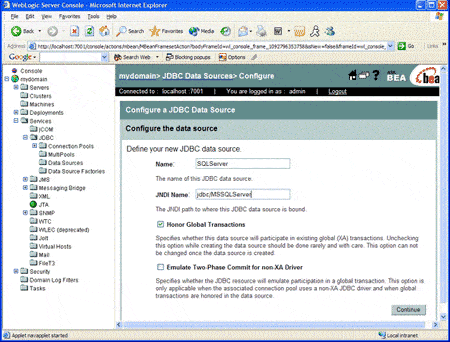
- In the Name field, enter the name of the data source. In the JNDI Name field, enter the Java Naming Directory Interface (JNDI) name to which the JDBC data source will be bound as shown in the following example. The JNDI name is used by an application to retrieve an instance of the data source from the JNDI.
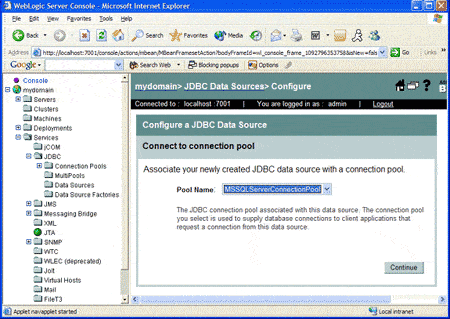
- Click Continue. The Connect to connection pool window appears. In the Pool Name drop-down box, select the connection pool with which to associate your new data source. For example, to create the following example, you would select the MSSQLServerConnectionPool connection pool that was created in section "2. Create a Connection Pool."
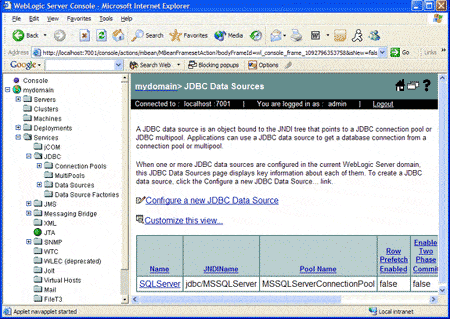
- Click Continue. The Target the data source window appears. Select the server and clusters where the data source will be deployed. Click Create. The new data source is added to the list of data sources as shown in the following example.
Generate a JSP Test Page
An application can obtain connections from a Connection Pool by performing a JNDI lookup for the data source associated with the connection pool. The application uses the JNDI name specified for the data source when it was created to perform the lookup.
A sample JSP test page named WebLogicTest.jsp is contained in the WebLogicTest.war file, which is available with this document. The WebLogicTest.jsp page, contained in the WebLogicTest.war file, includes the following code to look up the data source and obtain a connection to the database from the data source.
InitialContext ctxt = new InitialContext ();DataSource ds =(DataSource)ctxt.lookup("("jdbc/MSSQLServer");con = ds.getConnection ();
Deploy the WebLogic Web Application to the WebLogic Server
To deploy the WebLogicTest web application, complete the following steps:
- Save the WebLogicTest.war file provided with this document to a local directory.
- Ensure that WebLogic Server is running by executing the startup script you modified in section "1. Install DataDirect Connect® for JDBC." Open the WebLogic Server Administration Console by specifying the URL http://localhost:7001/console7 in a web browser. Specify the administrator user name and password, and click Sign In.
- In the WebLogic Server Console window, select mydomain8 | Deployments | Web Application Modules. The right pane displays an option that allows you to deploy a new web application as shown in the following example.
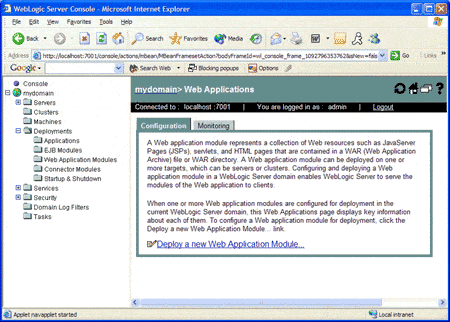
- In the right pane, click the Deploy a New Web Application Module link. The Deploy a Web Application Module window appears in the right pane.
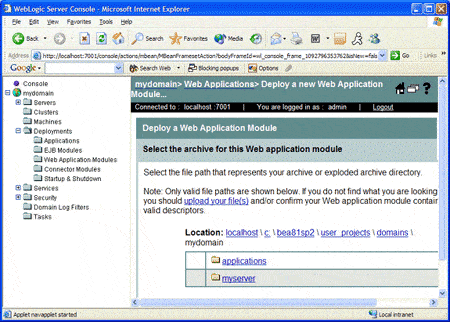
- Click the upload your file(s) link. The Install or Update Application window appears in the right pane. Click Browse, and navigate to the local directory that contains the WebLogicTest.war file. Select the WebLogicTest.war file, and click Upload.
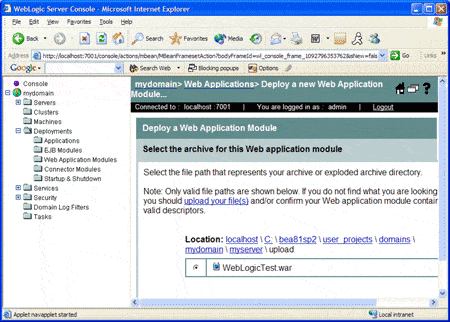
- Click the myserver link. Then, click the upload link, and select the WebLogicTest.war item as shown in the following example.
- Click Target Module. The Review your choices and deploy window appears in the right pane. Click Deploy. The WebLogicTest web application is added to the list of deployed web applications as shown in the following example.

Run the WebLogic Web Application
- Ensure WebLogic Server is running by executing the startup script you modified in section "1. Install DataDirect Connect® for JDBC."
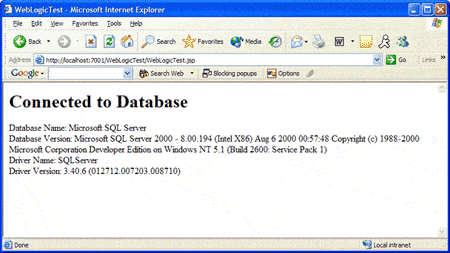
- Enter the URL http://localhost:7001/WebLogicTest/WebLogicTest.jsp9 in your Web browser to display the WebLogicTest page.
- If the DataDirect Connect for JDBC driver has been installed and configured correctly, the contents of the page display the version information of the driver and the database server to which it connects. For example, the following figure shows version information for the DataDirect Connect for JDBC SQL Server driver connecting to a database server running Microsoft SQL Server 2000.
1 The steps in this document were generated using WebLogic version 8.1. These steps may vary for other versions of WebLogic.
2 The directory examples shown in this document are on Windows.
3 If the server is not running on the local machine, substitute localhost:7001 with the actual hostname and port of the WebLogic Server.
4 mydomain is the default name assigned to a new domain. If a name other than the default was specified when creating the domain, replace mydomain with the actual name of the domain.
5 If the server is not running on the local machine, substitute localhost:7001 with the actual hostname and port of the WebLogic Server.
6 mydomain is the default name given to a new domain. If a name other than the default was specified when creating the domain, replace mydomain with the actual name of the domain.
7 Substitute localhost:7001 with the actual hostname and port of the WebLogic Server if the server is not running on the local machine.
8 mydomain is the default name given to a new domain. If a name other than the default was specified when creating the domain, replace mydomain with the actual name of the domain.
9 If the server is not running on the local machine, substitute localhost:7001 with the actual hostname and port of the WebLogic Server.