Sitefinity Ecommerce Donation Widget

The content you're reading is getting on in years.
This post is on the older side and its content may be out of date.
Be sure to visit our blogs homepage for our latest news, updates and information.
I thought it would be exciting to demonstrate how you can use the Sitefinity Ecommerce API to create a custom donation widget for accepting online donations. Donations are usually difficult for many ecommerce systems. Below I have listed a few reasons ecommerce applications struggle with online donations.
- The donation amount is usually constrained to a specific dollar amount, meaning you can only have donations like $5, $10, $15 dollars shown in a drop-down.
- Donations are usually separate products or options for a product priced at $0.
- Some ecommerce systems do not allow you to have a $0 price for your product and instead show you a popup a window stating “Price must be greater than $0”.
- Even the popular PayPal Donation button is limited to use a fixed donation amount, OR the visitor can enter their own donation amount; but not both.
These are just a few problems you can experience in typical ecommerce systems and applications, all of which are not ideal if you want to maximize your donation potential.
In this post, I have included the source code for this project along with a video demonstrating how to add this project into a Sitefinity 5.x solution. The video also demonstrates how to add the donation widget into Sitefinity along with making a sample donation and checking out. I am using the Sitefinity 5.0 Starter Kit called “Corporate Starter” as this starter kit has Sitefinity Ecommerce enabled. Because we are using the Sitefinity Ecommerce API, you will need the Sitefinity Ecommerce Add-On enabled in Sitefinity. To see if your web site has the Ecommerce add-on enabled, login to the Sitefinity backend and look at the top main navigation for a button labeled “Ecommerce”. If you see this button/selection, you have the Sitefinity Ecommerce Add-on enabled. If you do not see the button labeled “Ecommerce” in the main navigation, you will need to purchase this Sitefinity Add-on in order to use this donation widget.

Below are the steps for adding the donation widget to your solution.
- Unzip the donation project into a new folder
- Open your Sitefinity solution file in Visual Studio
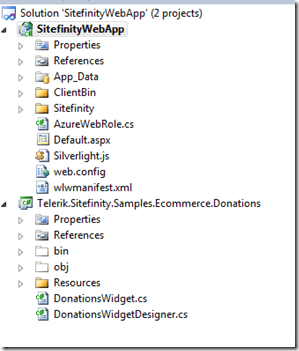
- Add an existing project to your solution and select the project file named “Telerik.Sitefinity.Samples.Ecommerce.Donations.csproj” located in the folder you created in step 1
- Right click on SitefinityWebApp and select “Add Reference”, which will add a reference to the new donation project.

- Copy the file donation.css from the root of the project, into the following folder:
SitefinityWebApp > App_Data > Sitefinity > WebsiteTemplates > Quantum > App_Themes > Quantum > Global - Run your Sitefinity project and login to the Sitefinity dashboard (backend)
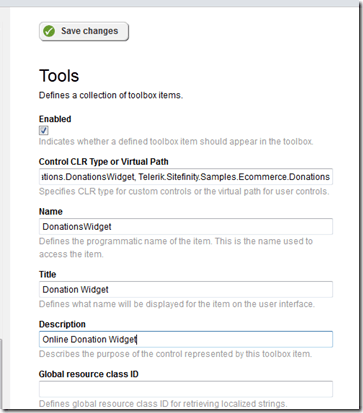
- Go to the following: Administration > Settings > Advanced Settings > Toolboxes > Toolboxes > PageControls > Sections > Ecommerce > Tools. This is where you will add-in the donation widget into Sitefinity so that is show up as a available widget to drag and drop onto a page.
- Create a new toolbox and use the following information below
- Control CLR Type or Virtual Path = Telerik.Sitefinity.Samples.Ecommerce.Donations.DonationsWidget, Telerik.Sitefinity.Samples.Ecommerce.Donations
- Name = DonationsWidget
- Title = Donation Widget
- Description = Online donation widget

- Click the save button at the bottom. You have now added the donation widget into Sitefinity. The donation widget can now be dragged and dropped onto a page.
- Click on Ecommerce and follow the steps below
- Click on Types of products
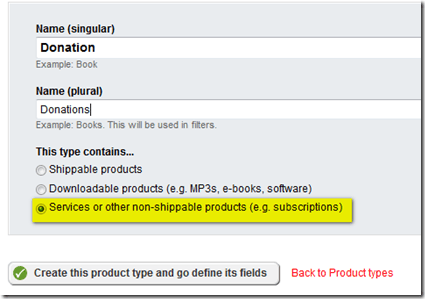
- Add a new product and following using the new product type of “Donation”, and follow the steps below
- Call the name of the product Donation
- Add some text in the description
- Keep the price at $0 and click save.
- Set the sku number to Online Donation
- Create a new page called Donate
- On the new page, drag and drop the Donation Widget, found in the Ecommerce section of the widgets.
- Edit the properties of donation widget and search for a product called donation.
- Select the donation product and click save. This is how the donation widget is linked to a product.
- Publish the page and test your donation widget. Select an amount shown in the drop-down, or select “other” and enter a user specific amount, like 1.99.
- Click add to cart.
- Done
Click HERE to download the source code for the sample donation widget.
NOTE: this functionality was disconnected in Sitefinity 6.3 because of the multiple prices changes made in this version.


