Sitefinity Ecommerce - Add a checkbox to confirm terms and conditions upon checkout

The content you're reading is getting on in years.
This post is on the older side and its content may be out of date.
Be sure to visit our blogs homepage for our latest news, updates and information.
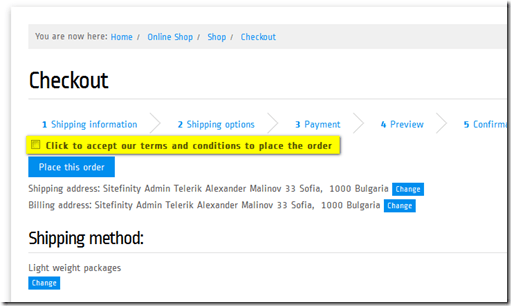
In Sitefinity, modifying a template for a widget is extremely easy. In this example, I will show you how to add a simple checkbox to the “Checkout” page, whereby the customer must click on agreeing to the terms and conditions before they can confirm the purchase.
How it works
By modifying the template for the checkout widget, we are adding a checkbox at the top of the page which disables the “Place This Order” button until the check box has been checked. The template includes inline JavaScript to enable/disable the “Place This Order” button.
Getting Started
To add this functionality, you need to modify the template used for the Sitefinity “checkout widget”. There are several ways to modify the template of a widget. The first way is to log into the Sitefinity backend and select “Design” in the main navigation menu then select “Widget Templates”. This is the most common way of editing a widgets template, however when using this method you CANNOT have any JavaScript in your template as JavaScript is parsed out of any widget template. You could add the “JavaScript Widget” to the checkout page and add the JavaScript from this template to the JavaScript widget. However, this is not ideal nor best practices when a template for a widget requires JavaScript.
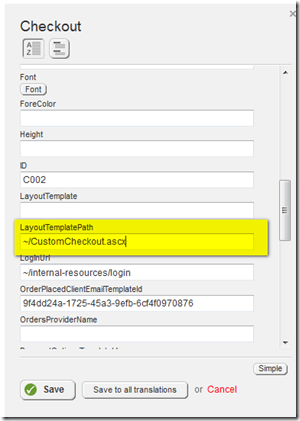
The second way of adding a template (which I find easier than adding a JavaScript Widget to a page) is actually editing the properties of a widget and entering the location of the template. In the example below, I am editing the checkout widget, selecting the “Advanced” properties button and adding in the custom path to the value LayoutTemplatePath. The value I am adding is ~/CustomCheckout.ascx which is where the template with the inline JavaScript is located; in the root of my web site.
As you can see in the code below, I am using the template for the checkout widget and modifying it by adding in a few lines of code for the checkbox as well as some JavaScript which disables the “Place This Order” button until the checkbox has been checked. You can also add your own JavaScript to enable a pop-up window stating “You must agree to the Terms and Conditions before purchasing”, and you may want to link the words “terms and conditions” to the actual content page. You may also want to gray out the “Place This Order” button until the checkbox has been checked. I will leave this for you to decide how to style this functionality.
Checkout Widget Template
Click HERE to download a Gist of the Checkout Widget Template with the checkbox and JavaScript.
Hopefully this example has helped you to understand how to add simple functionality to Sitefinity widget templates.
Note that this widget template may be outdated. Please take the template included in the Sitefinity version that you use and just add to it the chkAcceptTermsAndConditions checkbox and the JavaScript included at the bottom of the template.


