Developing JavaScript Widgets for Sitefinity CMS: Building the Web API

The content you're reading is getting on in years.
This post is on the older side and its content may be out of date.
Be sure to visit our blogs homepage for our latest news, updates and information.
The first post in this series that will eventually lead to developing a full set of Javascript widgets for your Sitefinity CMS users involves developing the web services we will utilize in the app. We need to develop our own web service to wrap the API because Sitefinity requires authentication for all calls made to its native services. For this example we will use Web API. If you are not familiar with web API then you can learn more about it here. If you are familiar with web API there are still some unique steps that you must take in order for it to work properly in your Sitefinity website.
Setting up web API in Sitefinity
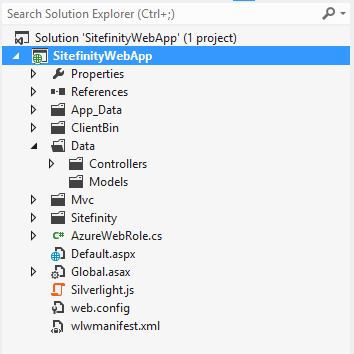
The first step to setting up web api in Sitefinity is to create your controllers. For this example let’s create a folder under the root of our Sitefinity website called “Data”. Under “Data” let’s create two more folders called “Controllers” and “Models”. You should end up with something like this:

From there let’s right click the “Controllers” folder and select Add > Class. We will name our new class TestController.cs. Open TestController.cs and inherit from ApiController which is a part of the System.Web.Http namespace.
Note: Including "Controller" in the class name is important!
With the class all set up we can add our test method. We will use this test method to just return a string to our web API calls. Let’s call this public string method GetTestText and have it return a simple string “Test succeeded”. It should look something like this now:
using System;using System.Collections.Generic;using System.Linq;using System.Web;using System.Web.Http;namespace SitefinityWebApp.Data.Controllers{ public class TestController : ApiController { public string GetTestText() { return "Test succeeded"; } }}
Now we have our controller but our project has no idea how to get to it. We need to register our routes. This is where it gets a little bit different, although fundamentally similar, to your standard implementation of WebAPI in, for example, an MVC project. In order to properly map our routes we need to create a global.asax file. To do this open up your Solution Explorer and right click your project. Navigate to Add > New Item. From the list find Global application class. Some of you may already have this class if you’ve utilized other features of Sitefinity such as hooking up to our events system. If you do, you will not need to create a new one and we can use the existing file.
Once you have the global.asax file created open it. You will notice it has a few default methods already laid out in there for you. The one we will be focusing on is the Application_Start method. Inside the application start method we need to initialize the bootstrapper. Again, if you’ve already done this for another reason we can use the existing file and methods. In the end it should look like this:
protected void Application_Start(object sender, EventArgs e){ Bootstrapper.Initialized += new EventHandler<ExecutedEventArgs>(Bootstrapper_Initialized);}
We then need to implement the Bootstrapper_Initialized method. In this method we check if the command passed is “Bootstrapped” so we can follow through with registering our routes. Your bootstrapper_initialized should look like this:
protected void Bootstrapper_Initialized(object sender, ExecutedEventArgs e){ if (e.CommandName == "Bootstrapped") { RegisterRoutes(RouteTable.Routes); }}
We now need to implement the RegisterRoutes method. This method is where we will actually register our web API routes. To those of you familiar with web API, the differences pretty much stop right here and you can register your routes in a similar fashion to outside of Sitefinity. Let’s make sure the RegisterRoutes method looks like this to start. We will be navigating back to this method quite a few times over this series to update it for our future controllers. Your global.asax should look like this when completed:
using System.Web.Security;using System.Web.SessionState;using Telerik.Sitefinity.Abstractions;using Telerik.Sitefinity.Data;namespace SitefinityWebApp{ public class Global : System.Web.HttpApplication { protected void Application_Start(object sender, EventArgs e) { Bootstrapper.Initialized += new EventHandler<ExecutedEventArgs>(Bootstrapper_Initialized); } protected void Bootstrapper_Initialized(object sender, ExecutedEventArgs e) { if (e.CommandName == "Bootstrapped") { RegisterRoutes(RouteTable.Routes); } } public static void RegisterRoutes(RouteCollection routes) { GlobalConfiguration.Configuration.Formatters.JsonFormatter.SerializerSettings.ReferenceLoopHandling = Newtonsoft.Json.ReferenceLoopHandling.Ignore; routes.Ignore("{resource}.axd/{*pathInfo}"); routes.MapHttpRoute( name: "DefaultApi", routeTemplate: "api/{controller}/", defaults: new { id = RouteParameter.Optional } ); }
}
}
Consuming the data
Let’s go ahead and build our project. When the build is completed successfully open your Sitefinity website in IIS or cassini. When your site has loaded navigate to yourdomain/api/test. To break this down. /api/ calls the web api routing engine. In the previous step we mapped a route for /api/{Controller}. Since we called our controller TestController its usable name is “test”. So the second portion of the url /test/ calls that controller. Since we only have one method it is the default get method and accepts no parameters so we can stop there. Our method is called and the string we specified is returned.
In order to make this method useful we will need a way to consume the web API data when we call it dynamically. We can do this a number of ways but since this blog post series is about building javascript widgets in Sitefinity we will use javascript and the jQuery library (to make things easier). For the sake of this blog post we aren’t going to create any widgets yet. We will just utilize the Sitefinity default javascript widget which allows us to embed javascript into our Sitefinity page.
$(document).ready(function(){$.getJSON('/api/test', function (x){ alert(x); }); });
And that’s it for now. Stay tuned for the next blog post where we will build an asynchronous search results widget using this technology and remember you can follow me on Twitter @DunnWeb.
