Creating a Simple Image Selector Using a Client Binder

The content you're reading is getting on in years.
This post is on the older side and its content may be out of date.
Be sure to visit our blogs homepage for our latest news, updates and information.
Introduction
There have been numerous requests by the Sitefinity community asking for a custom control used to select images for a particular scenario. This and the next few blog posts are going to show how you can create a simple image selector, and how you can plug it into Sitefinity to select thumbnails for news items. You can download the source code from here.
Web Services and Client Binders
As you know, Sitefinity has an extensive web service API, which you can use to create, display, update or delete all kinds of content managed by the CMS. We’re going to use these web services in our example to get a list of images and display them to the user.
Since writing the client-side code to invoke a web service and work with its response can be quite cumbersome, we’ve included a set of built-in controls, called Client Binders, that make your job much easier. A client binder is essentially a custom control used to call a web service and display the result in another custom control). We have implemented binders for most RadControls used in Sitefinity that you can use out of the box – RadGridBinder, RadTreeViewBinder, RadListViewBinder, GenericCollectionBinder. You can find more information about client binders here.
In our example, we are going to use a GenericCollectionBinder working with the Sitefinity image service, since the markup we’re outputting will be custom and we’re not using RadGrid or RadTreeView. Here’s how the end result is going to look like:
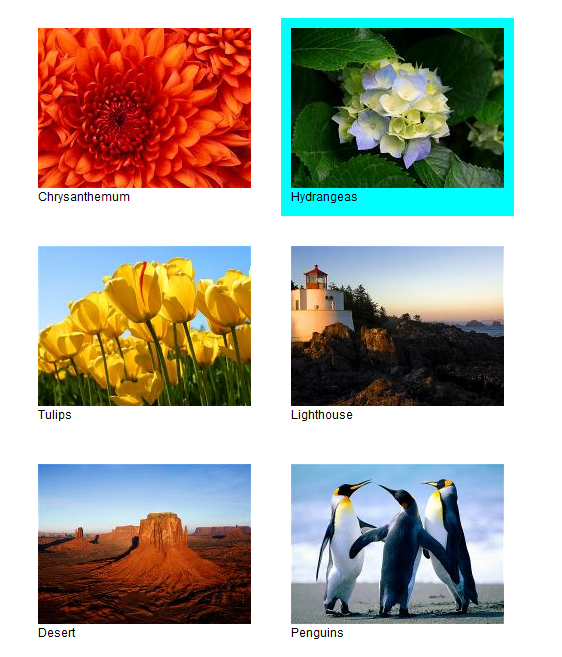
The role of this control is to display a list of images available in Sitefinity, and return the URL of the image that the user clicked. We can later use this URL in whatever way we find appropriate (we’re going to cover that in the next blog post).
Code Walkthrough
In the template for our image selector, we have two controls – a GenericCollectionBinder, and an HTML server control representing an unordered list of images:
<ul id="imageList" runat="server"></ul><sitefinity:GenericCollectionBinder ID="imageListBinder" runat="server" TargetId="imageList" ServiceUrl="~/Sitefinity/Services/Content/ImageService.svc/" BindOnLoad="false" DataKeyNames="Id" DataMembers="Id, Title, ThumbnailUrl"> <Containers> <sitefinity:BinderContainer ID="imageTitleContainer" runat="server"RenderContainer="true"> <div style="float:left; margin: 10px 10px 10px 10px; padding: 10px"> <a href="javascript:void(0);" class="sf_binderCommand_selectImage"> <img sys:src="{{ThumbnailUrl}}" /> </a> <li>{{Title}}</li> </div> </sitefinity:BinderContainer> </Containers></sitefinity:GenericCollectionBinder>There are several properties we need to set on the binder - the URL of the service we are using, the ID of the target control displaying the result, the name of the data item property serving as a key, and a list of the properties we are using. As you can see, we also have a BinderContainer. You can think of it as the item template, or markup that will be rendered for each item returned by the service. In our case, we render a thumbnail, and the name of each image. The things in the curly brackets are actually placeholders. When binding, the binder will replace them with the corresponding value of the given properties. This acts like the Eval() function in ASP.NET, but performs its magic on the client.
Server Control
The SimpleImageSelector class inherits from SimpleScriptView. This is a widely used Sitefinity class which providers the basis of all script controls (using both server and client functionality). It also provides a container, through which we can access all controls we place in the template. It is recommended that you inherit from it when writing your custom controls. Our server-side code for the image selector does 3 things:
- Specify the template we are using (by overriding the LayoutTemplatePath property):
publicoverridestringLayoutTemplatePath{get{return"~/ImageSelector/SimpleImageSelector.ascx";}set{base.LayoutTemplatePath = value;}} - Include a custom stylesheet (to signify the selected images after the user clicks them):
protectedoverridevoidOnInit(EventArgs e){base.OnInit(e);HtmlLink link =newHtmlLink();link.Attributes.Add("href", VirtualPathUtility.ToAppRelative("~/ImageSelector/SimpleImageSelector.css"));link.Attributes.Add("type","text/css");link.Attributes.Add("rel","stylesheet");this.Page.Header.Controls.Add(link);} - Provide a reference to the corresponding client-side component (overriding GetScriptReferences and GetScriptResources).
Client Control
We're building a very simple image selector, so there's only two things it does:
- Tell the binder to invoke the service and display the result (make sure you have uploaded at least one image).
_onLoad:function(sender, args) {this.get_binder().DataBind();}, - After a user clicks a particular image, mark it and save its URL
_binderCommand:function(sender, args) {if(args.get_commandName() =="selectImage") {varimageUrl = args.get_dataItem().MediaUrl;this.set_selectedImageUrl(imageUrl);// remove class from previously selected imagesvarselected = jQuery(args.get_itemElement().parentNode).find("div.sf_selectedImage").each(function(index, element) {jQuery(element).removeClass("sf_selectedImage");});// set class to currently selected imagejQuery(args.get_itemElement()).addClass("sf_selectedImage");}},
A particularly interesting feature we've used in this case are binder commands. We can instruct all client binders to fire a command with a particular name, by specifying a special class in our markup. In our case we have the following on the <a> tag:
<a href="javascript:void(0);" class="sf_binderCommand_selectImage"> <img sys:src="{{ThumbnailUrl}}" /></a>
When the binder sees this, it knows that when the <a> tag is clicked, it has to fire a command with the name "selectImage". It is also kind enough to pass us all the information for the particular item that we need. We then handle the command, and update our selected URL. With this, the role of our simple image selector is done.
Installation Instructions
- Create a new website, or use and existing one, and open its .csproj file in Visual Studio (should open as a web application project, not a website).
- Download the source code for this example.
- Extract the ZIP in the main folder of your site.
- Include the folder in your project (If the folder is not visible in visual studio, click the "show all files" button in Solution Explorer).
- Right click the SimpleImageSelector.js file, click Properties, set BuildAction to "EmbeddedResource".
- Open AssemblyInfo.cs file and add the following line at the bottom:
[assembly: WebResource("SitefinityWebApp.ImageSelector.SimpleImageSelector.js","application/x-javascript")] - Run your project
- Log into the backend, and from Administration -> Settings -> Advanced, add your new control to the toolbox.
- Create a new page, put the control on the page and see how it works.
What's Next
In the next blog post, we're going to see how we can use the image selector, to choose Thumbnails for news items in the Sitefinity backend.
