ASP.NET to Sybase 15.5 With the ADO.NET Entity Data Framework
ASP.NET to Sybase 15.5 With the ADO.NET Entity Data Framework
Introduction
In this tutorial, we demonstrate how you can easily connect Microsoft Visual Studio to a Sybase 15.5 server by using DataDirect’s Connect for ADO.NET in conjunction with the ADO.NET Entity Framework. This configuration lets you fully exploit the power of Microsoft’s ADO.NET Entity Data Framework when working with Sybase without needing to write any code.
- Visual Studio setup
- Install and test DataDirect Connect for ADO.NET
- Create a new Web Application project
- Build the User Interface
- Get a list of job titles
- Retrieve a list of employees
- Display details for a selected employee
While new architectures that interact with data are continually arising, one constant remains: the underlying technologies that make access to information possible remain as critical as ever. In this article, you’ll see that all communication with the database is handled within the CLR (Common Language Runtime) leading to better performance, security, and reliability. What makes DataDirect Connect for ADO.NET such a compelling choice for this task is that its 100% managed code architecture eliminates the need to install, configure, or maintain any additional client-side software such as Sybase’s client libraries, as shown in figure 1

You’ve probably heard a lot about the ADO.NET Entity Framework. The purpose of this article is to help you make use of it in your Sybase environment.
The example for this article is a simple Web-based application that presents a basic employee directory using sample data from an Sybase 15.5 instance. While this simple application and its rudimentary user interface won’t win any GUI design awards, you will learn how to get productive quickly and without needing to write any code.
Run the Sybase_Employees_Jobs.sql file in ISQL to load the table definition and values that are used in this document. This file can be found in the ZIP file that contains the sample project.
Download the ASP.NET to Sybase code samples.
Instructions
1) Install Visual Studio Professional 2008 SP1 Visual Studio Professional 2010.
If you already have Visual Studio on your computer, make sure to download the .NET Framework 3.5 SP1 or 4.0; the wizards and other key components won’t work without it.
2) Install DataDirect Connect for ADO.NET
Please note that this article was written with version 3.5. If you are using a newer version, you can follow these same steps as well.
Make sure that you have administrative privileges on this computer. In addition, before installing the DataDirect product, make sure you’re running one of the following operating systems:
- Windows Server 2008 (all Editions)
- Windows Vista (all Editions)
- Windows XP (all Editions)
- Windows Server 2003 (all Editions)
DataDirect Connect for ADO.NET supports the 32 and 64 bit versions of these operating systems. Don’t worry: the installer takes care of this for you automatically.
3) Launch Visual Studio, and create a new project, using a Visual C# ASP.NET Web Application. Name your project EntityFramework_ASPNET_Demo.
Make sure that you’ve selected .NET Framework 3.5 or 4.0 from the drop-down on the upper right side of the New Project dialog box. Also, the source code examples below assume that you used the same names for your projects as we do in this tutorial.
4) Add the ADO.NET Data Model to your project by following these steps:
- Right-click on the name of your new project.
- Choose Add-> New Item.
- Select the ADO.NET Entity Data Model template. This launches the Entity Data Model Wizard.
- Choose the Generate from database option.
- Click on the New Connection button.
- Fill in details about your Sybase connection as shown in figure 2. Make sure to select the DataDirect Connect for ADO.NET Sybase Data Provider.
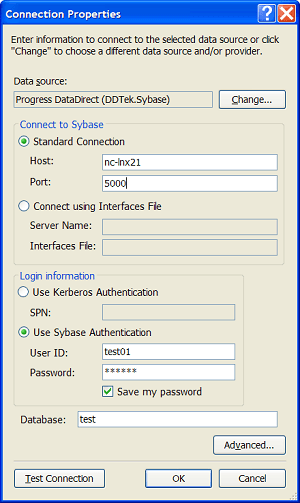
When you’ve finished, click on the Test Connection button to double-check that everything is configured correctly. If you receive a Test connection succeeded message, move on to these steps:
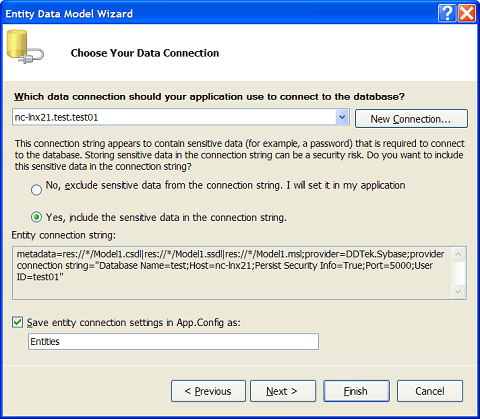
- Click the Yes, include the sensitive data in the connection string. radio button
- Check the Save entity connection settings in App.Config box, and enter Entities in the text box as shown in figure 3.
- Click Next. The Wizard connects to the database and presents a list of the objects that you can include in your model.
- Expand the Tables entry, and place check marks next to the EMPLOYEES (TEST01) and JOBS (TEST01) entries. Use the default namespace called Model.
- Click Finish.
The Wizard now connects to Sybase, deciphers the relationships between these two tables, and then creates a data model based on what it learned. There are a few important points to bear in mind about the interaction between the Entity Data Model Wizard and Sybase 15.5:
- It may take a few minutes for the Wizard to complete its work.
- The Wizard must be able to infer primary and foreign keys from your Sybase schema.
- Be on the lookout for any diagnostic messages from Entity Framework and related Wizard regarding your database structure.
- If your Sybase tables use niche data types, such as UDT (user-defined types), you may receive some messages from the Entity Framework.
- The Entity Framework mandates that your stored procedure parameters need to be comprised of supported data types.
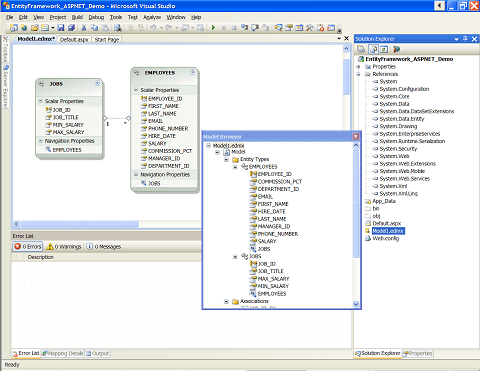
When the Wizard completes its work, click the Show all Files icon at the top of the Solution Explorer. Notice that the Wizard has created numerous references, an App.Config file, and a data model.
Figure 4 shows the relationship mapping between the two tables as visualized in the ADO.NET Entity Data Model Designer, the references and other files that were created, as well the Model Browser:
5) Build and save your project. To build the project, right click on the project name in the Solution Explorer and choose Build. In the upcoming steps, you’ll construct the ASP.NET application without writing any code.It’s now time to build the user interface, which consists of adding a series of GUI controls and related data sources.
6) Add a DropDownList control to the application.
The first step in building our user interface is to create a control on the page that selects a department. Here’s how to do that:
- Switch to the Default.aspx page tab.
- Switch to the Design view at the bottom of the screen.
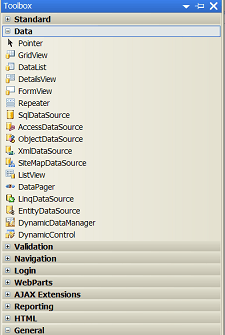
- Make the toolbox visible (as shown in figure 5), and drag a DropDownList control onto the blank page. Once configured, this will provide a list of job titles from Sybase; we’ll then retrieve a list of employees for the chosen department.
- Check the Enable AutoPostBack box on this control.
- In the Properties window, rename this control to JobTitles. You’ll find this setting in the ID field.
- Build and save the project, but don’t run it yet. You must first associate a data source with the control, which comes next.
7) Get a list of job titles from the Sybase database.
To do this, we need to connect a data source with the control you just added. Here’s how:
- Drag an EntityDataSource control from the toolbox onto the page.
- Click the flyout on the top right of the control and choose Configure Data Source.
- Choose the Named Connection and DefaultContainerName you created earlier in step 4, and click Next.
- Choose the JOBS value from the EntitySetName drop-down box.
- Leave the EntityTypeFilter set to the default of (None).
- Check the Select All (Entity Value) box and click Finish.
- Open the Properties window for the EntityDataSource and set the ID property to DataSourceJobTitle, which renames the data source to something more meaningful.
- Click on the drop-down list you created in step 6. Select the Choose Data Source menu option.
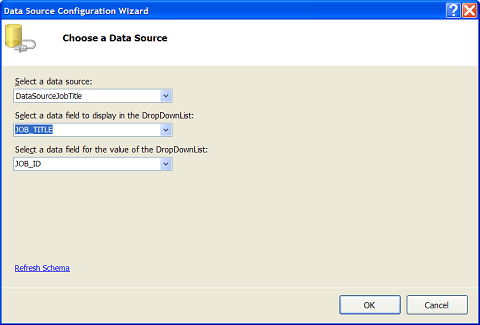
- When the Data Source Configuration Wizard pops up, click on the Refresh Schema link at the bottom of the window.
- Select the DataSourceJobTitle from the Select a data source drop-down.
- Choose JOB_TITLE in the Select a data field to display in the DropDownList field. This shows the user the actual name of the job.
- Choose JOB_ID in the Select a data field for the value of DropDownList field and click OK as shown in figure 6. This returns the internal identifier for the selected job.
- Once you’ve finished, save your project and then click the green Start Debugging icon at the top of the main Visual Studio window. Make sure to accept the Modify the Web.config file to enable debugging radio button. You should now have a working web page with a populated drop-down list of job titles. It’s time to tie this together with employee details.
8) Retrieve a list of all employees with the job title you choose from the drop-down list.
In this step, we take advantage of the entity framework’s understanding of the inherent relationships among our tables. Here are the steps to follow:
- To space things out on the page, hit Return 2 times beneath the DataSourceJobTitle control.
- Drag a GridView control onto the page, followed by an EntityDataSource. We’ll use the first control to display the employee list, and the second one to connect the control to the database.
- Rename the EntityDataSource to DataSourceEmployeeList by changing the value of the ID field on its Properties window.
- Click the flyout on this data source, and choose the Configure Data Source menu option.
- Choose the Named Connection and DefaultContainerName you created earlier in step 4, and click Next.
- Choose EMPLOYEES from the EntitySetName, and check the Select All (Entity Value) box.
- Click Finish to complete selecting data.
Next up, it's time to set the WHERE clause for the query. Here’s where we’ll connect the job title list from earlier with related employees; remember that this relationship was discovered when we used the Wizard to explore the database. First up is retrieving data from Sybase:
- Open the Properties window for DataSourceEmployeeList, and click on the ellipses next to the Where entry.
- Check the Automatically generate the Where expression based on the provided parameters box.
- Click on the Add Parameter button.
- Rename the newparameter entry JOBS.JOB_ID. This takes advantage of the relationship that the entity framework discovered between the EMPLOYEES and JOBS tables.
- Set the Parameter source drop-down to Control.
- Set the ControlID drop-down to JobTitles. This is the control that returns the job title and job id. Figure 7 shows how this dialog should appear:
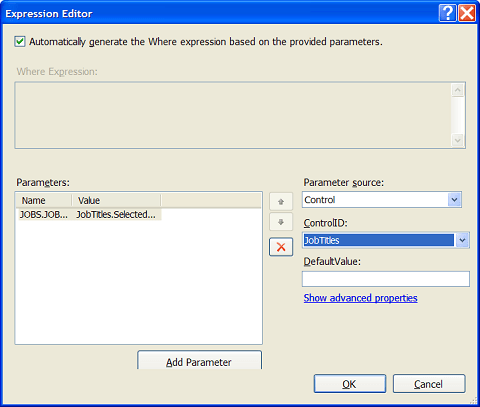
- Click OK to save your changes to the data source.
After this, we need to associate the grid of employees with the Sybase data:
- Click on the grid you dragged onto the page two sequences ago. Open its Properties window, and rename it to EmployeesGrid.
- Bring up the GridView Tasks dialog by clicking on the grid, and select the DataSourceEmployeeList for the Choose Data Source drop-down.
- Check the Enable Selection box. This will let us choose a particular employee for further analysis.
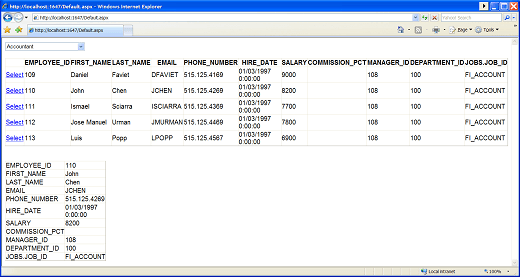
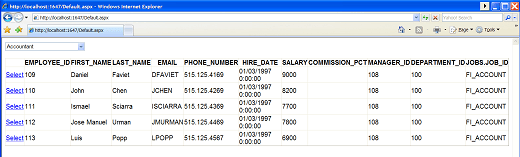
- Save project, and then run it in debug mode. You should see changes in the drop-down reflect in the employee list, just like in figure 8:
9) Display details for a selected employee.
Now that we’ve retrieved a list of all employees with this job title, it’s time to drill-down and see all of the details of a selected employee.
- To space things out on the page, hit Return 2 times beneath the EmployeesGrid control.
- Drag a DetailsView control onto the page. Notice that instead of displaying a list of items, this control only displays one.
- Drag one more EntityDataSource onto the page.
- Rename the just-added EntityDataSource to DataSourceEmployeeDetail.
- Click the flyout on this data source, and choose the Configure Data Source menu option.
- Choose the Named Connection and DefaultContainerName you created earlier in step 4, and click Next.
- Choose EMPLOYEES from the EntitySetName, and check the Select All (Entity Value) box.
- Click Finish to complete selecting data.
- Open the Properties window for DataSourceEmployeeDetail, and click on the ellipses next to the Where entry.
- Check the Automatically generate the Where expression based on the provided parameters box.
- Click on the Add Parameter button.
- Rename the newparameter entry EMPLOYEE_ID.
- Set the Parameter source drop-down to Control.
- Set the ControlID drop-down to EmployeesGrid. In other words, clicking on a row in the grid will populate this data source.
- Click OK to save.
The last step is to associate the user interface with its data source:
- Click on the DetailsView control you added in the previous sequence.
- Change to its Properties window, and rename it to EmployeeDetail.
- Click on the flyout next to the control, and select the DataSourceEmployeeDetail data source.
- Save the project, and then run it in debug mode. Your results should appear similar to figure 9.