Integrating Sitefinity CMS and SalesForce CRM

The content you're reading is getting on in years.
This post is on the older side and its content may be out of date.
Be sure to visit our blogs homepage for our latest news, updates and information.
You have your Sitefinity CMS, you have your CRM and now you want these two to interact. It is :
- Doable, as Sitefinity CMS, being an ASP.NET web application, allows you to easily add any functionality;
- Easy, as the API of the CMS, in conjunction with the variety of extensibility points make it all a straightforward process.
As an example we will cover the basic scenario of generating leads in SalesForce by submitting a form on the Sitefinity site.
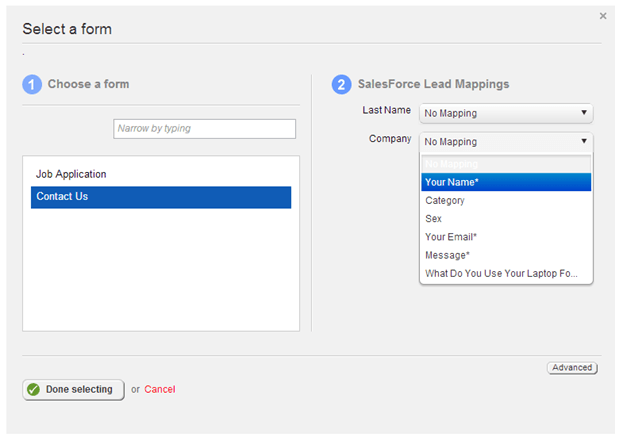
A form is a collection of field controls. On form submission the data from these controls will be used for the lead generation request to SalesForce. Somehow these field controls need to be mapped to the fields of a lead record within SalesForce. To allow that, we will use a custom forms control with a custom control designer that allows the user to set the mapping. The required fields for a lead creation are Last Name and Company. Here is the end result for a designer with these two fields:

Now let’s get started!
- First you should allow access to SalesForce by creating a Connected App. Each app has a consumer key and a consumer secret. You also need a user, who has permissions for lead creation. For the configuration within Sitefinity you will need that user’s username, password and security token.
- Download the source code for the new Forms control. Place the code under the root of your application.
- You have to register the new configuration section so merge this code in the Global.asax file:
protected void Application_Start(object sender, EventArgs e) {Telerik.Sitefinity.Abstractions.Bootstrapper.Initialized += Bootstrapper_Initialized;}protected void Bootstrapper_Initialized(object sender, Telerik.Sitefinity.Data.ExecutedEventArgs args) {Config.RegisterSection<SalesForceConfig>();} - Finally build the application and register FormsControlCustom using Sitefinity Thunder.
Now start the site, go to the advanced settings, find the SalesForce section and configure the widget using the data from step 1.
And you are actually done!

