Extending the built-in content modules

The content you're reading is getting on in years.
This post is on the older side and its content may be out of date.
Be sure to visit our blogs homepage for our latest news, updates and information.
The built-in content modules like News, Events and Libraries provide a great set of functionality. However at some point you need to extend these modules with custom functionality that would help you manage better your site's content.
In this blog post we'll take a look at several scenarios that may be used to extend the default look and functionality of a content module.
1. Adding a new column to the main module grid
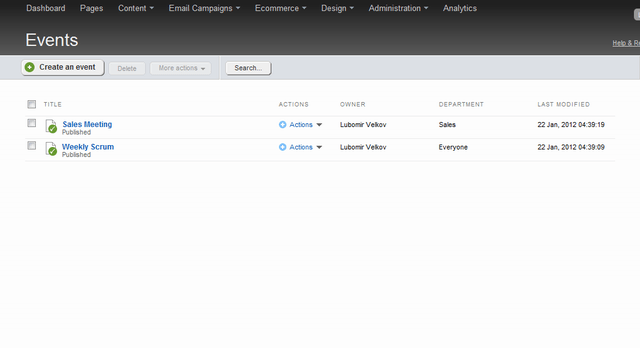
Let's take a look at the Events module. The main grid displays the following columns - Title, Actions, Owner and Last Modified. If you added a custom field to the Events module and wish to display it in the grid you basically would need to follow these steps:
- Extend the default ViewModel for the content module
- Write a custom service class that utilizes the ViewModel from step #1
- Add a new column definition to the Grid view mode
- Update the view mode definition to use your custom service
We'll use the Events module so for step #1 we'll need to inherit from the Events ViewModel class - Telerik.Sitefinity.Modules.Events.Web.Services.EventViewModel. Let's first add a custom field of type Short Text and named Department. Now we need to include this new field in our new ViewModel class. The class itself is very simple - we need to declare 3 constructors and a public property, named Department. Here is the source of the class -
using System;using System.Collections.Generic;using System.Linq;using System.Runtime.Serialization;using System.Web;using Telerik.Sitefinity.Events.Model;using Telerik.Sitefinity.Model;using Telerik.Sitefinity.Modules.Events.Web.Services;using Telerik.Sitefinity.Modules.GenericContent;namespace SitefinityWebApp.EventsModuleAdditions{ public class ExtendedEventViewModel : EventViewModel { #region Constructors /// <summary> /// Initializes a new instance of the <see cref="ExtendedEventViewModel"/> class. /// </summary> public ExtendedEventViewModel() : base() { } /// <summary> /// Initializes a new instance of the <see cref="ExtendedEventViewModel"/> class. /// </summary> /// <param name="contentItem">The content item.</param> /// <param name="provider">The provider.</param> public ExtendedEventViewModel(Event contentItem, ContentDataProviderBase provider) : base(contentItem, provider) { var department = contentItem.GetValue("Department").ToString(); this.Department = department; } /// <summary> /// Initializes a new instance of the <see cref="ExtendedEventViewModel"/> class. /// </summary> /// <param name="contentItem">The content item.</param> /// <param name="provider">The provider.</param> /// <param name="liveItem">The live event related to the master event.</param> /// <param name="tempItem">The temp event related to the master event.</param> public ExtendedEventViewModel(Event contentItem, ContentDataProviderBase provider, Event live, Event temp) : base(contentItem, provider, live, temp) { var department = contentItem.GetValue("Department").ToString(); this.Department = department; } #endregion #region Public properties [DataMember] public string Department { get; set; } #endregion }}As you can see the main idea is to retrieve the custom field from the Content item and assign it to the public property - this is done in the constructors -
var department = contentItem.GetValue("Department").ToString();this.Department = department;The GetValue() extension method is declared in the Telerik.Sitefinity.Model namespace.
Now we need to make this new ViewModel useful and for this we need to define a new service class. The default class is declared as
public class EventService : ContentServiceBase<Event, EventViewModel, EventsManager>but in our case we'll declare it like this
public class ExtendedEventService : ContentServiceBase<Event, ExtendedEventViewModel, EventsManager>The class itself is nothing fancy - it needs to implement several abstract methods -
public override IQueryable<Event> GetContentItems(string providerName)
publicoverride IQueryable<Event> GetChildContentItems(Guid parentId, string providerName)
publicoverride Event GetContentItem(Guid id, string providerName)
publicoverride Event GetParentContentItem(Guid id, string providerName)
publicoverride IEnumerable<ExtendedEventViewModel> GetViewModelList(IEnumerable<Event> contentList, Telerik.Sitefinity.Modules.GenericContent.ContentDataProviderBase dataProvider, IDictionary<Guid, Event> liveContentDictionary, IDictionary<Guid, Event> tempContentDictionary)
publicoverride IEnumerable<ExtendedEventViewModel> GetViewModelList(IEnumerable<Event> contentList, Telerik.Sitefinity.Modules.GenericContent.ContentDataProviderBase dataProvider)Check the attached file for the full source, but the main idea is that we now use our ExtendedEventViewModel.
Now we need to register the class to be available for usage and this is done in Global.asax with the following lines
protected void Application_Start(object sender, EventArgs e){ Bootstrapper.Initialized += new EventHandler<Telerik.Sitefinity.Data.ExecutedEventArgs>(Bootstrapper_Initialized);}void Bootstrapper_Initialized(object sender, Telerik.Sitefinity.Data.ExecutedEventArgs e){ SystemManager.RegisterWebService(typeof(ExtendedEventService), "Sitefinity/Services/Content/ExtendedEventService.svc");}The next step is to add a new column to the Grid view. To do that go to Administration -> Settings -> Advanced -> Events -> Controls -> EventsBackend -> Views -> EventsBackendList -> View Modes -> Grid -> Columns and there press Create new -> DataColumnElement. Enter the following details:
Bound Property Name - leave blank
Client Template - <span>{{Department}}</span>
Name - Department
ResourceClassId - leave blank
HeaderCssClass - leave blank
HeaderText - Department
TitleText - Department
ItemCssClass - sfRegular
Width - 0
Disable Sorting - False
Sort expression - leave blank
Click Save changes and for the last step go back to the EventsBackendList node and under WebServiceBaseUrl enter ~/Sitefinity/Services/Content/ExtendedEventService.svc/. This will add the new column at the end of the grid and will start displaying the entered Department. Since currently it is not possible to reorder the columns and since they are added always at the end, if you wish to keep the Last Modified column last you can use the following little trick - delete the default Date column, then readd it keeping the same settings - it will be added after the Departments column and your Events grid will look like this -

That's it about extending the grid with an additional column. Now let's take a look at
2. Adding a new Action command in the individual Content item Actions menu
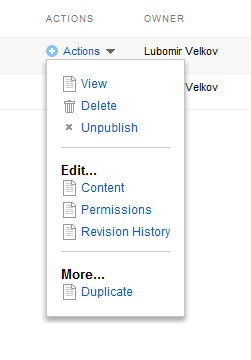
The first step here would be to extend the definitions for the Actions menu. Go to Administration -> Settings -> Advanced -> Events -> Controls -> EventsBackend -> Views -> EventsBackendList -> View Modes -> Grid -> Columns -> Actions -> MenuItems. We'll add a new action - Duplicate - that will make a copy of the selected Event. Let's separate this command in a new section named "More...". First select Create new -> LiteralWidgetElement and enter the following details -
Name - Separator2
ContainerId - leave blank
CssClass - sfSeparator
CommandText - More...
Global resource class ID - leave blank
VirtualPath - leave blank
WrapperTagId - leave blank
WrapperTagName - Li
Type - Telerik.Sitefinity.Web.UI.Backend.Elements.Widgets.LiteralWidget
Type checkbox - Check it
Save the changes, go back to MenuItems and choose Create new -> CommandWidgetElement and enter the following details (leave blank or unchecked everything except) -
Command name - duplicate
Command button type - Standard
Name - Duplicate
CommandText - Duplicate
WrapperTagName - Li
Type - Telerik.Sitefinity.Web.UI.Backend.Elements.Widgets.CommandWidget
Save the changes and now when you click on an Actions button you should get a menu like this

Now the next step is to define a custom JavaScript that will be loaded by the Events grid view. Go to Administration -> Settings -> Advanced -> Events -> Controls -> EventsBackend -> Views -> EventsBackendList -> Scripts and click Create new. Enter the following -
Script location - ~/EventsModuleAdditions/ExtendedEventScript.js
Name of the load method - eventsListLoaded
Now we create a JavaScript file in the indicated location with the following contents -
function duplicateCommandHandler(sender, args) { if (args._commandName == "duplicate") { jQuery.ajax({ type: "POST", url: sender._baseUrl + "Sitefinity/Services/Content/ExtendedEventUtilityService.svc/" + args._dataItem.Id + "/duplicate/", contentType: "application/json; charset=utf-8", dataType: "json", processdata: false, success: function(data) { if (data != "ERROR") { args._dataItem.Id = data; sender.get_itemsGrid().executeCommand("edit", args._dataItem, [data], args._itemElement, null, null); // Or call the line below instead to just refresh the grid //sender.get_itemsGrid().dataBind(); } }, error: function(data) { } }); }}function eventsListLoaded(sender, args) { sender.add_itemCommand(duplicateCommandHandler);}
sender.get_itemsGrid().dataBind();
args._dataItem.Id = data;sender.get_itemsGrid().executeCommand("edit", args._dataItem, [data], args._itemElement, null, null);
SystemManager.RegisterWebService(typeof(ExtendedEventUtilityService), "Sitefinity/Services/Content/ExtendedEventUtilityService.svc");
Finally here is the archive with the source code for this blog post - Events Module Additions

