
TimeSpan selector
In many cases you may need to filter content items by the date and time when they are published. This tutorial demonstrates how to add a timespan selector in a widget's designer view.
The image below illustrates a timespan selector in the designer of the News widget: 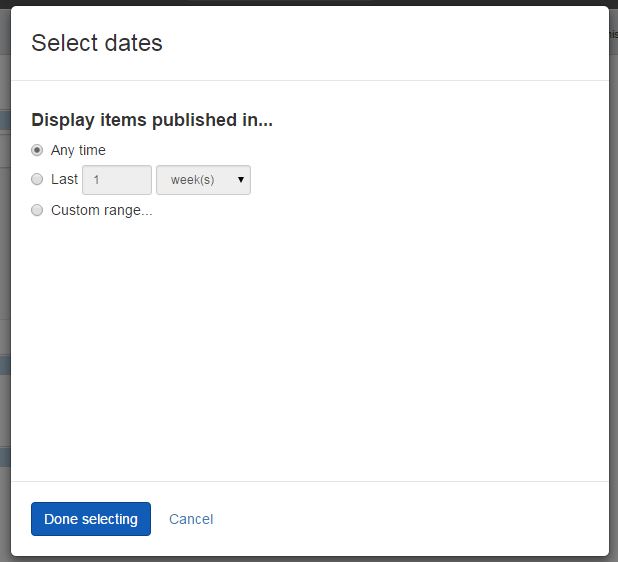
Add Timespan selectors
- Sitefinity CMS automatically registers the scripts you need and, if no other designer view with explicitly set priority exists, Sitefinity CMS sets your designer view priority 1. In case you need to have full control over the scripts that are loaded or you want to set custom priority, you can alternatively create your own
DesignerView.YourView.jsonfile. If you have aJSONfile that matches the convention (even if empty), this automatic scripts registration will not occur. In yourDesignerView.<YourView>.jsonfile, add ascriptsarray. The content of the file should be similar to the following:JSON{ "priority": 1, "components" : ["sf-timespan-selector"] } - Sitefinity CMS automatically finds all AngularJS modules you rely on and references the widget designer to them. In case you rely on custom AngularJS modules or have logic that needs an AngularJS controller, you can create your own
designerview-<yourview>.jsfile. If you have a.jsfile that matches the convention (even if empty), this automatic modules referencing will not occur. In yourdesignerview-<yourview>.jsfile, place the following code right before the definition of your custom view controller:JavaScript(function () { //add the following snippet before the definition of the custom controller: angular.module('designer').requires.push('sfSelectors'); //definition of the custom controller angular.module('designer').controller('MyViewCtrl', ['$scope', 'propertyService', function ($scope, propertyService) { $scope.$watch( 'selectedItem', function (newVal, oldVal) { if (!!newVal && newVal !== oldVal) { $scope.properties.SelectedItem.PropertyValue = JSON.stringify(newVal); } }, true ); $scope.$watch( 'selectedId', function (newVal, oldVal) { if (!!newVal && newVal !== oldVal) { $scope.properties.SelectedId.PropertyValue = newVal; } }, true ); propertyService.get() .then(function (data) { if (data) { $scope.properties = propertyService.toAssociativeArray(data.Items); var serializedSelectedItem = $scope.properties.SelectedItem.PropertyValue; if (serializedSelectedItem != "") $scope.selectedItem = JSON.parse(serializedSelectedItem); var serializedSelectedId = $scope.properties.SelectedId.PropertyValue; if (serializedSelectedId != "") $scope.selectedId = serializedSelectedId; } }); }]); })(); - In your
DesignerView.<YourView>.cshtmlfile, place the following tag in the HTML code:HTML+Razor<sf-timespan-selector sf-selected-item="selectedItem"></sf-timespan-selector>
To access the selected value, you use the sf-selected-item attribute. The value of the attribute is a scope property that you must add in your widgets controller:
using BooksWidget.Mvc.Models;
using System;
using System.Collections.Generic;
using System.Linq;
using System.Web;
using System.Web.Mvc;
using Telerik.Sitefinity.Mvc;

namespace BooksWidget.Mvc.Controllers
{
    [ControllerToolboxItem(Name = "Books", SectionName = "MVC samples", Title = "Books")]
    public class BookController_TimespanExample : Controller
    {

        //custom logic

        public string SelectedItem
        {
            get;
            set;
        }
    }
}
Depending on your scenario, you can filter items by:
- Any time
Returns all content items that are public - Period to now
Filters content items that are published in a specific till a time period until the current moment - Custom range
Filters content items that are published in a custom time period
The returned value is an object of type timeSpanItem() with the following properties:
|
Property |
Description |
|
|
Represents one of 3 possible scenarios:
|
|
|
If you set the |
|
|
If you set the |
|
|
If you set the |
|
|
If you set the |
|
|
Returns the result when you click the Done selected button. The default value is empty string. |
