Custom themes and templates: Add and configure the layout elements
After you have decided about the logical separation of the page, you must create the template for the Telerik Hospital site and add the layout elements to it. Perform the following:
Creating the template
To create the template for the Telerik Hospital site, perform the following:
- Go to Sitefinity’s backend (http://<yoursite>/sitefinity)
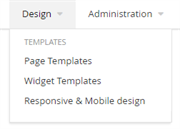
- In the main menu, click Design » Page Templates.

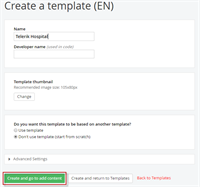
- Click Create a Template.
- In the Name input field, enter Telerik Hospital.
- Select Don't use template (start from scratch).
- Click Create and go to add content.

Adding the Menu layout element
The next step is to add the Menu block to the template layout. To do this, perform the following:
- After the template has been created click Layout button in the upper-right corner.

- Drag 100% layout element from the right menu and drop it in the layout area on the left.
- Click Edit in the title bar of the dropped element.
- In the right menu click Classes and labels.
- In the Wrapper field, enter Menu. You will use this class later in your CSS file.
- Click Done.
Adding the Header layout element
The next step is to add the Header block to the template layout. To do this, perform the following:
- Drag another 100% layout element from the right menu and drop it in the layout area on the left, under the Menu block.

- Click Edit in the title bar of the dropped element.
- In the right menu click Classes.
- In the Wrapper field, enter Header. You will use this class later in your CSS file.
- Click Done.
Adding the Main layout element
The next step is to add the Main block to the template layout. To do this, perform the following:
- Drag another 100% layout element from the right menu and drop it in the layout area on the left, under the Header block.
- Click Edit in the title bar of the dropped element.
- In the right menu click Classes.
- In the Wrapper field, enter Main. You will use this class later in your CSS file.
- Click Done.
Adding the Footer layout element
The last step is to add the Footer block to the template layout. To do this, perform the following:
- Drag another 100% layout element from the right menu and drop it in the layout area on the left, under the Main block.
- Click Edit in the title bar of the dropped element.
- In the right menu click Classes.
- In the Wrapper field, enter Footer. You will use this class later in your CSS file.
- Click Done.
- To save your changes click Publish.
The final result looks like the following screenshot:

The main wireframe is ready. Next, you must add the menu, the logo, the slogan, and the contact information in the footer – these elements will persist in all your pages.