Create Add-ons in Continuous delivery
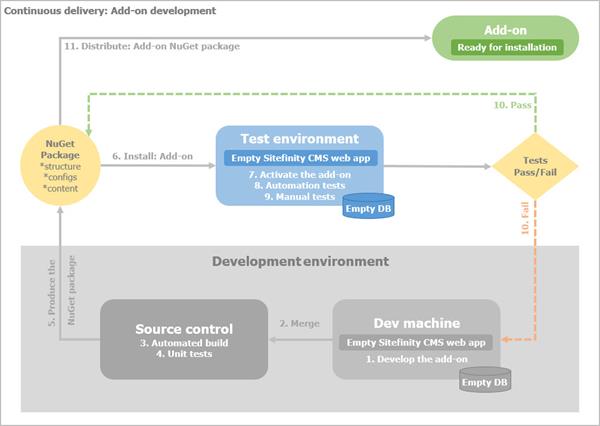
The following chart demonstrates how to develop and test an add-on in a continuous delivery process:

To properly develop, test, and deliver an add-on, we recommend using the following continuous delivery process:
PREREQUISITES: You have setup Continuous delivery.
For more information, see Setup the Continuous delivery process.
Development environment
- Develop the add-on in your local development environment.
Use a solution, containing an empty Sitefinity CMS web application, which directly references all custom projects that are part of the add-on. Use an empty database.
For more information, see Best practices: Add-on development.
- Store the solution in a source control system, such as Microsoft TFS.
- Use an automated build, such as MSBuild that is integrated with the source control system.
- Execute Unit tests.
- Export the add-on.
- Edit the .nuspec file.
- Create the NuGet package.
Test environment
- Install the add-on NuGet package on a test environment.
For more information, see Install add-ons.
The test environment must also use an empty Sitefinity CMS web application and an empty database.
- Open the test environment and activate the add-on.
For more information, see Activate an add-on.
- Perform UI automation tests, manual tests, performance tests, and security tests.
RESULT: After the add-on passes all test, you can release the NuGet package, so that it can be installed in another Sitefinity CMS project.
If any of the tests fail, go back to your development environment, fix the problem and perform the above procedure again.