Promote content with SiteSync
Once successfully configured, the SiteSync module starts tracking the content you publish or schedule for publishing. The content is marked as pending for sync, and you can see the marked items and promote the content to the destination environment at any time, using the SiteSync module UI.
The following video demonstrates the process of promoting content between two environments using SiteSync:
Select the sites to promote content from
To view the list of items that are marked as pending for sync and to promote this content, you start by navigating to Administration -> Site Sync.
If you are using Multisite, The SiteSync module will open directly the Syncing of published data screen. On this screen you can see a list of all sites that have content marked as pending for sync. If you configured more than one destination environment, you have the option to specify which one to use to promote data to. Sites whose content has never been promoted will display a label indicating Never synced:

Sites whose content you have previously promoted will display a label indicating “Synced” and a link to view the details for their last sync:

To proceed with viewing a list of the content, marked as pending for sync and promote that content, you need to select the sites you want to promote from or use the option to sync all sites.
Select which content to promote
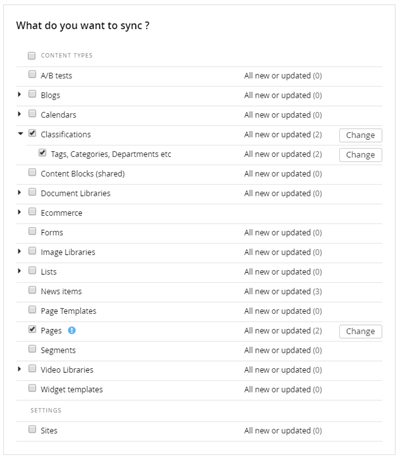
Once you have selected the site(s) whose content you want to promote, SiteSync displays a list of the content marked as pending for sync. This screen also provides an option to promote settings to the destination environment. For more information about promoting settings, see Select which Sitefinity CMS settings to promote.
The list groups content by type, and enables you to either select all content types, or drill down to select which content you need to promote. You can narrow down the list of content you want to promote in the following manner:
- Select a content type
You can select the content types for which you want to promote content items to the destination environment. If the content type is hierarchical, SiteSync will expand the list and let you select its children. By default, when you select a content type, you indicate that you want to promote all items, marked as pending for sync, for that content type.

- Select items from a content type
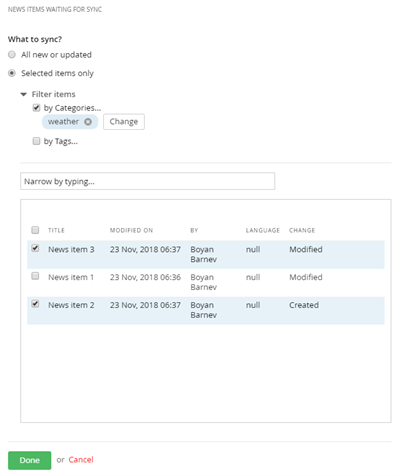
You can further narrow down the list of content, to be promoted to the destination environment, by clicking on the Change button next to each content type. This option lets you make a finer selection of content you want to promote. If the list is large, you can first filter it by classification, or use the search option.

NOTE: Some types of content may be dependent on each other. If you decide to promote only certain types of content (or selected items from that content type), you must ensure you respect the content relations. For example, if you add a related data field of type Images to a content type, you must promote not only the items of this content type, but Images as well.
Select which Sitefinity CMS settings to promote
In addition to promoting content to the destination environment, SiteSync enables you to promote Sitefinity CMS settings. You can use this option to sync configuration changes you made to your Sitefinity CMS website with the destination environment. For details on which settings you can sync, see Which content and settings are synced.
By default, the options to promote Sitefinity CMS settings are not enabled. You can control which options are available for selection when promoting content. To configure the available options, navigate to Administration -> Settings -> Advanced -> Site sync. For more information see SiteSync advanced settings.
Add a note for content promotion
Once you select the content you wish to promote to the destination environment, you can also leave a note for that sync operation. Notes, left for a sync operation, can be seen on the sync summary screen. This screen is displayed by default when an operation completes its execution, or when viewing the sync history details. For more information about sync history, see View the history of past content promotions
Notes, left for scheduled sync, are displayed in the Scheduled tasks tab of the SiteSync module, and can help your team identify the reason behind a scheduled content promotion. For more information about scheduling content promotion check the next paragraph from this article.
Promote the content or schedule the sync operation
When promoting content with SiteSync, you have the option to sync that content immediately to the destination environment, using the Sync now button. You can also choose to schedule the operation to execute at a later point in time or run regularly via the Schedule syncing button.
Scheduled sync operations can help in situations where you want to promote content on a specific date and time, and you want to automate this process, instead of having someone do it manually. To schedule the sync at specific date, select one of the following:
- Today or Tomorrow and enter the specific time when you want to sync.
- Specific date and enter the specific date and time.
Additionally, you can schedule a recurring sync operation to automate the process of promoting content. For example, you can configure SiteSync to promote blog posts daily at 7:30am.
To schedule a recurrent sync, choose Custom.
- Select the interval of the sync - day, week, month, etc.
- Select the exact time.
When you schedule a content promotion task, the job appears under the Scheduled tasks tab of the SiteSync module. For more information see View scheduled content promotion tasks.
NOTE: You can configure the number of times and the interval that the system will attempt to sync content, in case there are items that failed to sync. To do this, click Administration » Settings » Advanced » SiteSync.
- In Sync operation retry interval field, enter in minutes the interval on which the synchronization will be retried
- In Retry count when there are failed items field, enter the count of times that synchronization will be attempted, if there are failed items