Custom themes and templates: Preparing your work environment
Before you begin creating your theme, you must do the following:
-
Start your project
The first thing you must do is to start your project. If you do not have a project, create a project first.
For more information about starting a Sitefinity CMS project, see Create projects.
-
Create a project sitemap
Creating the sitemap of a project provides an overview of the remaining work and enables a structured view of the project.
For more information about creating pages in a Sitefinity CMS project, see Pages: Structure functionality and appearance.
-
Create project visuals
Create your media files (images, animations, videos etc.) outside Sitefinity CMS and use them while creating the HTML structure and the CSS files.
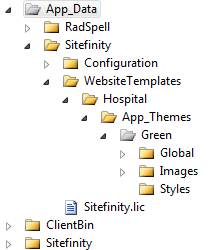
After performing these steps in order to start with the creation of the Telerik Hospital template you need to prepare the folder structure for your template and theme. For more information about the structure required when creating a template and a theme see Overview: Themes.
In the screenshot below you can see how you must organize the template and theme folders for the Telerik Hospital:

When you have finished creating the folder structure, you can start Custom themes and templates: Create the layout template.