Set up the project for local development (using Sitefinity CMS)
In Sitefinity Cloud PaaS setup where the Developer Extensions toggle is enabled, the source code of the Sitefinity web application is also stored in the Sitefinity Cloud Management Portal. This provides an interface for developers to view what code is currently deployed and clone it locally to troubleshoot any issues or implement new custom code.
Setting up the project code locally
The project’s code files can be accessed from the Repository tab on the Management Portal. You can download the code for local development by cloning the solution locally.
To set up a Sitefinity Cloud project on your local development environment, follow these steps:
- Log in to your Sitefinity Cloud Management Portal.
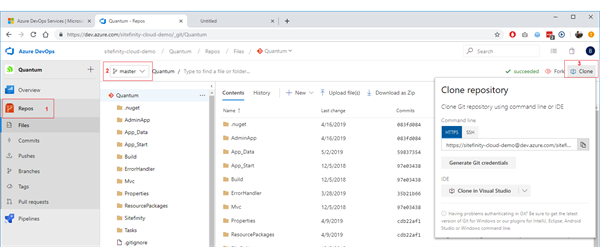
- Navigate to Repos.
- From the branches dropdown, select the project branch you want to setup locally, for example, select master.
- To clone the project Git repository on your local machine, click the Clone button, located in the upper right corner of the screen.
You can clone the repository using the command line or by selecting an IDE you want to clone to. For example, to clone the project in Visual Studio, select Clone in Visual Studio from the IDE dropdown and specify your Sitefinity Cloud credentials when prompted by Visual Studio.

- Restore the project NuGet packages and build the solution.
- Restore a DB backup on your local machine.
For more information on backing up and restoring Sitefinity Cloud project databases, see Backup and restore the database.
- Change the connection string in the web.config file (or the
DataConfig.config file, if not available in the web.config file) to point to the local copy of the project database on your SQL server.
- Create a new IIS website:
- Point the physical path of the website to the folder of the locally cloned project.
- Host the website under http://localhost:18080 for the Microsoft Entra ID (formerly, Azure AD) integration to work out-of-the-box. Alternatively, you can add domains for local development by following the instructions in Domain management » Use a domain for local or external development. If you need the Microsoft Entra ID integration to work with your customer domains, you have to submit a support case for the Sitefinity Cloud team to make the necessary changes.
- Browse the website at the configured domain.
On the local environment, developers can connect to a local copy of the database to implement and test their solution.
Deploying code updates
Once the development team is done implementing any code updates on their local environment, they can push the code to a dedicated feature branch and then make a pull request to merge it to the main/master branch of the project.
Upon detecting a commit to the main/master branch, Sitefinity Cloud triggers an automated build process, and the project is tested against all available tests. Once the tests pass, the code is deployed to the first non-Production environment (normally, Staging), where you can verify that the code runs successfully. Then, you can promote it to the Production environment.
For more information, see Deploy code changes.
Deploying database changes
In case there are data structure changes, such as creation of a custom field or a dynamic module, you can promote them from the local environment to the Sitefinity Cloud environments using the Export for deployment capability. For more information, see Sitefinity CMS documentation » Export and deploy database changes.
NOTE: Executing database queries directly on the Sitefinity Cloud environment databases is not supported.