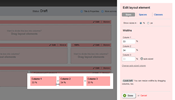
Edit layout elements
To edit a predefined layout element, click Edit at the upper-right corner of the element.
The Edit layout element box appears where you can perform the following:
Modify column width
The following screenshot shows the two ways you can change column width – by dragging the columns’ border or by entering widths in the input fields:

To modify column width, perform the following:
- Click Sizes tab.
In section Widths, a number of input fields appear. The number of input fields corresponds to the number of columns you have chosen – from one to five. - Choose the unit of measurement between percentages and pixels in Show sizes in radio button.
- In Column 1 input field, enter the desired column width for the first column in the chosen unit of measurement.
If you have chosen a layout with more than two columns, you must enter the width for all of them except for the last one, which is automatically calculated by the system.
EXAMPLE: If you have chosen a layout element with three columns, you must enter the size for Column 1 and Column 2. You cannot enter in Column 3 – the size of the third column is automatically calculated.
You can change the automatically calculated column by performing the following:
- Click Change auto-sized column.
- Click Make this auto-sized link of the column you want to be automatically calculated.
- Click Cancel changing auto-sized column.
- You can resize the width of the columns by dragging their borders.
In the layout element at the left, grab the line dividing the columns and grad it to the desired place.
In each column, the system displays the width in the chosen unit of measurement.
Modify spacing between columns
- To modify spaces between columns, click Spaces and choose the unit of measurement between percentages and pixels in Show spaces in radio button.
- You can specify the following types of spaces:
- Space between columns
- Space above and below columns
- Enter the spaces in the chosen unit of measurement
The system applies equal spaces to all columns. You can adjust spaces between columns individually by clicking Individual spaces per column link.
For each column you can specify individual spacing on the Top, Right, Bottom, and Left
Assigning classes to columns
You can choose a new or change the class name for each column, if later you want to set a CSS style for this particular column.
When you finish with editing sizes, spaces, and classes, click Done button.
After you have created the layout, you can add content widgets to each box.
For more information, see Widgets: Add content and functionality to pages.