For developers: Create a Sitefinity CMS WCF Service
Sitefinity CMS supports zero-configuration WCF REST services and the actual process of creating a new WCF REST service is trivial (here, we are not talking about the design and implementation of the service).
Creating a WCF REST service
To create a new WCF REST service follow these steps:
- With your website opened in Visual Studio, navigate to the /Sitefinity/Services folder (by convention all webservices are located in this folder)
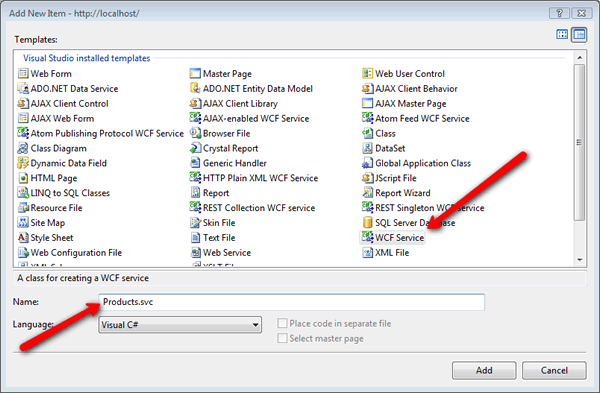
- Right click on the folder and select "Add new item..."
- From the "Templates" window select "WCF service" and name it as you see fit (usually it makes sense to name the service after the resource it represents in plural).

- After you click "Add" three files will be added to your website. First the Products.svc file will be added to the /Sitefinity/Services folder, and then in App_Code two new filesProducts.cs and IProducts.cs files will be added.
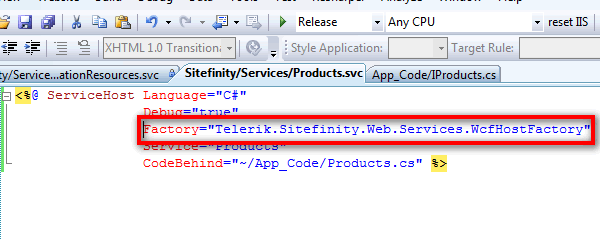
- In order to implement zero-configuration WCF REST service with Sitefinity CMS, you should open the newly created Products.svc file and set the Factory attribute on the service to Telerik.Sitefinity.Web.Services.WcfHostFactory like it is demonstrated in the following screenshot:

- If you wish to implement your service inside of a separate project, you should remove the CodeBehind declaration and set the Service property to the fully qualified type (e.g. Service="Telerik.Sitefinity.Localization.Web.LocalizationResources").
By following these simple steps you have created a new web service and now you are ready to move on to the service design and implementation.