Update
This blog post relates to Sitefinity 4.x versions. With Sitefinity 5.x and older versions you can use the Notifications service to send the notifications. Please use this article if you are on Sitefinity 5.x or later: How to customize Sitefinity Workflow notifications.
The following blog post will cover the scenario of creating a custom workflow and activity for your content items. Consider the scenario, where you want to extend the notifications within the workflow to include a comparison of the previous version of the item sent for approval and the version pending approval. We will mimic the behavior in the version comparison screens for content items. For this we will need to create a custom workflow activity, that will allow us to insert additional information in the notification e-mail. Then we will need to replace the built in notification activity with the custom one, and finally register the custom workflow.
Implementing the custom activity
Sitefinity has a built in activity which notifies approvers, that there is content pending their approval. We will inherit from this activity and extend it. Here is the code that we will need to use:
protected override void Execute(CodeActivityContext context){ try { OnExcecuting(context); var smtpSettings = Config.Get<SystemConfig>().SmtpSettings; var dataContext = context.DataContext; var workflowDefinition = (WorkflowDefinition)dataContext.GetProperties()["workflowDefinition"].GetValue(dataContext); if (workflowDefinition != null) { if (workflowDefinition.WorkflowType == WorkflowType.StandardOneStep && !workflowDefinition.SendFirstLevelEmailNotification) { return; } if (workflowDefinition.WorkflowType == WorkflowType.StandardTwoStep) { var approvalState = (((AnyDraftFacade)(dataContext.GetProperties()["masterFluent"].GetValue(dataContext))).Get() as IApprovalWorkflowItem).ApprovalWorkflowState; if (approvalState == "AwaitingPublishing" && !workflowDefinition.SendSecondLevelEmailNotification) return; if (approvalState == "AwaitingApproval" && !workflowDefinition.SendFirstLevelEmailNotification) return; } } //get the item sent through workflow var masterFluent = dataContext.GetProperties()["masterFluent"].GetValue(dataContext) as AnyDraftFacade; //check if it has an already published version var live = masterFluent.GetLiveIfExists(); var emailList = GetEmails(context); var message = GetMailMessage(emailList, smtpSettings.DefaultSenderEmailAddress, EmailText); //if there is published version construct the comparison if (live != null) { StringBuilder sb = new StringBuilder(); //use ContentComparator to compare two versions of the same item. The class returns a comparison of each property ContentComparator contentComparator = new ContentComparator(); contentComparator.Settings.DateTimeDisplayFormat = "dd MMM, yyyy; hh:mm tt"; //get only different results var compareResults = contentComparator.Compare(live.Get(), masterFluent.Get()).Where(cR => cR.AreDifferent == true); sb.Append("<table>"); //construct comparison table with styling foreach (var result in compareResults) { string diffHTML = result.DiffHtml; if(diffHTML.Contains("class='diff_new'")) diffHTML = diffHTML.Replace("class='diff_new'","style='color: #008000; text-decoration: underline;'"); if(diffHTML.Contains("class='diff_deleted'")) diffHTML = diffHTML.Replace("class='diff_deleted'", "style='color: #FF0000; text-decoration: line-through;'"); if(diffHTML.Contains("class=\"diff_new\"")) diffHTML = diffHTML.Replace("class=\"diff_new\"", "style='color: #008000; text-decoration: underline;'"); if(diffHTML.Contains("class=\"diff_deleted\"")) diffHTML = diffHTML.Replace("class=\"diff_deleted\"", "style='color: #FF0000; text-decoration: line-through;'"); sb.AppendFormat(@"<tr> <td style='font-size: 13px; font-weight: bold; line-height: 1.1; width: 100px;'>{0}</td> <td style='font-size: 11px; margin-left: 20px; overflow: hidden; width: 375px;'>{1}</td> <td style='font-size: 11px; margin-left: 20px; overflow: hidden; width: 375px; '>{2}</td> </tr>", result.PropertyName, result.OldValue, diffHTML); } sb.Append("</table>"); //add the table to the original message body message.Body += sb.ToString(); } EmailSender.Get().Send(message); } catch (Exception ex) { }}The here we get the item being passed through the workflow from the workflow DataContext.
Replacing the built-in NotifyGroup activity
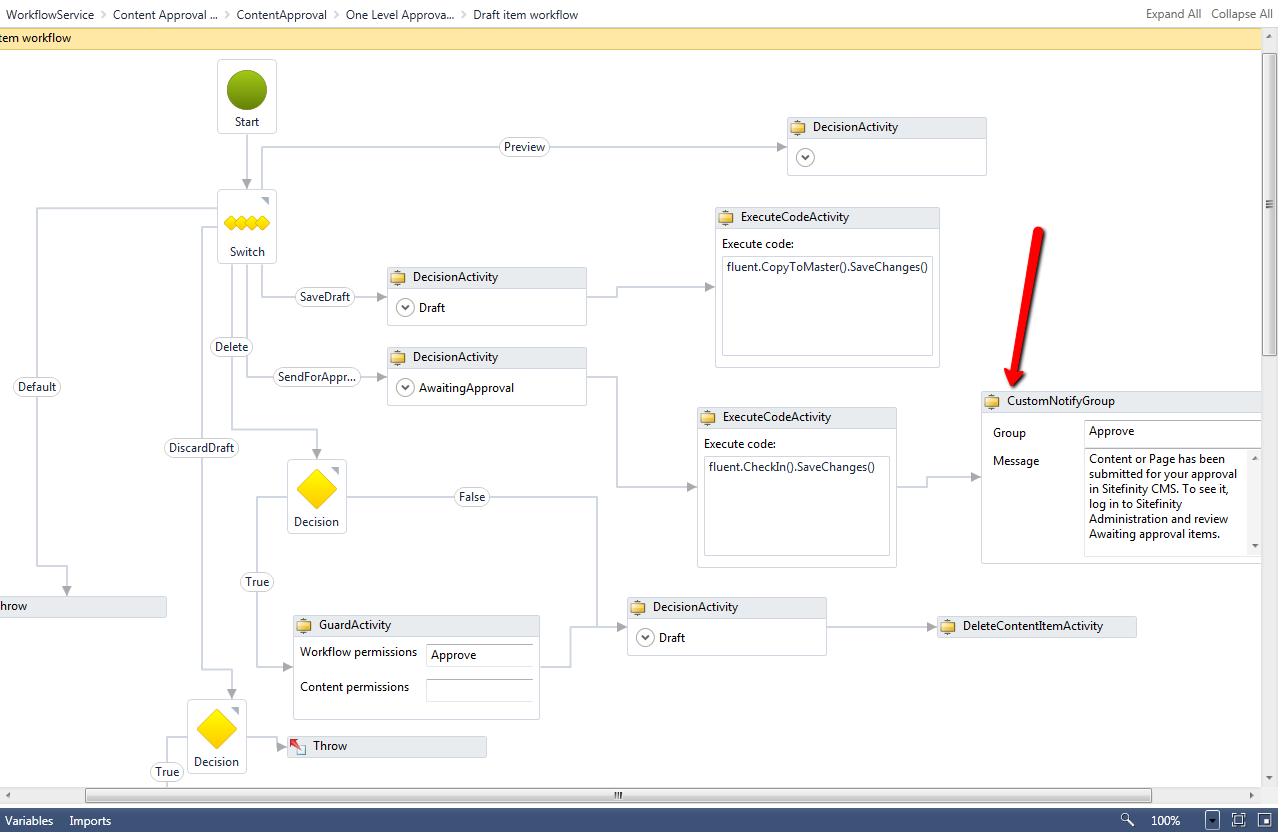
For this we need to take the built in workflow file for content items - AnyContentApprovalWorkflow.xamlx. After you add this file to the project with the custom activity and build it you will see the custom activity added to the workflow toolbox in Visual Studio. In this sample we are going to change the one step approval workflow. Open the workflow designer and navigate to WorkflowService -> Content Approval -> One Level Approval -> Draft item workflow and replace the built-in NotifyGroup activity with the custom one, refer to the following image.
After this set the build action for the workflow file to be Embedded Resource and build the project.
Registering the custom workflow
Registering the embedded workflow with the Virtual Path Provider
To do this first you need to add your assembly to the bin folder of your project. Then open your website's administrative area and navigate to Administration -> Settings -> Advanced -> VirtualPathSettings -> Virtual paths and register the embedded workflow file with the Virtual Path Provider.
After this the VirtualPathSettingsConfig config file should have the bellow setting:
<virtualPathSettingsConfig xmlns:config="urn:telerik:sitefinity:configuration" xmlns:type="urn:telerik:sitefinity:configuration:type" config:version="4.4.2117.0"> <virtualPaths> <add resourceLocation="Telerik.Sitefinity.Samples.Workflow.Workflows.AnyContentApprovalWorkflow.xamlx, Telerik.Sitefinity.Samples.Workflow" resolverName="EmbeddedResourceResolver" virtualPath="~/CustomWorkflows/AnyContentApprovalWorkflow.xamlx" /> </virtualPaths></virtualPathSettingsConfig>
Registering the custom workflow for content items
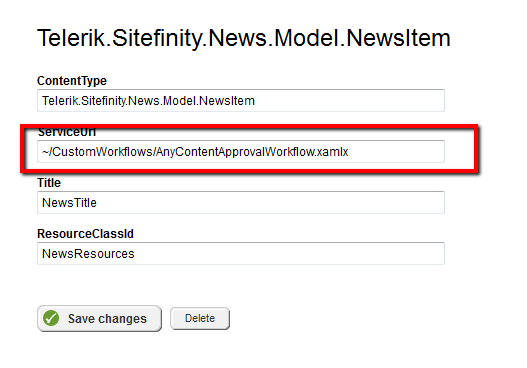
After the workflow has been added to the VPP we can now use the path for the service to map content items to it. Go to Administration -> Settings -> Advanced -> Workflow -> Workflows and choose an item type to use the custom workflow. For example for news items you can use the bellow configuration.
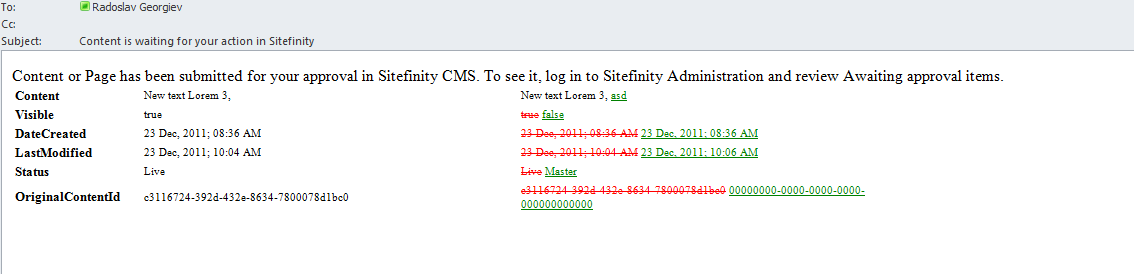
Finally restart the website and add news items to the workflow scope. When a content author makes an edit to a published item and sends it for approval the resulting e-mail message will look as in the next image.
Download sample project
You can download the project for the custom control from this location: Telerik.Sitefinity.Samples.Workflow. Make sure that you resolve the references to Sitefinity and OpenAccess assemblies.