Cloud and Hybrid TUTORIAL
ETL On-Premises Oracle data to Google BigQuery using Google Cloud Dataflow
Updated: 02 Dec 2024
Introduction
Google Cloud Dataflow is a data processing service for both batch and real-time data streams. Dataflow allows you to build pipes to ingest data, then transform and process according to your needs before making that data available to analysis tools. DataDirect Hybrid Data Pipeline can be used to ingest both on-premises and cloud data with Google Cloud Dataflow.
The tutorial below shows you how ingest on-premises Oracle data with Google Cloud Dataflow via JDBC, using the Hybrid Data Pipeline On-Premises Connector. Google Cloud Dataflow uses Apache Beam to create the processing pipelines. Beam has both Java and Python SDK options. The tutorial below uses a Java project, but similar steps would apply with Apache Beam to read data from JDBC data sources including SQL Server, IBM DB2, Amazon Redshift, Salesforce, Hadoop Hive and more.
The tutorial below shows you how ingest on-premises Oracle data with Google Cloud Dataflow via JDBC, using the Hybrid Data Pipeline On-Premises Connector. Google Cloud Dataflow uses Apache Beam to create the processing pipelines. Beam has both Java and Python SDK options. The tutorial below uses a Java project, but similar steps would apply with Apache Beam to read data from JDBC data sources including SQL Server, IBM DB2, Amazon Redshift, Salesforce, Hadoop Hive and more.
Setting Up Progress DataDirect Hybrid Data Pipeline
- Install Hybrid Data Pipeline in your DMZ or in the cloud by following the below tutorials.
- To connect to On-Premises databases, you need to install an On-Premises agent on one of your servers behind the firewall, that lets the Hybrid Data Pipeline Server communicate with the database.
- To Install Hybrid Data Pipeline’s On-Premise Agent and configure it the cloud service where you installed Hybrid Data Pipeline Server, please follow the below tutorials.
- If your Hybrid Data Pipeline Server is in Google Cloud
- If your Hybrid Data Pipeline Server is in AWS
- If your Hybrid Data Pipeline Server is in Azure
- If your Hybrid Data Pipeline Server is in Digital Ocean
- Also install the Hybrid Data Pipeline’s JDBC driver which can be found on the same download page of Hybrid Data Pipeline Server and On-Premise Connector. Follow this documentation to install the driver.
- Once you have everything setup, navigate to http://<server-address>:8080/d2c-ui or https://<server-address>:8443/d2c-ui to view the Hybrid Data Pipeline’s UI.
- Log in with the default credentials d2cadmin/d2cadmin
- Once you have logged in, create a New DataSource, by clicking on New Data Source button as shown below.
- You should now see list of all Data stores as shown below. Choose Oracle as your data store.
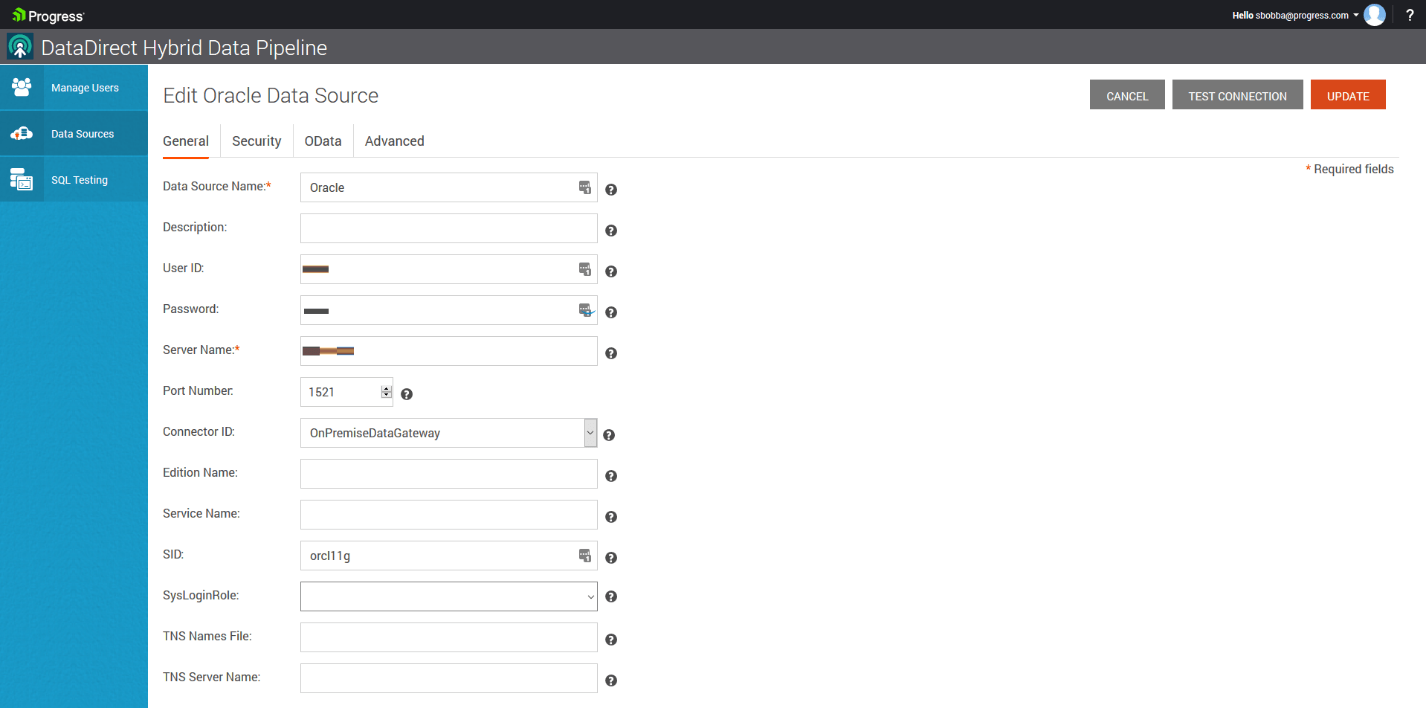
- On the Configuration, fill out all the connection parameters that you would generally use to connect to your Oracle database and set the Connector ID. The Connector ID is the ID of the On-premises connector that you have installed for this server and account in Step – 3. If you have installed and configured the On-Premise connector, you should automatically see the Connector ID In drop down.
- Now Click on Test Connection and you should now be able to connect to your Oracle database On-Premise. Click on UPDATE button to save the configuration.


Setting up Google Cloud Data Flow SDK and Project
- Complete the steps in the Before you begin section from this quick start from Google.
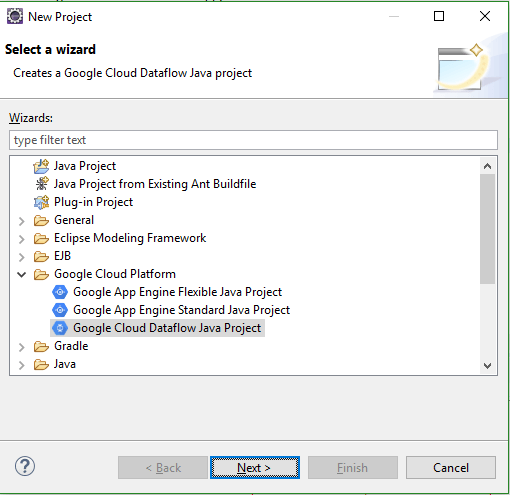
- To Create a new project in Eclipse, Go to File ->New -> Project.
- In the Google Cloud Platform directory, select Google Cloud Dataflow Java Project.
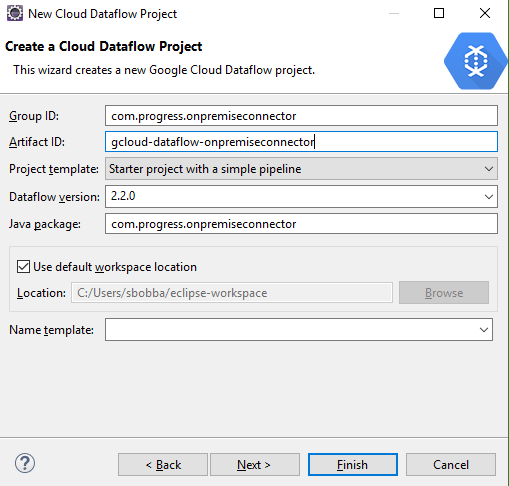
- Fill in Group ID, Artifact ID.
- Select Project Template as Starter Project with a simple pipeline from the drop down
- Select Data Flow Version as 2.2.0 or above.
- Click Next and the Project should be created.
- Add the JDBC IO library for apache beam from maven and DataDirect Hybrid Data Pipeline JDBC driver to the build path. You can find the Hybrid Data Pipeline JDBC driver in the install path.
Creating the Pipeline
- In this tutorial the main goal will be to connect to an On-Premises Oracle database, read the data, apply a simple transformation and write it to BigQuery. The code for this project has been uploaded to GitHub for your reference.
- Open the StarterPipeline.java file and clear all the code in main function.
- First thing you need to do is Create the Pipeline. To Create the Pipeline:
- This will be using input arguments to the program to configure the Pipeline.
- Connect to Oracle and read the data using JdbcIO.
read() method to a PCollection as shown below. - Once you have the data in PCollection, apply transform and hash the email-address in the data as shown below by using ParDo to iterate through all the items in PCollection.
- Then, convert the PCollection which has each row in format of List
to TableRow Object of BigQuery Model. - Finally, write the data to BigQuery using BigQueryIO.writeTableRows() method as shown below.
- You can find all the code for this project in GitHub for your reference.
Pipeline p = Pipeline.create( PipelineOptionsFactory.fromArgs(args).withValidation().create());PCollection<List<String>> rows = p.apply(JdbcIO.<List<String>>read() .withDataSourceConfiguration(JdbcIO.DataSourceConfiguration.create( "com.ddtek.jdbc.ddhybrid.DDHybridDriver", "jdbc:datadirect:ddhybrid://<;Hybrid-Data-Pipline-Server-Address>;hybridDataPipelineDataSource=<Data Source Name>") .withUsername("Username") .withPassword("Password")) .withQuery("SELECT * FROM TEST01.CUSTOMER") .withCoder(ListCoder.of(StringUtf8Coder.of())) .withRowMapper(new JdbcIO.RowMapper<List<String>>() { public List<String> mapRow(ResultSet resultSet) throws Exception { List<String> addRow = new ArrayList<String>(); //Get the Schema for BigQuery if(schema == null) { schema = getSchemaFromResultSet(resultSet); } //Creating a List of Strings for each Record that comes back from JDBC Driver. for(int i=1; i<= resultSet.getMetaData().getColumnCount(); i++ ) { addRow.add(i-1, String.valueOf(resultSet.getObject(i))); } //LOG.info(String.join(",", addRow)); return addRow; } }) ).apply(ParDo.of(new DoFn<List<String>, List<String>>() { @ProcessElement //Apply Transformation - Mask the EmailAddresses by Hashing the value public void processElement(ProcessContext c) { List<String> record = c.element(); List<String> record_copy = new ArrayList(record); String hashedEmail = hashemail(record.get(11)); record_copy.set(11, hashedEmail); c.output(record_copy); } }));PCollection<TableRow> tableRows = rows.apply(ParDo.of(new DoFn<List<String>, TableRow>() { @ProcessElement//Convert the rows to TableRows of BigQuery public void processElement(ProcessContext c) { TableRow tableRow = new TableRow(); List<TableFieldSchema> columnNames = schema.getFields(); List<String> rowValues = c.element(); for(int i =0; i< columnNames.size(); i++) { tableRow.put(columnNames.get(i).get("name").toString(), rowValues.get(i)); } c.output(tableRow); } }));//Write Table Rows to BigQuery tableRows.apply(BigQueryIO.writeTableRows() .withSchema(schema) .to("nodal-time-161120:Oracle.CUSTOMER") .withWriteDisposition(BigQueryIO.Write.WriteDisposition.WRITE_APPEND));Note: Before you run the pipeline, Go to BigQuery Console and create the table with same schema as your Oracle Table.
Running the Pipeline
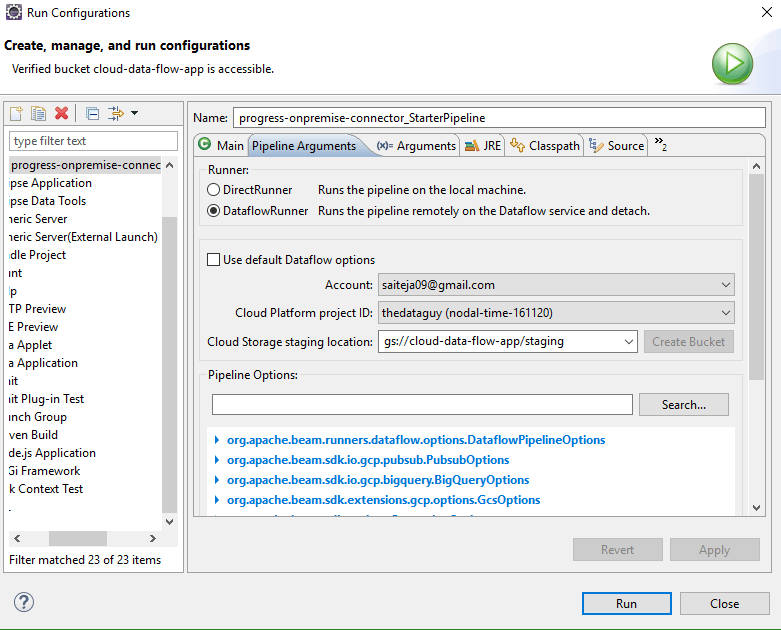
- Go to Run-> Run Configurations. Under Pipeline Arguments, you should see two different options to run the pipeline.
- DirectRunner – Runs the Pipeline Locally
- DataFlowRunner – Runs the Pipeline on Google Cloud DataFlow
- To Run locally, set the Runner to DirectRunner and run it. Once the pipeline has finished running, you should see your Oracle data in Google BigQuery.
- To Run the pipeline on Google Cloud Data Flow, set the Runner to DataFlowRunner and make sure that you choose your account, project ID and a staging location as shown below.
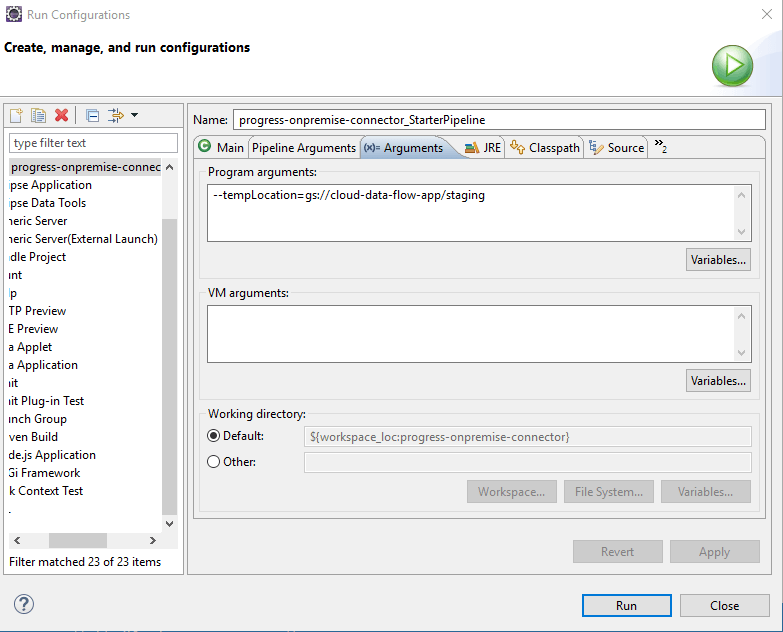
- Under Arguments -> Program Arguments, set the path to tempLocation for BigQuery Write to store temporary files as shown below.
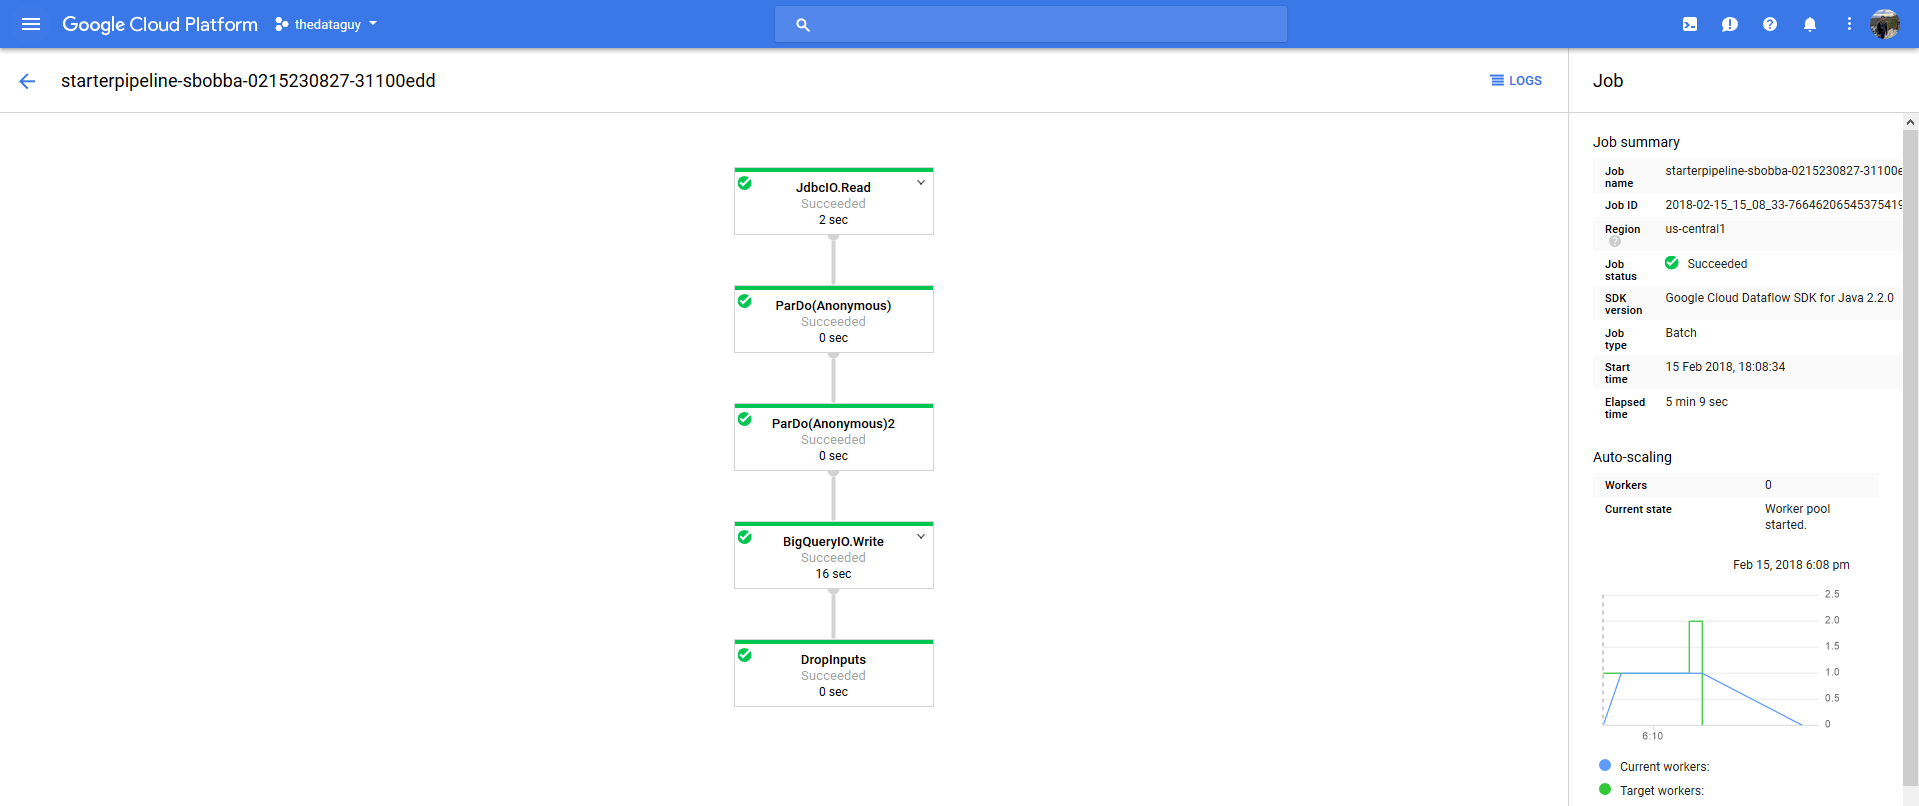
- Click on Run and you should now see a new job in Google Data Flow console starting. You can track the progress by clicking on the job and you should see a flow chart to show status of each stage.
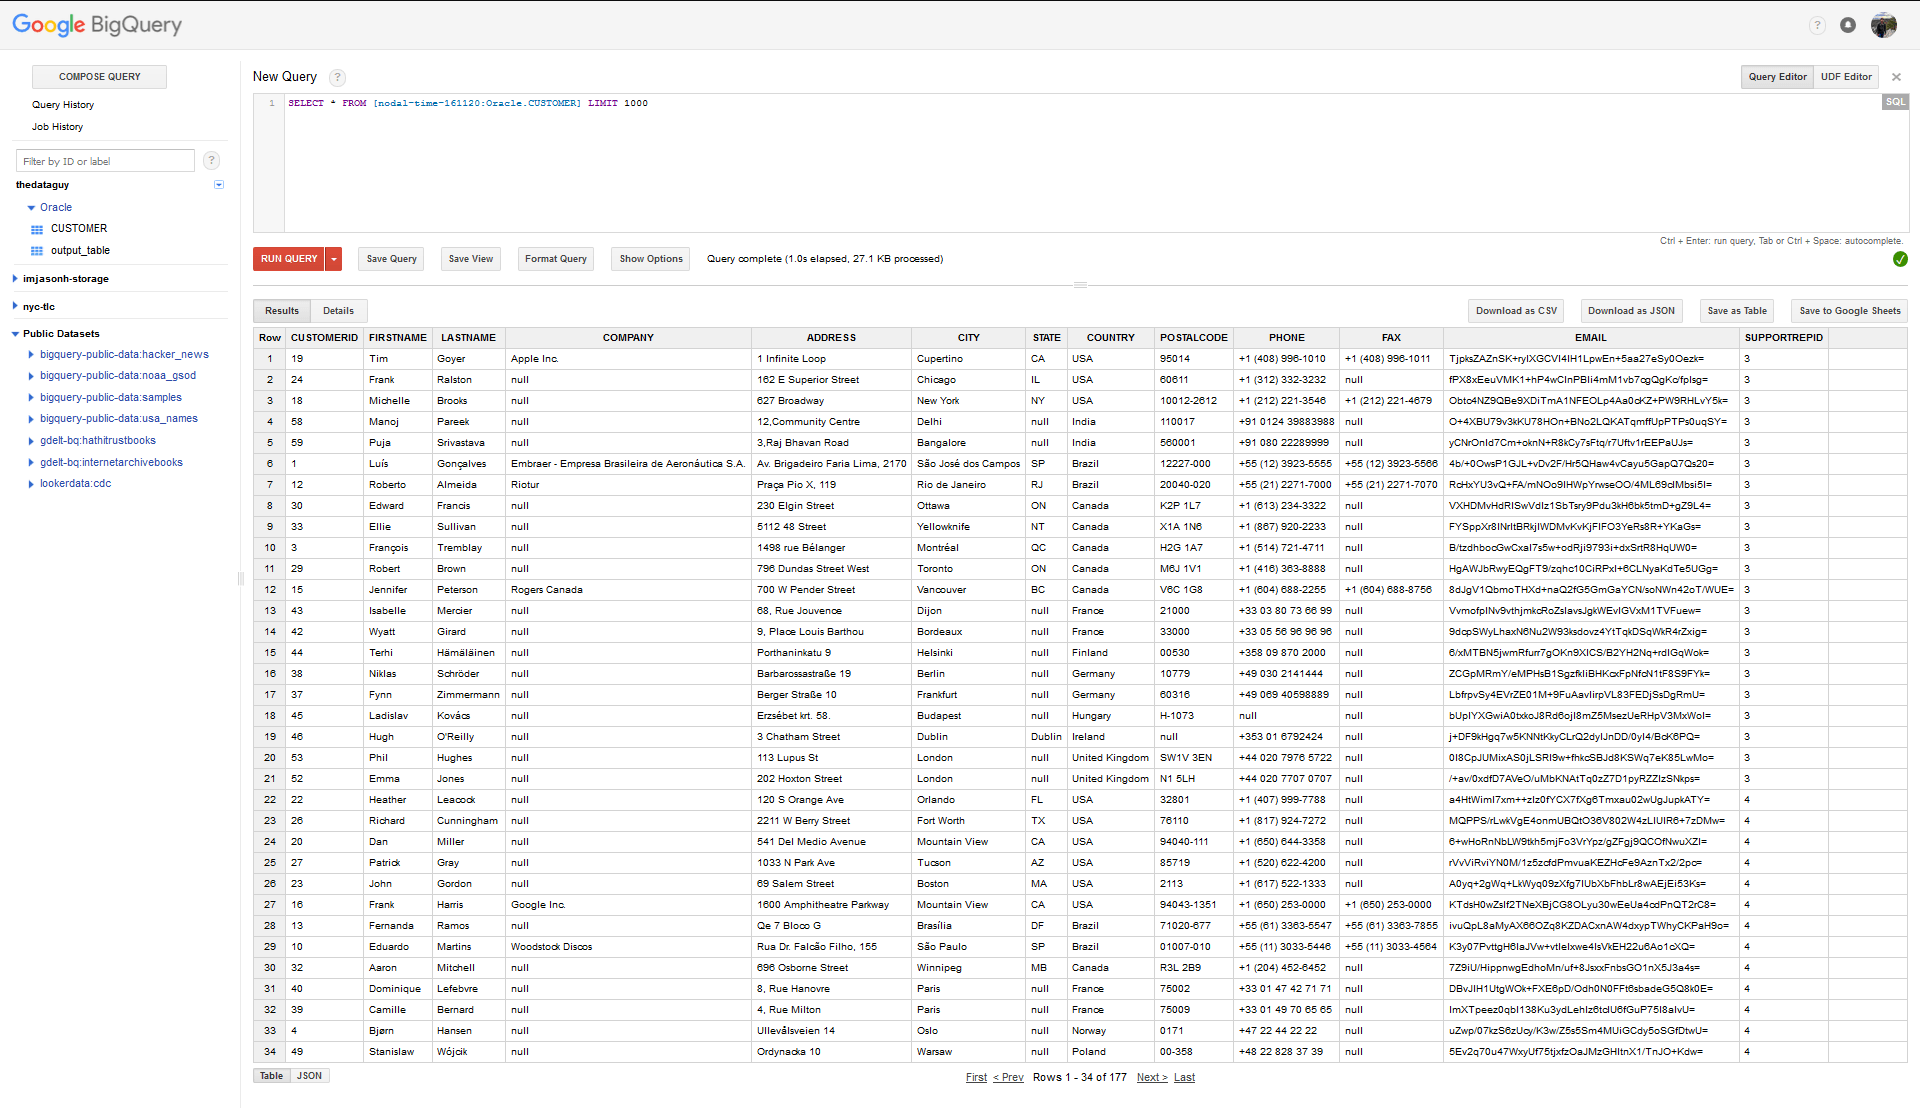
- Once the pipeline has run successfully, you can go to Google BigQuery console and run a query on table to see all your data.
