Google Load Balancer Setup for Hybrid Data Pipeline
Introduction
Accessing on-premises data from the cloud often brings with it many security and availability headaches, but with DataDirect Hybrid Data Pipeline it is now possible to securely access data behind any firewall while still leveraging the benefits of advanced cloud load balancing.
In this tutorial, you’ll learn how to quickly configure Google Cloud’s Load Balancer to achieve both the scalability and reliability of a clustered Hybrid Data Pipeline installation by leveraging our support of the WebSockets protocol.
Download and Install a Hybrid Data Pipeline Cluster
This document assumes you are already familiar with installing a Hybrid Data Pipeline cluster on 2 or more GCP instances which meet the minimum requirements – including use of an external configuration database and shared storage. It also assumes familiarity with configuring VPCs, Networking and basic administration within the GCP environment.
General Information about installing a single node in Google Cloud can be found here, while details on a cluster installation can be found in our Installation Guide.
Note that there are a few changes with the DataDirect Hybrid Data Pipeline installation specific to supporting cloud load balancers:
- There is a new option for Load Balancers. Be sure to choose option 3 if using a WebSockets based load balancer such as the Google Cloud Load Balancer.
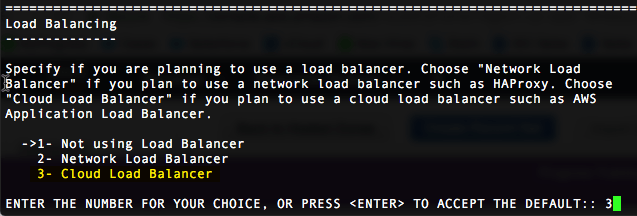
- Make sure to load your PEM file (SSL cert) on the HDP server as well as on the Google Load Balancer. This ensures the proper redistributable files are created to support installation of the On-Premises Connector and hybrid ODBC/JDBC drivers.
- Ensure your “Load Balancing Host Name” matches the hostname in your SSL cert.
Configuring a Load Balancer Google Cloud
For the purpose of this document, it is assumed you are installing a 2 node cluster which only has SSH (port 22) access from the outside world and that both nodes are in the same VPC/subnet.
Note: You must allow access from the Load Balancer to the HDP VMs using a Firewall rule. Google’s Load Balancer initiates traffic from 130.211.0.0/22 and 35.191.0.0/16. Be sure to allow TCP ports 8080, 11280 and 40501 from those network ranges.
Now you are ready to configure the Load Balancer. This involves several steps, which are described in detail in the section that follows:
1.Create Instance Groups for your VMs
2.Create the Load Balancer Backend Services
3.Create the Load Balancer Host and Path Rules
4.Create the Load Balancer Frontend
Define a VM Instance Group for each Hybrid Data Pipeline Node
- Begin where you can see the Hybrid Data Pipeline VM instances which you have already installed:

- Create and configure Instance Groups for your virtual machines. Each HDP node will need to be in its own instance group.
a. Go to Compute Engine -> Instance Groups
b. Click Create Instance Group.
-Name the group (ex: hdp44-node1)
-Click "Unmanaged instance group"
-Add the VM instance under "VM Instances"
c. Repeat steps a & b above for each node of your cluster.
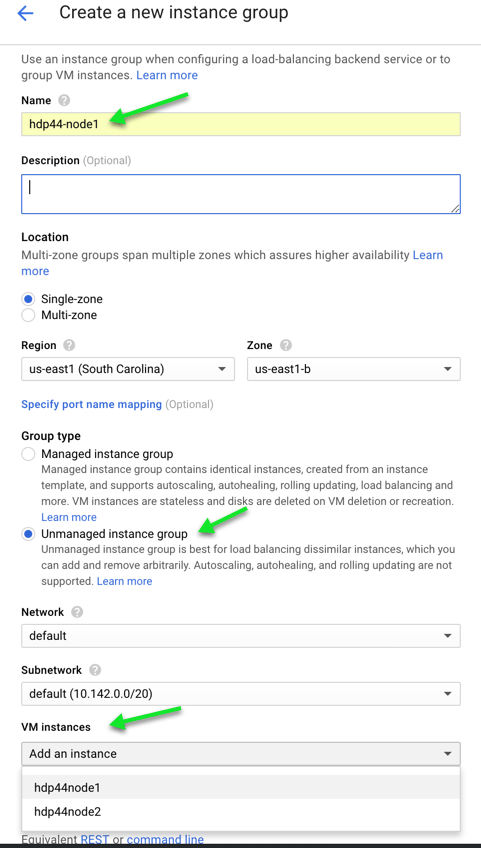
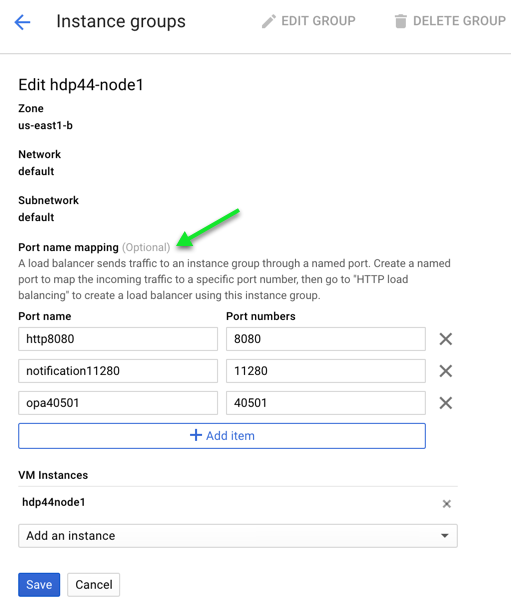
d. From the list of Instance Groups, check the box next to the first one and choose “Edit” from the top of the screen.

e. On the Edit screen, add 3 Port Name mappings
- http8080 8080
- notification11280 11280
- opa4050` 40501
f. Click Save
g. Repeat steps d & e for each cluster node
Create Load Balancer and Backend Services
- Create Load Balancer
- Navigate to Network Services à Load Balancing
- Click on Create Load Balancer

- Click “Start Configuration” for the “HTTP(S) Load Balancing” option
- Name the load balancer: (hdp44-loadbalancer in this example)
- Create Backend Configuration
- Click on Backend Configuration
- Select Create Backend Services à Create a backend service
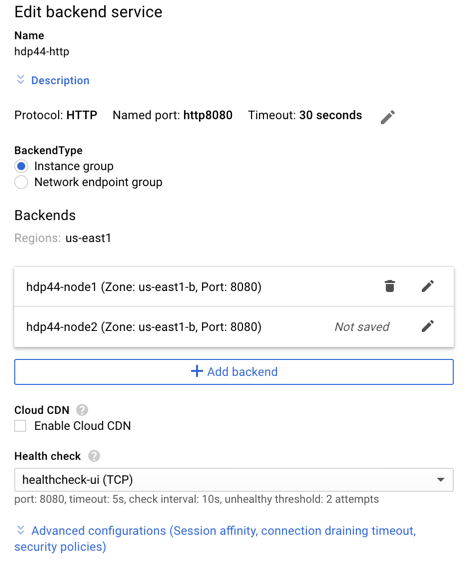
- Configure the backend service for default traffic to the nodes
- Name: hdp44-http
- Click the pencil to edit the Named Port
- Named Port: http8080

- Named Port: http8080
- Add Backend(s) – (repeat for all HDP Instance Groups that make up the cluster)
- Instance Group: hdp44-node1
- Port: 8080
- Add Health Check
- Name: healthcheck-ui
- Protocol: TCP
- Port: 8080
- Click Advanced configuration
- Session Affinity: Generated Cookie
- Affinity cookie TTL: 360 seconds
- Click Create
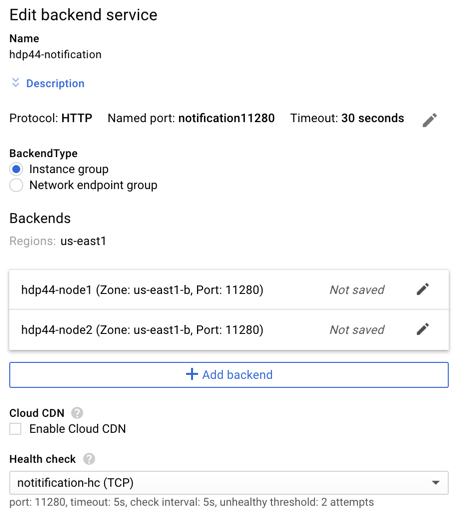
- Configure the backend for the Notification service
- Name: hdp44-notification
- Click the pencil to edit the Named Port
- Change Named Port: notification11280
- Add Backend(s) – (repeat for all HDP Instance Groups that make up the cluster)
- Instance Group: hdp44-node1
- Port: 11280
- Add Health Check
- Name: notification-hc
- Protocol: TCP
- Port: 11280
- Configure a backend service to point to EACH HDP node’s On-Premises port (one service per HDP server in the cluster)
- Name: hdp44-opa-node1
- Click the pencil to edit the Named Port
- Change Named Port: opa40501
- Add Backend HDP node (only one node per service for the OPA backend services)
- Instance Group: hdp44-node1
- Port: 40501
- Add Health Check
- Name: opa-hc
- Protocol: TCP
- Port: 40501
- Click the pencil to edit the Named Port
- Name: hdp44-opa-node2
- Click the pencil to edit the Named Port
- Change Named Port: opa40501
- Add Backend HDP node (only one node per service for the OPA backend services)
- Instance Group: hdp44-node2
- Port: 40501
- Use existing health check
- Name: opa-hc
- Protocol: TCP
- Port: 40501
- Click the pencil to edit the Named Port
- Name: hdp44-opa-node1
Define the Host and Path Rules to Route Traffic to Backend Nodes
-
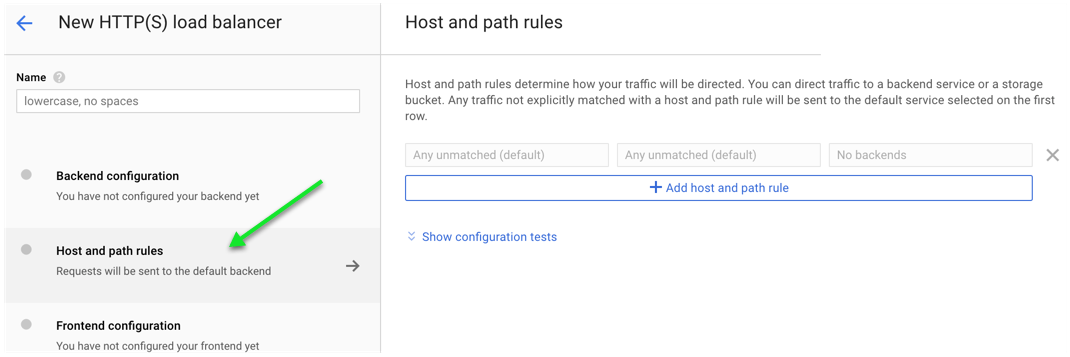
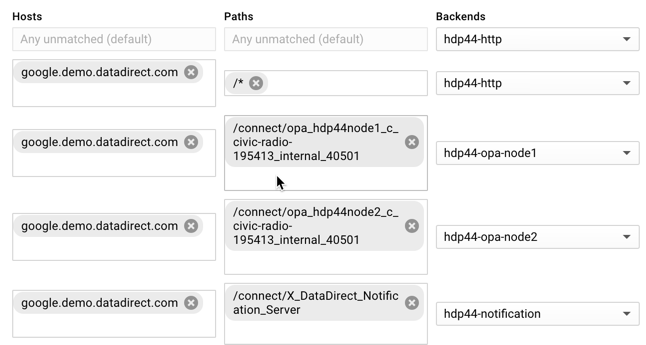
Create Host and Path Rules
- Click on Host and Path Rules

- Configure the default (Any Unmatched Rule)
- Backend: hdp44-http
- Configure a rule for the Notification Pool
- Hosts: <host.domain.com> which points to public IP of Load Balancer
- Path: /connect/X_DataDirect_Notification_Server
- Backend: hdp44-notification
- Configure a rule for HDP node 1 pointing to its OPA backend
- Hosts: <host.domain.com> which points to public IP of Load Balancer
- Path: /connect/opa_<hostname given to HDP node on install>_40501
- Be sure to replace the dots in the hostname with underscores
- Example: /connect/opa_hdp44node1_c_civic-radio-195413_internal_40501
- Be sure to replace the dots in the hostname with underscores
- Backend: hdp44-opa-node1
- Configure a rule for HDP node 2 pointing to its OPA backend
- Hosts: <host.domain.com> which points to public IP of Load Balancer
- Path: /connect/opa_<hostname given to HDP node on install>_40501
- Be sure to replace the dots in the hostname with underscores
- Example: /connect/opa_hdp44node2_c_civic-radio-195413_internal_40501
- Be sure to replace the dots in the hostname with underscores
- Backend: hdp44-opa-node2
- Repeat the pattern in step D above for any additional HDP nodes in the cluster. There should be one notification rule, one default rule and a rule for every node’s OPA port. (Note that a rule using the domain name defined below point to /* for the hdp44-http backend will be created, so you will end up with 5 rules in this example)
- Click on Host and Path Rules
Create the Frontend Configuration
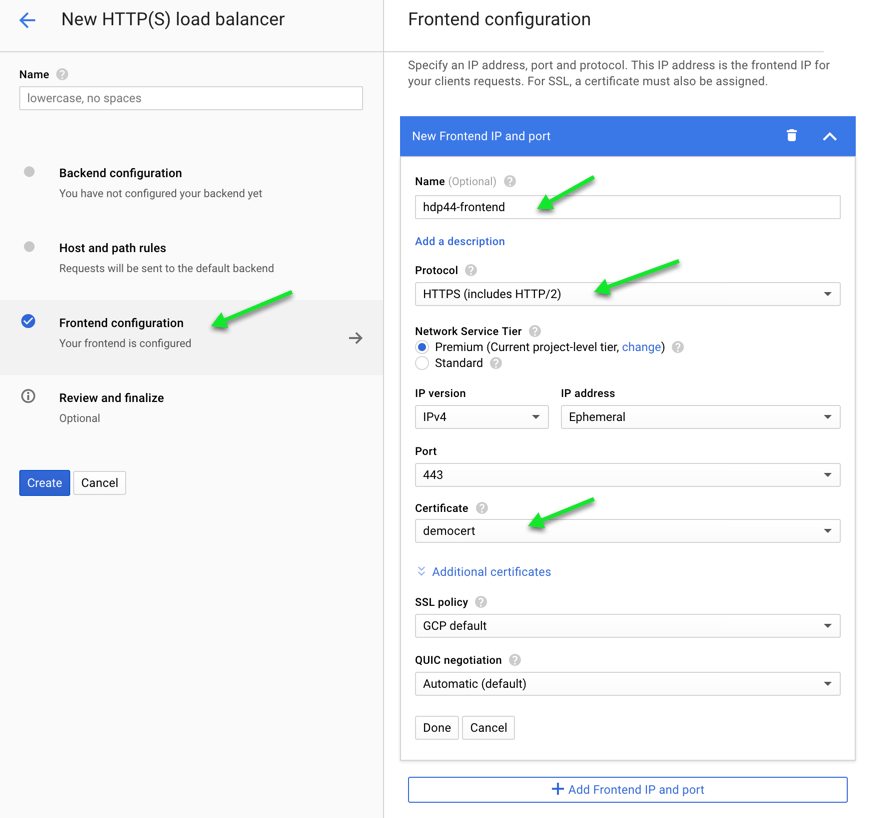
- Create the Frontend Configuration
- From the left pane of the New Load Balancer interface, select “Frontend Configuration”
- On the right side, create a new Frontend IP and port
- Name: hdp44-frontend
- Protocol: HTTPS
- Port: 443
- Certificate:
- Choose an existing cert or purchase/load an SSL cert into Google Cloud by choosing Create a new certificate. (This is required to offload SSL to the load balancer)
- Click Done
- Under the New HTTP(S) load balancer interface, click Create to launch the load balancer.
Final Configuration of 2 Node Cluster for Reference
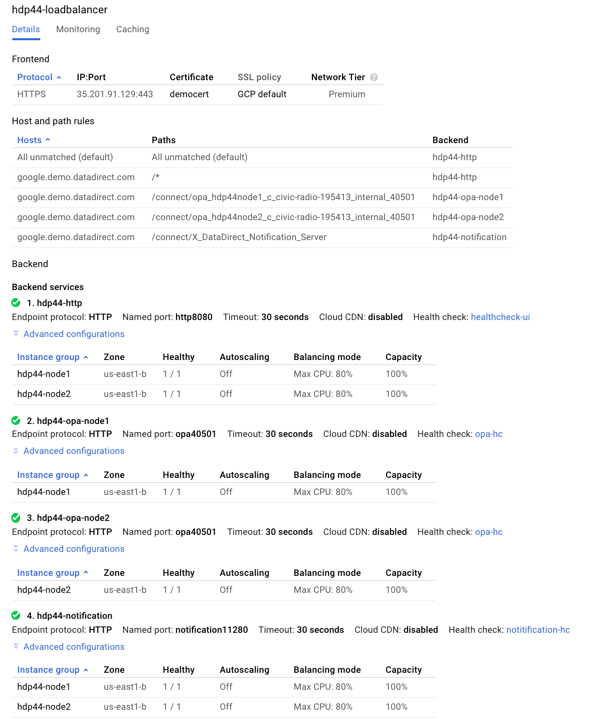
We hope this tutorial assisted in creating a cloud-based solution to OData enable both your on-premises and cloud data sources using Progress Hybrid Data Pipeline and Google Cloud’s Load Balancer. Now you can have security, scalability and reliability all together in a single data access solution which lets you bring sources such as Oracle, Postgres, MySQL, DB2 and SQL Server out from behind the firewall. If you have any question, please feel free to contact us.