JDBC Resource Adapters Tutorial
Introduction
J2EE Connector Architecture resource adapters are used by application servers to connect to Enterprise Information Systems (EIS), such as mainframe transaction processing systems, database systems, or legacy applications not written in the Java® programming language. The resource adapter communicates with the server to provide the underlying transaction, security, and connection pooling mechanisms. DataDirect Connect for JDBC provides resource adapters as an installable option.
This document takes you step-by-step through an example that shows you how to install and set up the DataDirect Connect for JDBC Resource Adapters with a J2EE application server, configure a Connection Factory, and use that Connection Factory from within an Enterprise Java Bean (EJB). Use the example in this document to set up and configure your own environment using DataDirect Connect for JDBC Resource Adapters.
NOTE: This document uses the IBM WebSphere 4.0 Advanced Edition (with FixPack 5) application server in its examples to describe the deployment and configuration of the DataDirect Connect for JDBCOracle Resource Adapter and the Connection Factory. If you choose to use another type of application server, expect the deployment and configuration steps to be different, but similar.
Installation
This section describes how to install the DataDirect Connect for JDBC Resource Adapters and the ConnectorSample demo code you can use to test them.
Installing the DataDirect Connect for JDBC Resource Adapters
DataDirect Connect for JDBC provides resource adapters as an installable option. Refer to the DataDirect Connect for JDBC Installation Guide for instructions on installing the resource adapters (reference the DataDirect Connect for JDBC documentation library).
Installing the ConnectorSample Demo Code
After you have installed DataDirect Connect for JDBC, locate the ConnectorSample demo code, which is installed in the install_dir/examples/connector directory, where install_dir is your DataDirect Connect for JDBC installation directory.
This directory should contain the following files and subdirectories:
- ConnectorSample.pdf - This document
- ConnectorSample.ear - The J2EE Application Enterprise Archive (EAR) file containing the ConnectorSample application.
/src - ConnectorSample.jsp - The source for the JavaServer Page (JSP) used to access the ConnectorSample application.
/src/connectorsample - ConnectorSample.java - The Java source file that defines the remote interface for the ConnectorSample EJB.
- ConnectorSampleHome - The Java source file that defines the home interface for the ConnectorSample EJB
- ConnectorSampleBean - The Java source file that contains the implementation for the ConnectorSample EJB.
Setting Up the Demo
Setting up the demo in our example involves deploying the DataDirect Connect for JDBC Oracle Resource Adapter, configuring a Connection Factory, and deploying the ConnectorSample application.
Deploying the Resource Adapter
Follow these steps to add the DataDirect Connect for JDBC Oracle resource adapter to the WebSphere 4.0 application server:
- Copy the resource archive file (oracle.rar) from the install_dir/lib directory (where install_dir is the DataDirect Connect for JDBC installation directory) to the WebSphere_Home/lib directory (where WebSphere_Home is the WebSphere installation directory).
- Start the WebSphere Admin Server.
- Start the WebSphere Administrators Console.
- Expand the WebSphere Administrative Domain node. Then, expand the Resources directory.
- Right-click the J2C Resource Adapters folder, and select New.
- In the General tab of the J2C Resource Adapter Properties dialog, specify the name as DataDirect Oracle Resource Adapter.
- Click the button to the right of the Archive File Name control.
- In the Install Driver dialog, select the node to which the resource adapter will be installed, and click the Browse button.
- Navigate to the WebSphere_Home/lib directory and select the oracle.rar file, and click Open.
- In the Install Driver dialog, click Install. The J2C Resource Adapter Properties dialog should look like the following figure
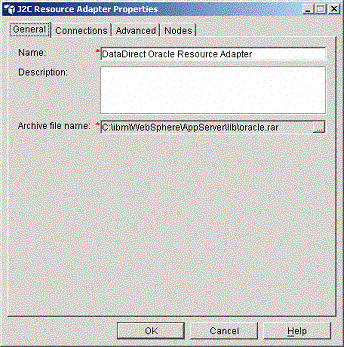
The J2C Resource Adapter Properties dialog allows you to perform the following actions:
- Select the Connections tab to show the list of properties supported by the resource adapter and their values. The values cannot be changed.
- Select the Advanced tab to show information contained in the resource adapter deployment descriptor.
- Select the Nodes tab to show the nodes on which the resource adapter is installed.
- Click OK to finish installing the resource adapter.
Configuring a Connection Factory
Follow these steps to configure a connection factory for the DataDirect Connect for JDBC Oracle resource adapter:
- Expand the DataDirect Oracle Resource Adapter node created in the previous section
- Right-click the J2C Connection Factories folder, and select New.
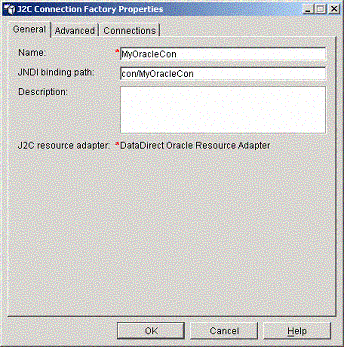
- In the class J2C Connection Factories Properties dialog, specify the name of the connection factory as MyOracleCon
- Specify the JNDI binding path as con/MyOracleCon.
- The General tab of the J2C Connection Factory Properties dialog should look like the following figure:
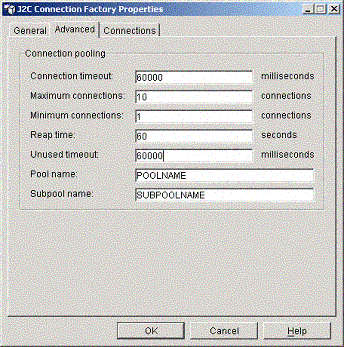
- Select the Advanced tab.
- Specify the connection pooling values for the Connection factory. The following figure shows what the Advanced tab looks like when a connection pool has been configured to hold 10 connections.
- Select the Connections tab.
- Specify the values for the following properties as appropriate for connecting to your Oracle database:
- ServerName – The name of the server on which the Oracle database is running.
- Port – The port number on the server to be used for the connection.
- UserName – The user name to be used for the connection.
- Password – The user password to be used for the connection.
- SID – The Oracle Server ID to be used for the connection.
- Click OK to finish configuring the Connection Factory.
Deploying the ConnectorSample Application
Follow these steps for deploying the ConnectorSample demo application to the WebSphere application server:
- Right-click the Enterprise Applications folder, and select Install Enterprise Application.
- In the Install Enterprise Application Wizard, click the Browse button.
- Navigate to the install_dir/examples/connector (where install_dir is your DataDirect Connect forJDBC installation directory). Then, select the ConnectorSample.ear file, and click Open.
- Click Next in the Install Enterprise Application Wizard.
- Continue to click Next in the wizard until the Mapping Resource References to Resources page is reached.
- Map the jdbc/ConnectorDS resource reference to the MyOracleCon Connection Factory created in the previous section. To do this, click Select Resource.
- In the Select Resource dialog, select the MyOracleCon entry from the drop-down list, and click OK.
- Continue to click Next until the Completing the Application Installation Wizard page is reached, and click Finished.
- Click Yes in the message box that is displayed to generate the installable code.
- Click OK in the Deploy dialog box.
- Once the Deploy operation is complete, right-click the ConnectorSample node in the Enterprise Applications folder. Then, select Start.
NOTE: Examine the source code for the ConnectorSampleBean class. The getConnection method of that class uses the jdbc/ConnectorDS resource reference to look up a DataSource object. Steps 6 and 7 in this procedure mapped that resource reference to the MyOracleCon Resource Adapter Connection Factory that was created in the previous section. It can do this because the DataDirect Connect for JDBC Resource Adapter connection factories construct an object that implements the java.sql.DataSource interface. The jdbc/ConnectorDS resource reference could just as easily have been mapped to a JDBC data source. The application code does not need to do anything different to work with a JDBC driver or a DataDirect Connect for JDBC Resource Adapter.
Setting Up the Database
Before you run the ConnectorSample application demo, the ConnectorSampleTbl must be created in the Oracle database. Using Oracle SQLPlus, DataDirect Test™ for JDBC, or another database tool of your choice, execute the following SQL statement to create the table required for the ConnectorSample application:
CREATE TABLE ConnectorSampleTbl (id int, name varchar(30))
Running the Demo
To run the ConnectorSample application demo, open your favorite web browser and navigate to the following URL: http://localhost:9080/ConnectorSampleWeb/ConnectorSample.jsp.
If the WebSphere application server is not running on a local machine, replace localhost in the URL with the name of the server running the WebSphere application server. Then, perform these actions as appropriate:
- Enter a name and a positive integer ID, and click Insert to insert records into the database
- Enter a name or an ID, and click Lookup to look up (fetch) a record from the database
- Enter a name, an ID, or both, and click Delete to delete a record from the database